
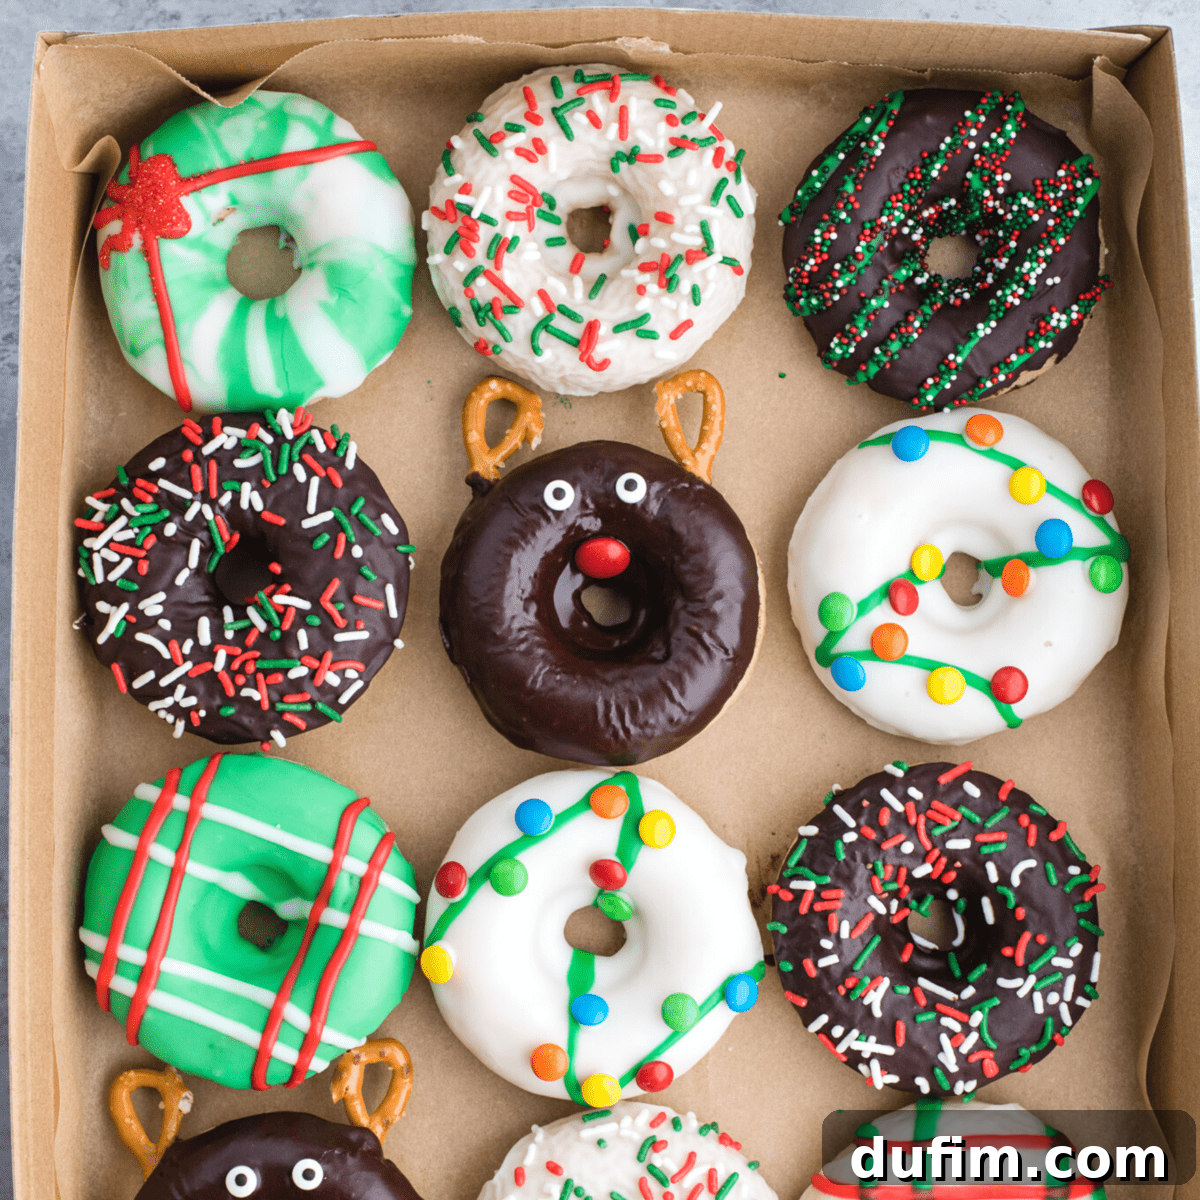
Embrace the festive spirit this holiday season with our enchanting Christmas donuts! This delightful baked donut recipe offers a world of creative decoration possibilities, making it an ideal activity to bring the entire family together for a memorable Christmas breakfast or a cozy holiday treat. Prepare to create edible masterpieces that taste as good as they look!
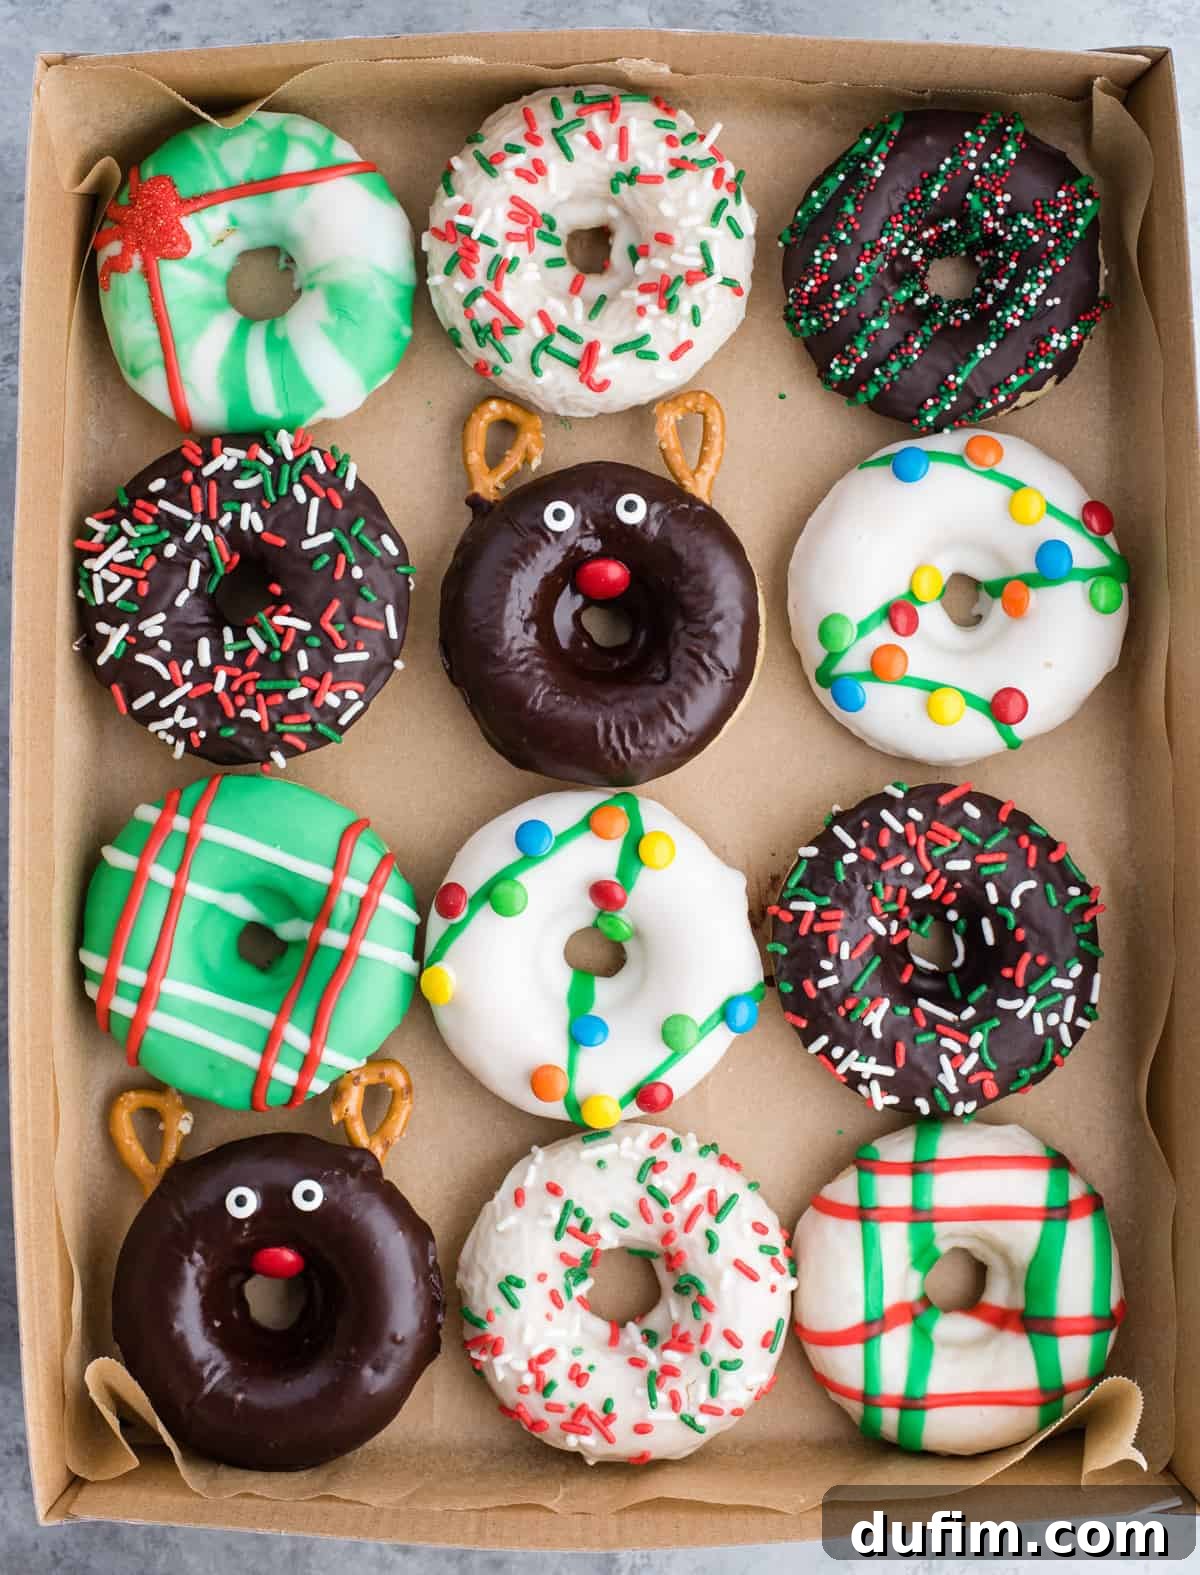
“Kids absolutely loved these donuts!!! They are soft and taste amazing. We won’t be getting donuts out anymore thanks to Beth!!!”
-Lauren
Delightful Christmas Donuts: Your Ultimate Guide to Festive Baked Treats
The holiday season calls for special treats, and what could be more charming and delicious than homemade Christmas donuts? Forget the hassle of deep-frying; our baked donut recipe is not only easier to make but also offers a slightly healthier indulgence, allowing you to savor the festive flavors with peace of mind. This comprehensive guide will walk you through everything you need to create perfect, fluffy donuts, from mastering the batter to unleashing your inner artist with captivating decorations. Get ready to fill your home with the sweet aroma of holiday cheer and make new cherished memories in the kitchen!
Why These Baked Christmas Donuts Will Be Your New Holiday Tradition
Our Christmas donut recipe isn’t just another sweet treat; it’s an experience designed for ease, exceptional flavor, and abundant festive fun. Here’s why these delightful baked goods are poised to become a staple in your holiday celebrations:
- Effortlessly Baked, Not Fried: Say goodbye to the mess and fuss of deep-frying. These donuts are perfectly baked in the oven, resulting in a wonderfully lighter texture and significantly simpler cleanup. This method also makes them a slightly healthier option for your holiday indulgence.
- Made with Everyday Ingredients: You’ll be pleased to find that most of the necessary ingredients are likely already staples in your pantry. This means fewer last-minute grocery runs and more spontaneous baking sessions, perfect for when the holiday spirit strikes!
- Quick to Prepare and Decorate: From mixing the batter to having the donuts ready for your artistic touch, the process takes less than 30 minutes. This quick turnaround time is ideal for busy holiday schedules, allowing you to enjoy more time celebrating and less time waiting.
- Endless Creative Decoration Options: This recipe is a blank canvas for your imagination. From classic sprinkles to intricate themed designs, the decoration possibilities are truly limitless. This flexibility allows everyone, from budding child artists to experienced bakers, to personalize their treats and create a unique batch every time.
- A Fantastic Family Activity: Baking these Christmas donuts is an excellent way to get the whole family involved in the holiday spirit. It’s a fun, interactive project that fosters teamwork, creativity, and leaves you with delicious results and treasured memories.
- Perfect for Any Occasion: Whether you’re looking for a special Christmas morning breakfast, a festive dessert for a holiday party, or a thoughtful homemade gift, these donuts fit the bill perfectly.
Unleash Your Creativity: Endless Christmas Donut Decoration Ideas
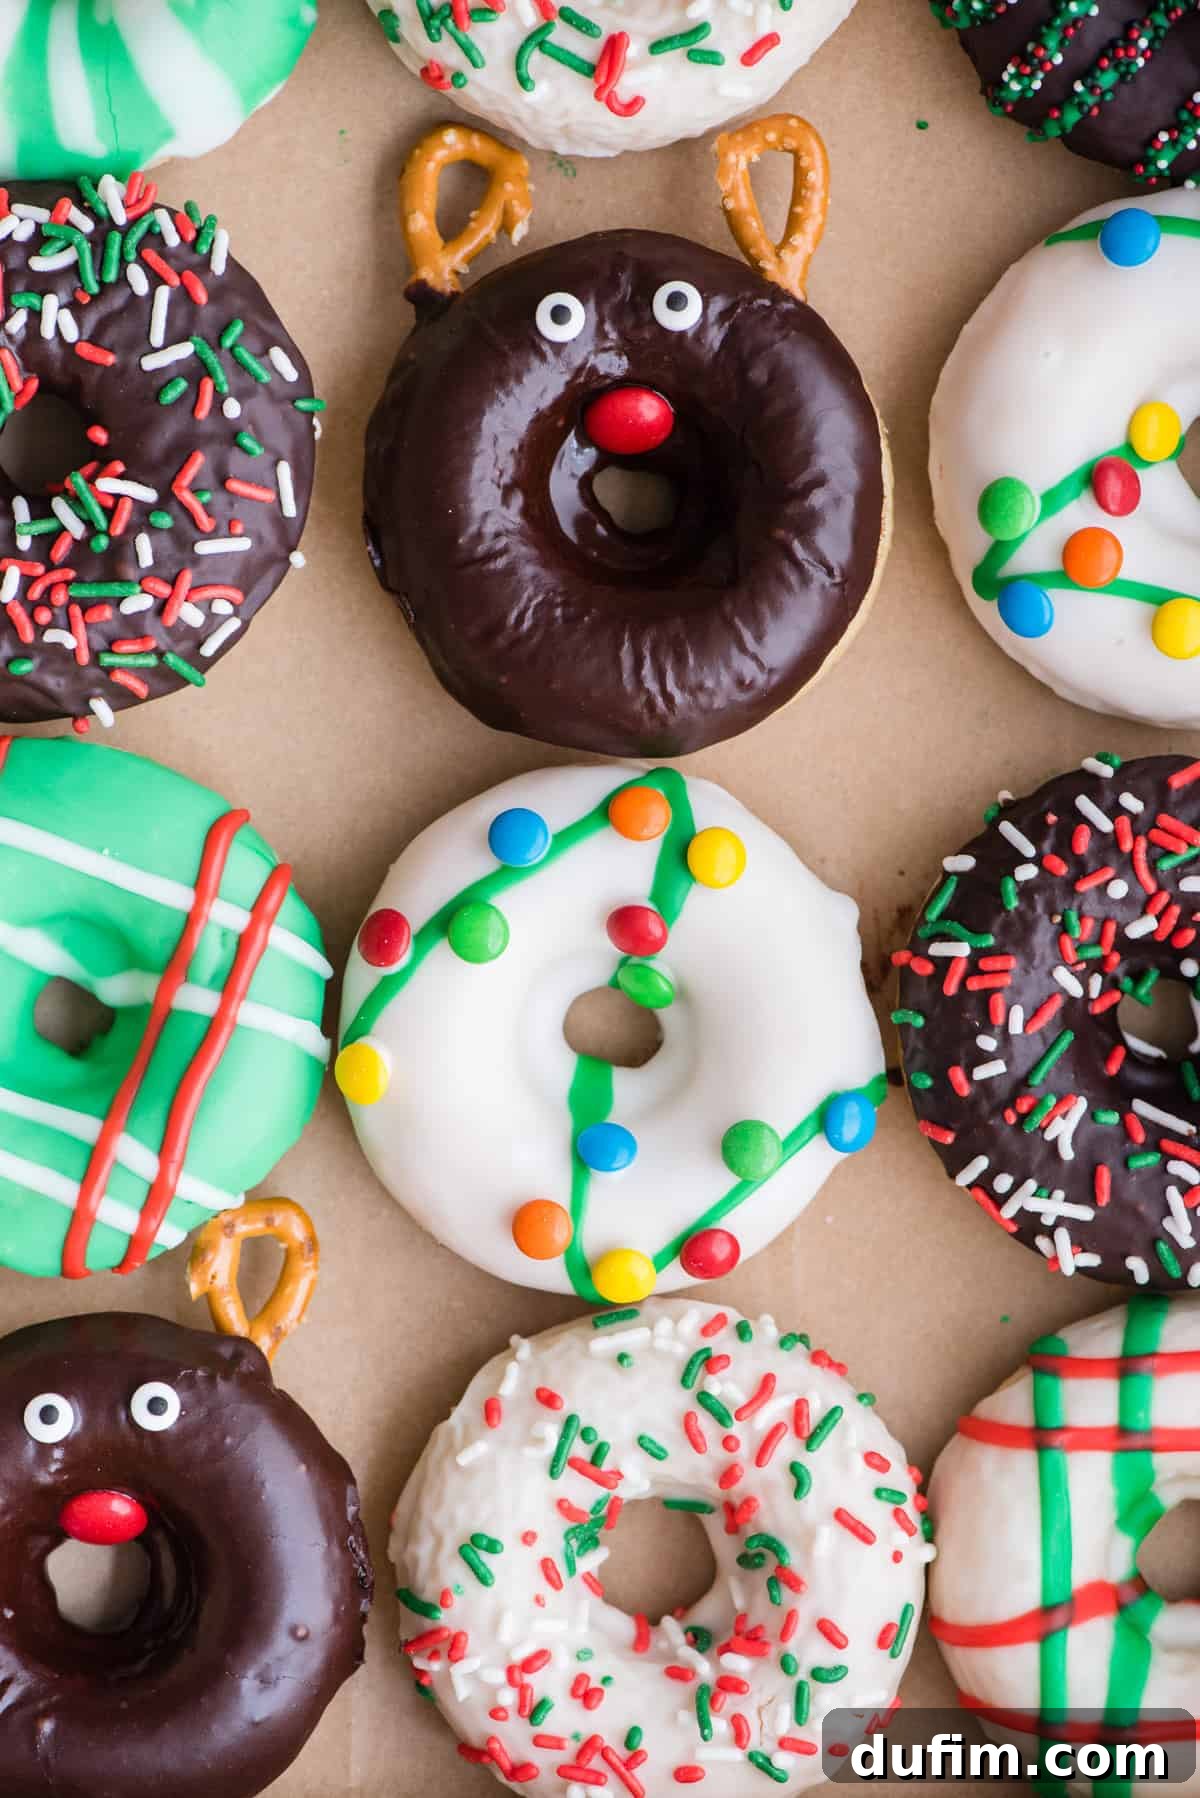
The true magic of Christmas donuts radiates from their vibrant and imaginative decorations. Whether you gravitate towards elegant simplicity or whimsical, playful charm, there’s a design concept perfectly suited for your taste. Here are some fantastic, detailed ideas to ignite your inspiration and help you craft a stunning array of edible art that will impress everyone:
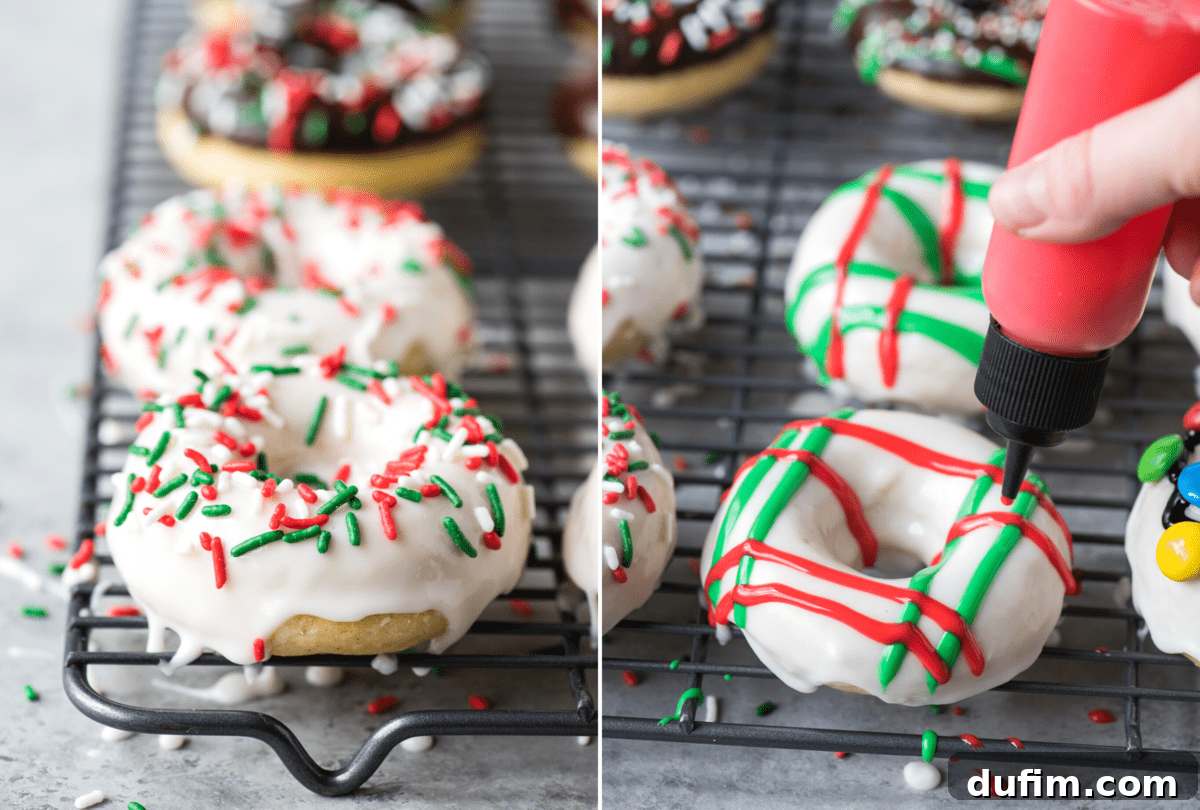
- Classic Plaid Perfection: Achieve a cozy, rustic holiday feel by creating a tartan-inspired pattern. First, dip your donut in a base color glaze (like white or light green) and let it set completely. Then, using a squeeze bottle or a piping bag with a very fine tip, carefully pipe thin, straight lines in a contrasting color (such as red). Let these lines set slightly, then pipe perpendicular lines to complete the plaid design.
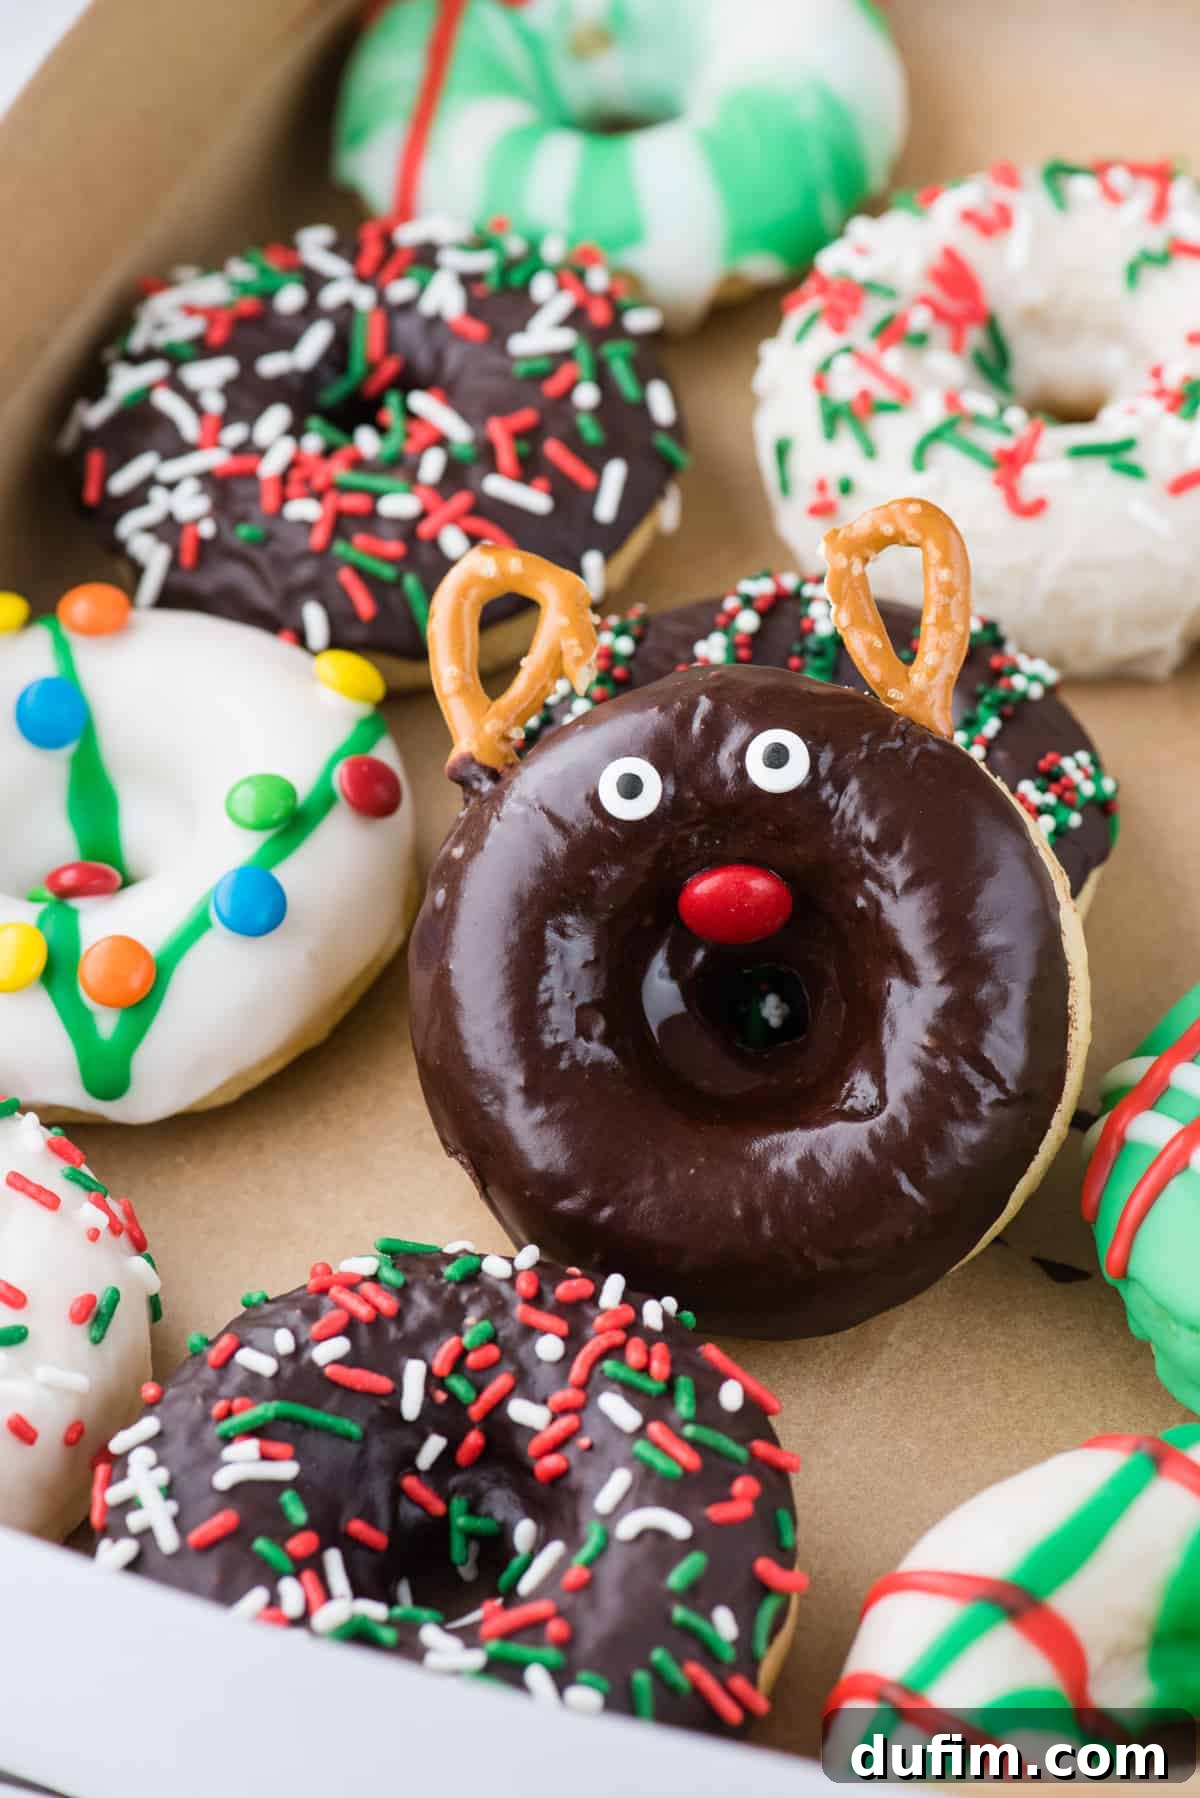
- Chocolate with Festive Sprinkles: A rich, decadent chocolate glaze serves as the perfect backdrop for a cascade of vibrant red, green, and white Christmas jimmie sprinkles. This classic combination is always a crowd-pleaser, wonderfully simple to execute, and adds instant holiday cheer.
- Elegant White with Nonpareils: A smooth, pristine white vanilla glaze provides a beautiful, snowy canvas. Top it with an assortment of colorful Christmas nonpareils or tiny edible pearls for a clean, sophisticated, yet cheerful look that evokes winter wonderland charm.
- Whimsical Christmas Lights: Dip your donuts in a light-colored glaze (white or light blue). Once set, use thin lines of brightly colored glazes (red, green, blue, yellow) piped artfully to resemble strings of twinkling Christmas lights. Add tiny candy dots or edible silver balls for the “bulbs” to complete the enchanting effect.
- Adorable Reindeer Donuts: Transform a chocolate-glazed donut into a delightful reindeer face. Use two mini pretzels for the antlers, strategically place two candy eyeballs, and finish with a red Mini M&M or a small dot of red frosting for the iconic Rudolph nose. This design is exceptionally fun and engaging for children to help create.
- Chocolate with Zigzag Patterns: After dipping a donut in luscious chocolate glaze, and while the glaze is still wet, quickly drizzle a contrasting white or red glaze in a fluid zigzag pattern across the top. For an even more artistic touch, use a toothpick to gently swirl through the wet glazes to create a marbled, feathery effect.
- Tie-Dye Present with Bow: Create a truly unique “gift” donut! Apply small dollops of various colored glazes (e.g., green, red, and white) onto the donut, then use a toothpick to gently swirl and blend them for a captivating tie-dye effect. Once set, add a contrasting frosting bow for a delightful edible present.
- Snowflake Wonderland: Cover your donuts with a light blue or white glaze. While the glaze is still slightly wet, sprinkle on some edible glitter for a shimmering, frosty look. Once set, use a fine-tipped piping bag with white frosting to draw delicate snowflake patterns.
- Candy Cane Crush: For a refreshing minty twist, dip donuts in a white glaze and immediately sprinkle generously with crushed candy canes. The vibrant red and white shards add both festive color and a delightful crunch.
- Gingerbread Character Donuts: Use a light brown glaze (perhaps flavored with a touch of gingerbread spice) and then decorate with white icing to draw tiny gingerbread person features – eyes, smile, and buttons.
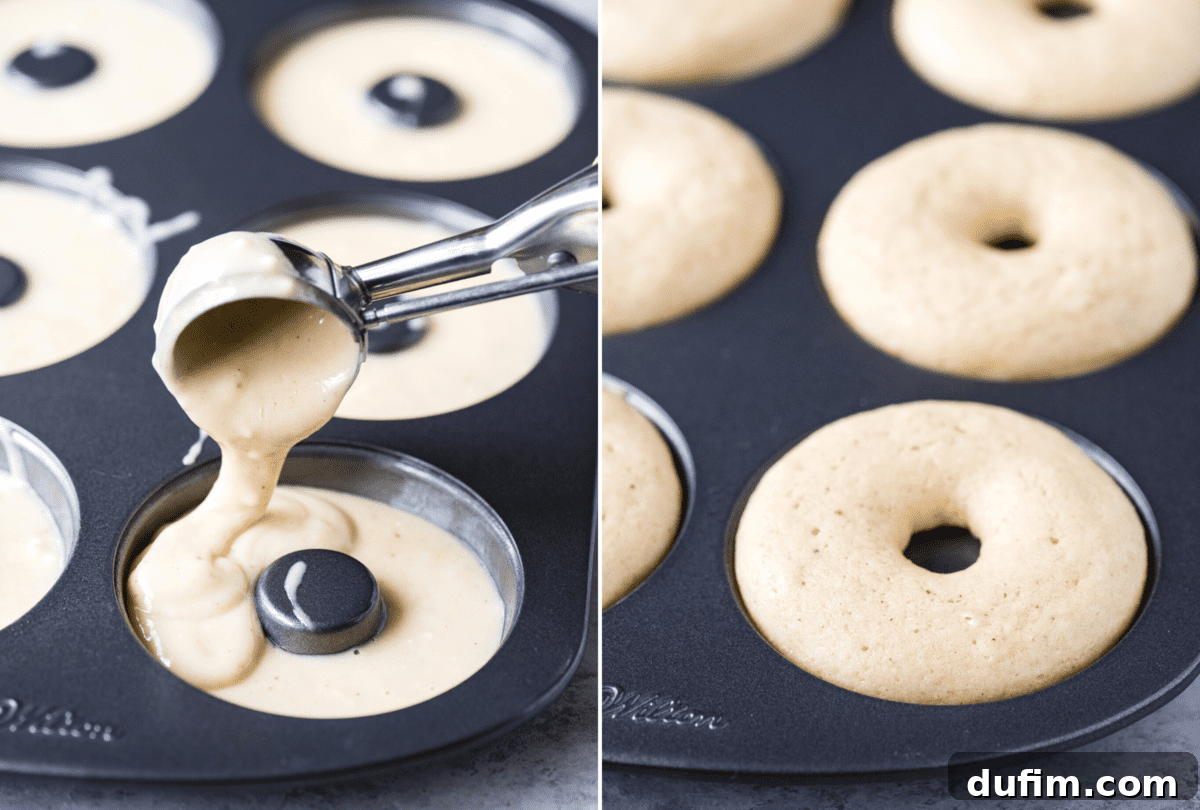
Mastering Your Donut Pan: Tips for Perfect Filling and Baking
Properly preparing and filling your donut pan is a critical step in achieving beautifully shaped and evenly baked donuts that release effortlessly. Utilizing the right tools and techniques will ensure your baked goods are consistently perfect.
For this recipe, I highly recommend investing in a good quality nonstick donut pan. Before adding any batter, spray the pan generously with a nonstick cooking spray. Don’t stop there; take a paper towel and carefully wipe the spray around each individual donut well, making sure to coat every curve and the center post. This thorough coating is absolutely crucial for preventing sticking and ensuring your finished donuts pop out cleanly without any breakage. It’s a small step that makes a huge difference in the final presentation.
Next, for precise and mess-free filling, I find that a cookie dough scoop (or an ice cream scoop for larger wells) is an invaluable tool. It allows you to portion out the batter efficiently, minimizing drips and ensuring each well receives a consistent amount. Aim to fill each well about two-thirds full; this leaves enough room for the donuts to rise without overflowing.
Finally, it’s important to do your best to evenly divide the batter among all the donut wells. Uneven distribution can lead to some donuts being undercooked and dense while others are overbaked and dry. After scooping, take a moment to use a small spatula or the back of a spoon to gently smooth the tops of the batter if they appear uneven, creating a flat surface for perfect glazing later on.
Time-Efficient Baking: From Prep to Plate in Under an Hour
One of the most appealing aspects of this baked Christmas donut recipe is its remarkable efficiency. It’s designed to fit seamlessly into even the busiest holiday schedules, allowing you to whip up these festive treats in less than an hour. This minimizes wait times and maximizes your precious holiday fun!
- Prep Batter and Fill Donut Pan: This initial stage, which includes gathering ingredients, mixing the simple batter, and carefully filling the donut wells, typically takes approximately 10 minutes. Speed and precision here help keep the total time down.
- Bake Time: The donuts require a quick 10-13 minutes in a preheated oven. Keep an eye on them; they should be lightly golden and springy to the touch.
- Cooling Period: Once baked, it’s essential to allow the donuts to cool completely in their pan for at least 10 minutes. This critical step helps them firm up and prevents them from breaking apart when you remove them.
- Decoration Fun: Dedicate approximately 20 minutes for the exciting part: glazing and decorating your donuts. This is where your creativity truly shines, and it’s a fantastic, engaging activity for the whole family to participate in.
- Total Estimated Time: You’ll be delighted to know that these scrumptious Christmas donuts can be ready to enjoy or beautifully decorated in just 50-53 minutes from start to finish!
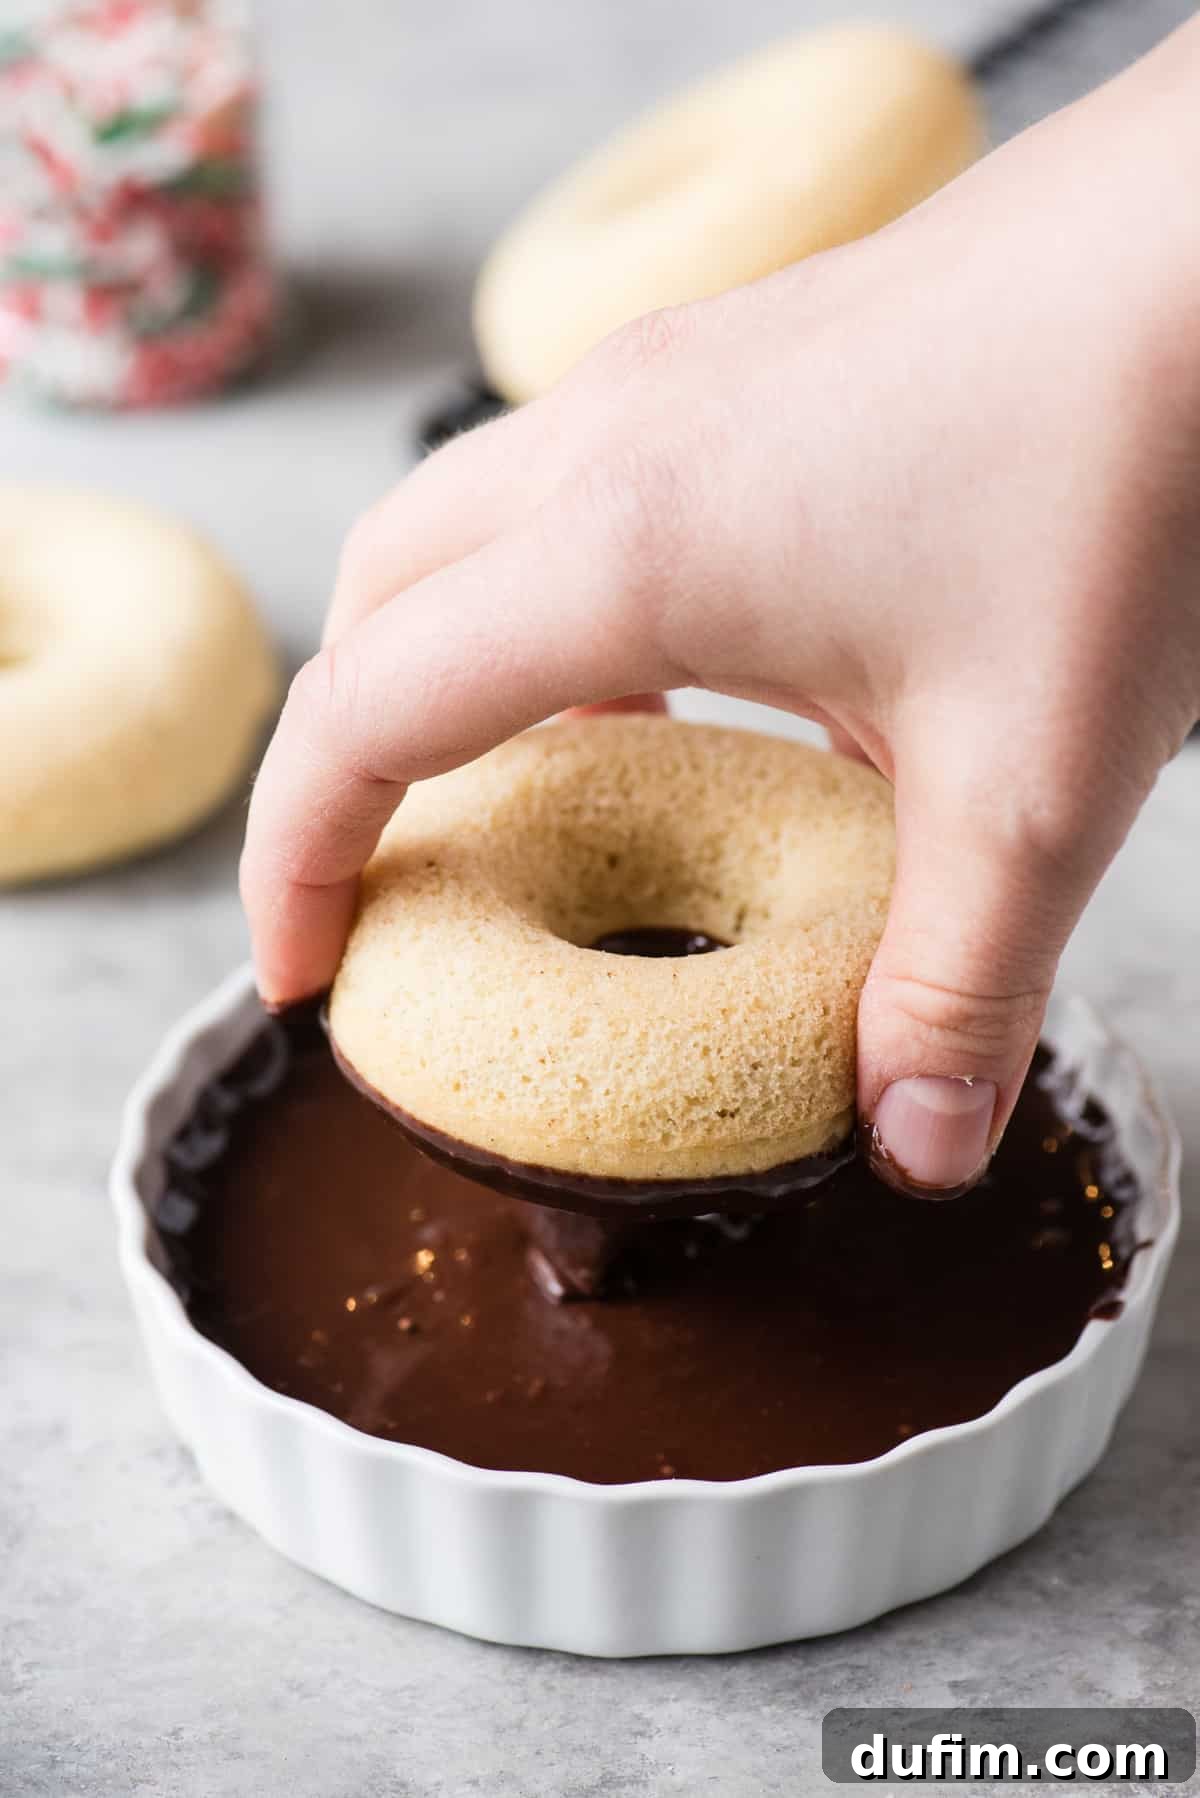
The Art of Glazing: Achieving a Flawless Finish for Your Baked Donuts
Applying the perfect glaze to your Christmas donuts is an art that’s surprisingly easier than it looks. A smooth, even coating not only enhances the donut’s incredible flavor but also creates the ideal canvas for your beautiful festive decorations. Follow these detailed steps to achieve a professional-looking and delicious finish every time:
Once your chosen glaze (whether it’s the classic white, rich chocolate, or a vibrant colored version) is prepared and whisked until perfectly smooth and free of lumps, transfer it to a small, shallow bowl. The bowl should be slightly wider than your donuts to allow for easy, complete submersion of the top surface. It is absolutely crucial that your baked donuts are completely cooled before glazing; attempting to glaze warm donuts will cause the glaze to melt, become runny, and simply slide off, creating a messy and unsatisfactory result.
Carefully take a cooled donut and gently dip the top side into the glaze, submerging it just enough to coat the desired surface. Avoid dipping too deeply, which can lead to excessive glaze that makes the donut overly sweet and difficult to handle. Lift the donut out of the glaze and hold it upside down directly over the bowl for a few seconds. This allows any excess glaze to drip off and fall back into the bowl, preventing a thick, clumpy layer and minimizing waste. You’re aiming for a thin, even coating.
Finally, gently place the freshly glazed donuts onto a wire cooling rack. It’s a good idea to position this rack over a sheet of parchment paper or wax paper to catch any remaining drips and make cleanup easier. Allow the glaze to set completely. Depending on the humidity levels in your kitchen and the consistency of your glaze, this can take anywhere from 15 minutes to a couple of hours. Once the glaze is firm to the touch, your donuts are perfectly ready for further creative decoration or immediate enjoyment!
Preserving Holiday Joy: How to Freeze Baked Christmas Donuts
The holiday season often brings a whirlwind of activities, and having make-ahead options can be an absolute lifesaver. These baked Christmas donuts freeze wonderfully, allowing you to prepare a batch in advance and enjoy fresh-tasting treats whenever the craving strikes, or unexpected guests arrive. Here’s how to properly freeze and thaw them to maintain their delicious quality:
First and foremost, ensure your baked Christmas donuts have cooled completely to room temperature after coming out of the oven. If you plan to glaze them, do so as instructed and allow the glaze to harden entirely before proceeding with freezing. Freezing unglazed donuts is also a fantastic option; you can then glaze them fresh after thawing for a truly just-made taste and appearance.
To prevent dreaded freezer burn and maintain their optimal freshness and texture, individually wrap each donut tightly in plastic wrap. Make sure there are no air pockets. Following this, place the wrapped donuts inside a freezer-safe ziplock bag or an airtight freezer container. For best organization, label the container with the date of freezing so you can easily keep track of freshness. When stored correctly, these delightful donuts will stay fresh in the freezer for up to 2-3 months.
To thaw: For a quick treat, simply microwave an individual donut for about 20 seconds until it’s soft and gently warmed through. If you prefer a more gradual thaw, which helps preserve their delicate texture, place the desired number of donuts on the counter at room temperature for approximately 30 minutes. This gentle thawing method ensures they retain their tender crumb and delicious flavor, ready to be enjoyed as a delightful holiday snack.
Baking for Everyone: How to Make Delicious Gluten-Free Christmas Donuts
No one should ever have to miss out on the pure joy and festive delight of Christmas donuts, especially those with gluten sensitivities. The wonderful news is that this baked donut recipe is incredibly adaptable and consistently yields fantastic results even when made with gluten-free flour. Through multiple tests and occasions, I’ve personally made these donuts with both traditional all-purpose flour and various gluten-free blends, achieving consistently awesome, soft, and flavorful outcomes every single time.
For the absolute best gluten-free baking experience and reliable results, I highly recommend using King Arthur’s Gluten Free Measure for Measure Flour. This particular flour blend is expertly formulated to be a direct one-for-one substitute for traditional all-purpose flour in the vast majority of recipes, simplifying the gluten-free baking process immensely. With this blend, you won’t need to make any complicated adjustments to liquid ratios, or add extra ingredients like xanthan gum, as it’s already perfectly balanced. Simply swap the regular flour called for in the recipe with an equal amount of King Arthur’s Measure for Measure blend, and you’re all set to create delicious, tender gluten-free Christmas donuts that everyone can enjoy!
The Secret to Perfect Baking: How to Properly Measure Flour
Accurate ingredient measurement is undeniably a cornerstone of successful baking, and flour, in particular, demands a specific technique to ensure your baked goods turn out with the perfect texture. Improperly measured flour is a surprisingly common culprit behind dry, dense, or crumbly results, drastically impacting the final quality of your donuts. Here’s the universally recommended and correct method for measuring flour:
- Fluff the Flour First: Before you even think about scooping, use a fork or a whisk to gently fluff up the flour in its bag or container. Flour has a tendency to settle and compact over time, especially if it’s been sitting for a while. This crucial first step aerates the flour, making it lighter and ensuring a more accurate volume measurement.
- Spoon into Measuring Cup: This is a key departure from common practice. Never scoop directly from the bag with your measuring cup. Instead, use a separate spoon (like a large kitchen spoon) to gently scoop the fluffed flour into your dry measuring cup until it’s overflowing and mounded. Avoid pressing or shaking the cup, as this will compact the flour again.
- Level with a Flat Edge: Once the cup is generously mounded with flour, use the straight edge of a butter knife or a similar flat utensil to carefully sweep across the top, leveling off the excess flour back into the bag. This ensures a precise, accurate measurement without overpacking.
Sticking your measuring cup straight into the bag of flour can compact it significantly, often leading to up to 25% (or even more) too much flour being packed into the cup. This excess flour will absorb an undue amount of moisture from your batter, inevitably resulting in dry, heavy, and less palatable baked goods. Following these simple, yet vital, steps will guarantee that your Christmas donuts are perfectly tender, moist, and delightfully fluffy every single time.
Expert Tips for Your Best Christmas Donuts Yet
To ensure your Christmas donut baking and decorating experience is as smooth, enjoyable, and successful as possible, keep these expert tips in mind. They’re designed to help you achieve professional-looking results, avoid common pitfalls, and make the most of your festive baking adventure:
- The frosting will naturally harden as it sets. Depending on the thickness with which you apply the glaze and the humidity levels in your kitchen, this process may take anywhere from a few minutes to a couple of hours. Plan your decorating and serving time accordingly if you need the glaze to be fully firm.
- For intricate and detailed decoration, such as drawing delicate reindeer features, crafting precise plaid patterns, or writing festive messages, I highly recommend using specialized squeeze bottles with fine tips or piping bags fitted with small round tips. These tools provide significantly better control and precision compared to simply using a spoon or knife.
- Always ensure your baked donuts are completely cooled to room temperature before attempting to glaze them. Glazing warm donuts will cause the glaze to melt immediately, run off the sides, and create a messy, uneven finish that won’t hold decorations.
- If you find your glaze has become too thick to dip smoothly, add a tiny amount of milk (start with half a teaspoon) and stir thoroughly until it reaches your desired dipping consistency. Conversely, if your glaze is too thin and runny, whisk in an extra tablespoon of powdered sugar at a time until it thickens to perfection.
- This is the exact donut pan I personally own and use, consistently achieving excellent, perfectly shaped results. Investing in a good quality nonstick pan makes a substantial difference in both ease of baking and the final appearance of your donuts.
- Consider preparing your glazes in advance. You can store them in airtight containers at room temperature for a few hours or in the refrigerator for a day or two. Just be sure to give them a good stir (or gently reheat if refrigerated) before use to restore their smooth consistency.
- Have all your sprinkles, candies, and other decorative elements laid out and easily accessible before you begin glazing. Some decorations adhere best when the glaze is still slightly wet, so being organized will allow you to work efficiently.
“So easy and a good tasting donut. Made for our Christmas bake sale!”
-Jen
Discover More Delightful Festive Christmas Recipes
If you’ve thoroughly enjoyed creating and savoring these delightful Christmas donuts, you’re in for an even greater treat! The holiday season is a truly wonderful time to explore new baking adventures and fill your home with the enchanting aromas of freshly baked goods. Here are some more of our absolute favorite festive recipes that are guaranteed to spread cheer, satisfy any sweet tooth, and add a touch of homemade magic to your celebrations:
- Turtle Cookies: Indulge in chewy, rich chocolate cookies generously loaded with toasted pecans and luscious caramel. A decadent treat for any chocolate lover.
- Maraschino Cherry Chocolate Chip Cookies: A vibrant, sweet, and wonderfully chewy twist on a classic chocolate chip cookie, perfect for adding a festive splash of red color to your holiday platter.
- Church Window Cookies: These beautiful, no-bake mosaic cookies are as fun and intriguing to look at as they are to eat. Their stained-glass appearance makes them a unique holiday dessert.
- Christmas Tree Brownies: Transform fudgy, rich brownies into festive edible Christmas trees! Simply cut them into tree shapes and decorate with green frosting and colorful sprinkles.
- Oreo Fudge: A decadently creamy and incredibly easy-to-make fudge recipe, generously packed with chunks of everyone’s favorite sandwich cookie. A perfect last-minute gift or party treat.
Rated 4.34 out of 5 stars by 15 readers.
Christmas Donuts Recipe
Beth
10 minutes
10 minutes
30 minutes
50 minutes
12
donuts
Leave a Review
Print Recipe
Equipment You’ll Need
-
Donut Pan
-
Large Mixing Bowl
-
Kitchen Scale (optional, for precise measurement)
-
Whisk or Spatula
-
Cookie Dough Scoop (for easy pan filling)
-
Cooling Rack
Ingredients for Fluffy Baked Donuts
For the Donuts:
- 2 cups (240g) all-purpose flour (or King Arthur’s Gluten Free Measure for Measure Flour for GF option)
- ¼ tsp ground nutmeg
- ½ cup (99g) granulated sugar
- 2 tsp baking powder
- 1 tsp salt
- ½ cup plus 2 Tbsp (148ml) milk, any type (skim milk suggested)
- 2 large eggs
- 1 tsp vanilla extract
- ¼ cup plus 2 Tbsp (89ml) vegetable oil
For the Classic White Glaze:
- 2 cups (227g) powdered sugar
- 1 tsp vanilla extract
- 2 Tbsp milk, any type (skim milk suggested)
- Red and green food coloring (optional, for festive colors)
For the Rich Chocolate Glaze:
- 1 ½ cups (169g) powdered sugar
- ¼ cup (21g) unsweetened cocoa powder
- 3 Tbsp milk, any type (skim milk suggested)
- 1 Tbsp vanilla extract
For Festive Decorations:
- Christmas jimmie sprinkles (red, green, white)
- Christmas nonpareils
- Mini M&Ms (for reindeer noses or colorful accents)
- Candy eyeballs (for reindeer or other character donuts)
- Mini pretzels (for reindeer antlers)
- Edible glitter or metallic dust (optional, for extra sparkle)
- Small candy dots or edible pearls
Step-by-Step Instructions for Your Christmas Donuts
Making the Donut Batter and Baking:
-
Preheat your oven to 350ºF (175ºC). This ensures the oven is at the correct temperature for even baking from the very beginning. Prepare your donut pan by spraying each well generously with non-stick cooking spray. Then, use a paper towel to thoroughly wipe and coat the entire surface of each donut well, including the center post. This crucial step prevents sticking and helps the donuts release effortlessly after baking, ensuring perfect shape.
-
In a medium-sized bowl, combine all your dry ingredients: the accurately measured all-purpose flour (or gluten-free blend), fragrant ground nutmeg, granulated sugar, baking powder, and a pinch of salt. Whisk these ingredients together until they are thoroughly combined and there are no visible lumps of dry ingredients. Set this bowl aside for a moment while you prepare the wet ingredients.2 cups (240g) all purpose flour,
¼ tsp nutmeg,
½ cup (99g) granulated sugar,
2 tsp baking powder,
1 tsp salt -
In a separate, larger mixing bowl, combine your wet ingredients: the milk, two large eggs, aromatic vanilla extract, and vegetable oil. Use a whisk or spatula to beat these together thoroughly until the mixture is smooth and all components are well integrated. Gradually add the prepared dry flour mixture to the wet ingredients, mixing by hand with a spatula just until everything is combined. Be careful not to overmix the batter, as this can develop the gluten too much, leading to tough or chewy donuts. A few small lumps in the batter are perfectly normal and acceptable.½ cup plus 2 Tbsp (148ml) milk,
2 large eggs,
1 tsp vanilla extract,
¼ cup plus 2 Tbsp (89ml) vegetable oil -
Carefully spoon the donut batter into each well of your prepared donut pan. For the neatest, most efficient, and most even fill, I highly recommend using a cookie dough scoop. Fill each well approximately two-thirds full; this allows the donuts sufficient space to rise during baking without overflowing. If the tops of the batter appear uneven after scooping, use a small spatula or the back of a spoon to gently smooth them out. This ensures your baked donuts will have a uniform, attractive shape.
-
Bake the donuts for 11-12 minutes, or until a toothpick inserted into the center of a donut comes out clean. The donuts should appear lightly golden around the edges and spring back gently when touched. Once baked, remove the pan from the oven and allow the donuts to cool completely in the donut pan for about 10 minutes. This essential cooling period helps them firm up and prevents them from breaking when removed. To release them, simply turn the donut pan upside down and gently tap it against the counter a few times. Repeat the baking process with any remaining batter.
Glazing and Festive Decoration:
-
To prepare the glazes, combine the ingredients for the classic white glaze (powdered sugar, vanilla extract, milk) in a bowl and stir vigorously until smooth and lump-free. For festive variations, you can divide the white glaze into three separate bowls: keep one white, add a few drops of red food coloring to the second, and green food coloring to the third, mixing each until the desired vibrant color is achieved. Repeat these steps to prepare the rich chocolate glaze. Once all glazes are ready, dip the top of each completely cooled donut into your desired glaze. Hold the donut over the bowl for a few seconds, allowing any excess glaze to drip off. Place the glazed donuts on a cooling rack to let the glaze begin to set for a few minutes before moving onto decoration.2 cups (227g) powdered sugar,
1 tsp vanilla extract,
2 Tbsp milk,
red and green food coloring,
1 ½ cups (169g) powdered sugar,
¼ cup (21g) cocoa powder,
3 Tbsp milk,
1 Tbsp vanilla extract -
Now for the most exciting and fun part: decoration! While the glaze is still slightly wet (this is key for sprinkles to adhere), immediately add your desired embellishments. Use the inspiring photos throughout this guide as a creative starting point, but don’t hesitate to let your own imagination soar! For precise designs like delicate reindeer antlers or intricate plaid lines, squeeze bottles or piping bags are incredibly helpful tools that offer superior control. Let your artistic vision run wild to create unique, personalized, and wonderfully festive donuts that will be the highlight of your holiday celebration!
Here are some additional ideas to spark your decoration journey:
- Classic plaid patterns using contrasting glaze colors.
- Chocolate glazed donuts generously topped with bright Christmas jimmie sprinkles.
- White glazed donuts adorned with whimsical Christmas nonpareils.
- Creative Christmas lights designs using various colored glazes and small candies.
- Charming reindeer faces crafted from chocolate glaze, mini pretzels, candy eyeballs, and Mini M&Ms.
- Elegant chocolate donuts with delicate white zigzag sprinkles.
- Artistic tie-dye present designs finished with a lovely frosting bow.
Christmas jimmie sprinkles,
Christmas nonpareils,
Mini M&Ms,
Candy eyeballs,
Pretzels
Nutrition Information (per donut)
|
Carbohydrates: 61g
|
Protein: 4g
|
Fat: 6g
|
Saturated Fat: 1g
|
Polyunsaturated Fat: 3g
|
Monounsaturated Fat: 2g
|
Trans Fat: 1g
|
Cholesterol: 29mg
|
Sodium: 284mg
|
Potassium: 85mg
|
Fiber: 1g
|
Sugar: 44g
|
Vitamin A: 66IU
|
Vitamin C: 1mg
|
Calcium: 68mg
|
Iron: 1mg
Nutrition Disclosure
All nutritional values are approximate and provided to the reader as a courtesy. Changing ingredients and/or quantities will alter the estimated nutritional calculations. For precise dietary information, it is recommended to calculate based on the exact products and measurements used.
Loved this recipe? Share your thoughts!
Rate and leave a comment below to let us know how your Christmas donuts turned out! Your feedback helps us create more delicious recipes.