
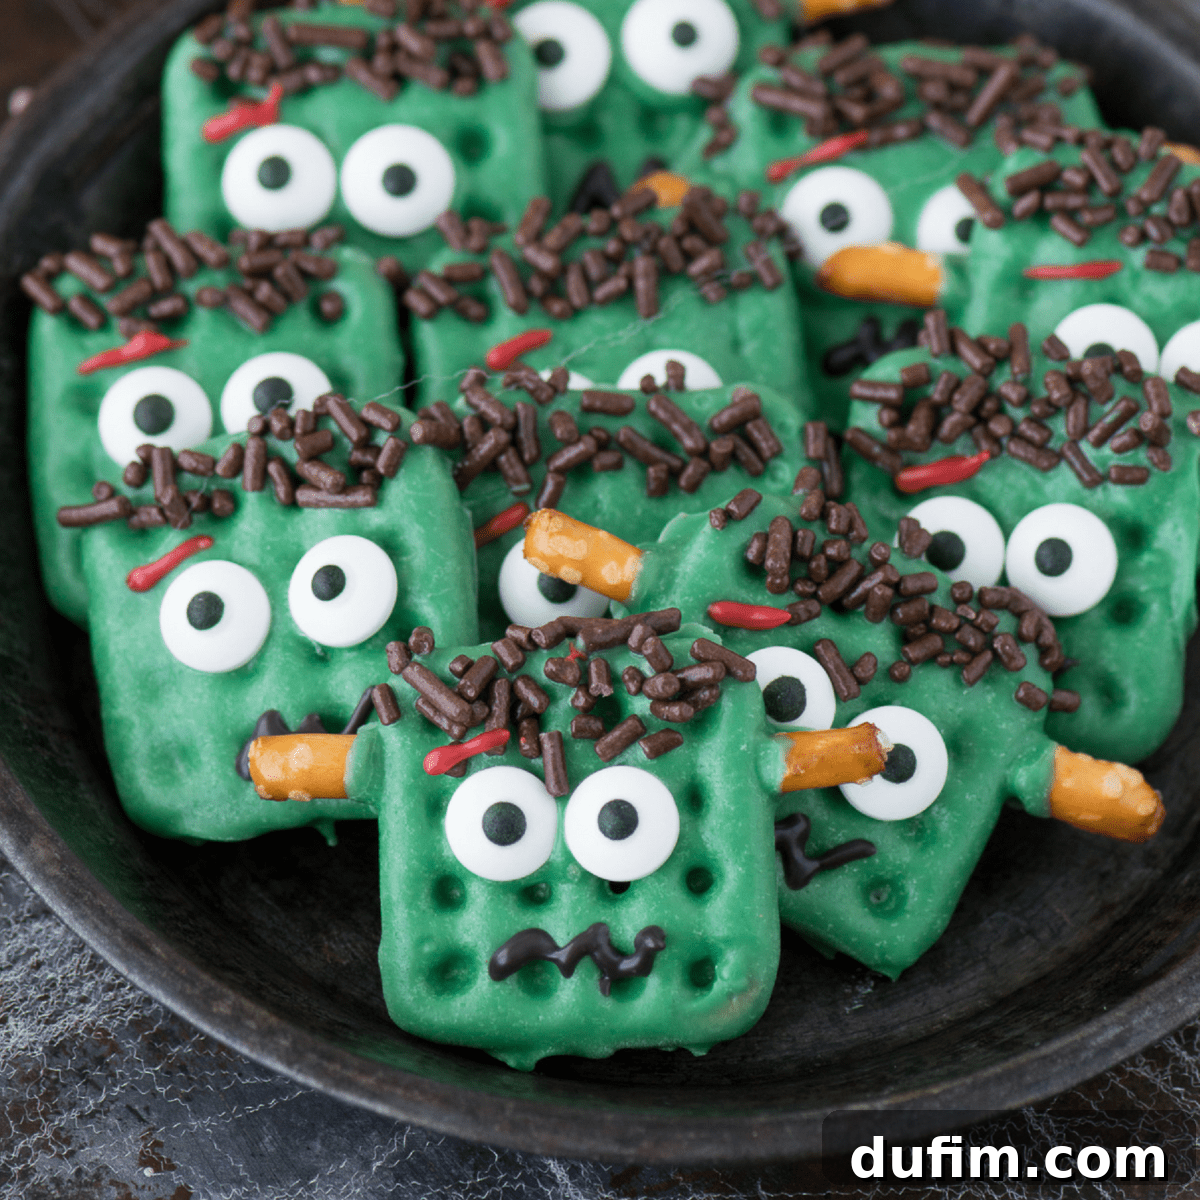
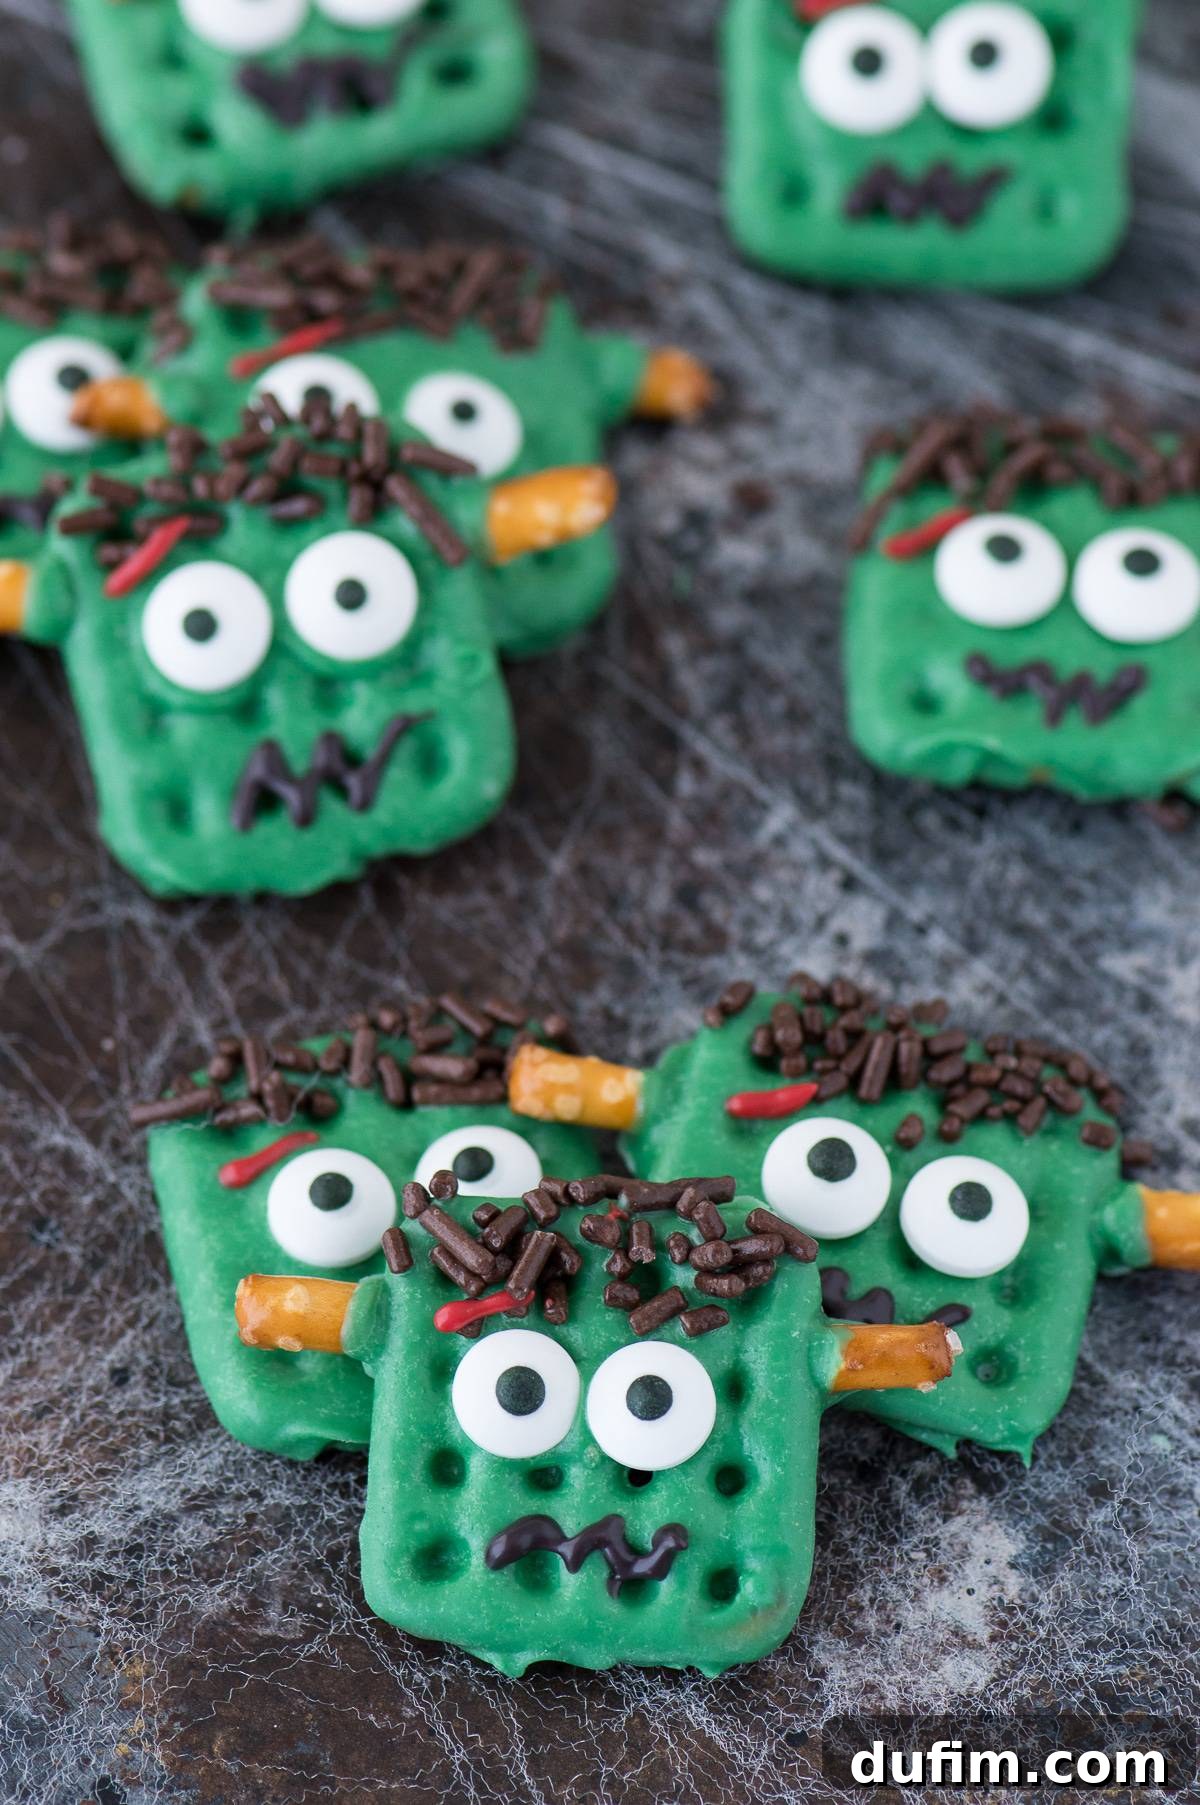
Unleash your inner mad scientist and create these incredibly cute Frankenstein Halloween Pretzels! Made with just a few simple ingredients like square pretzels and colorful candy melts, this is a delightfully easy Halloween treat that kids will love to help make and even more to devour.
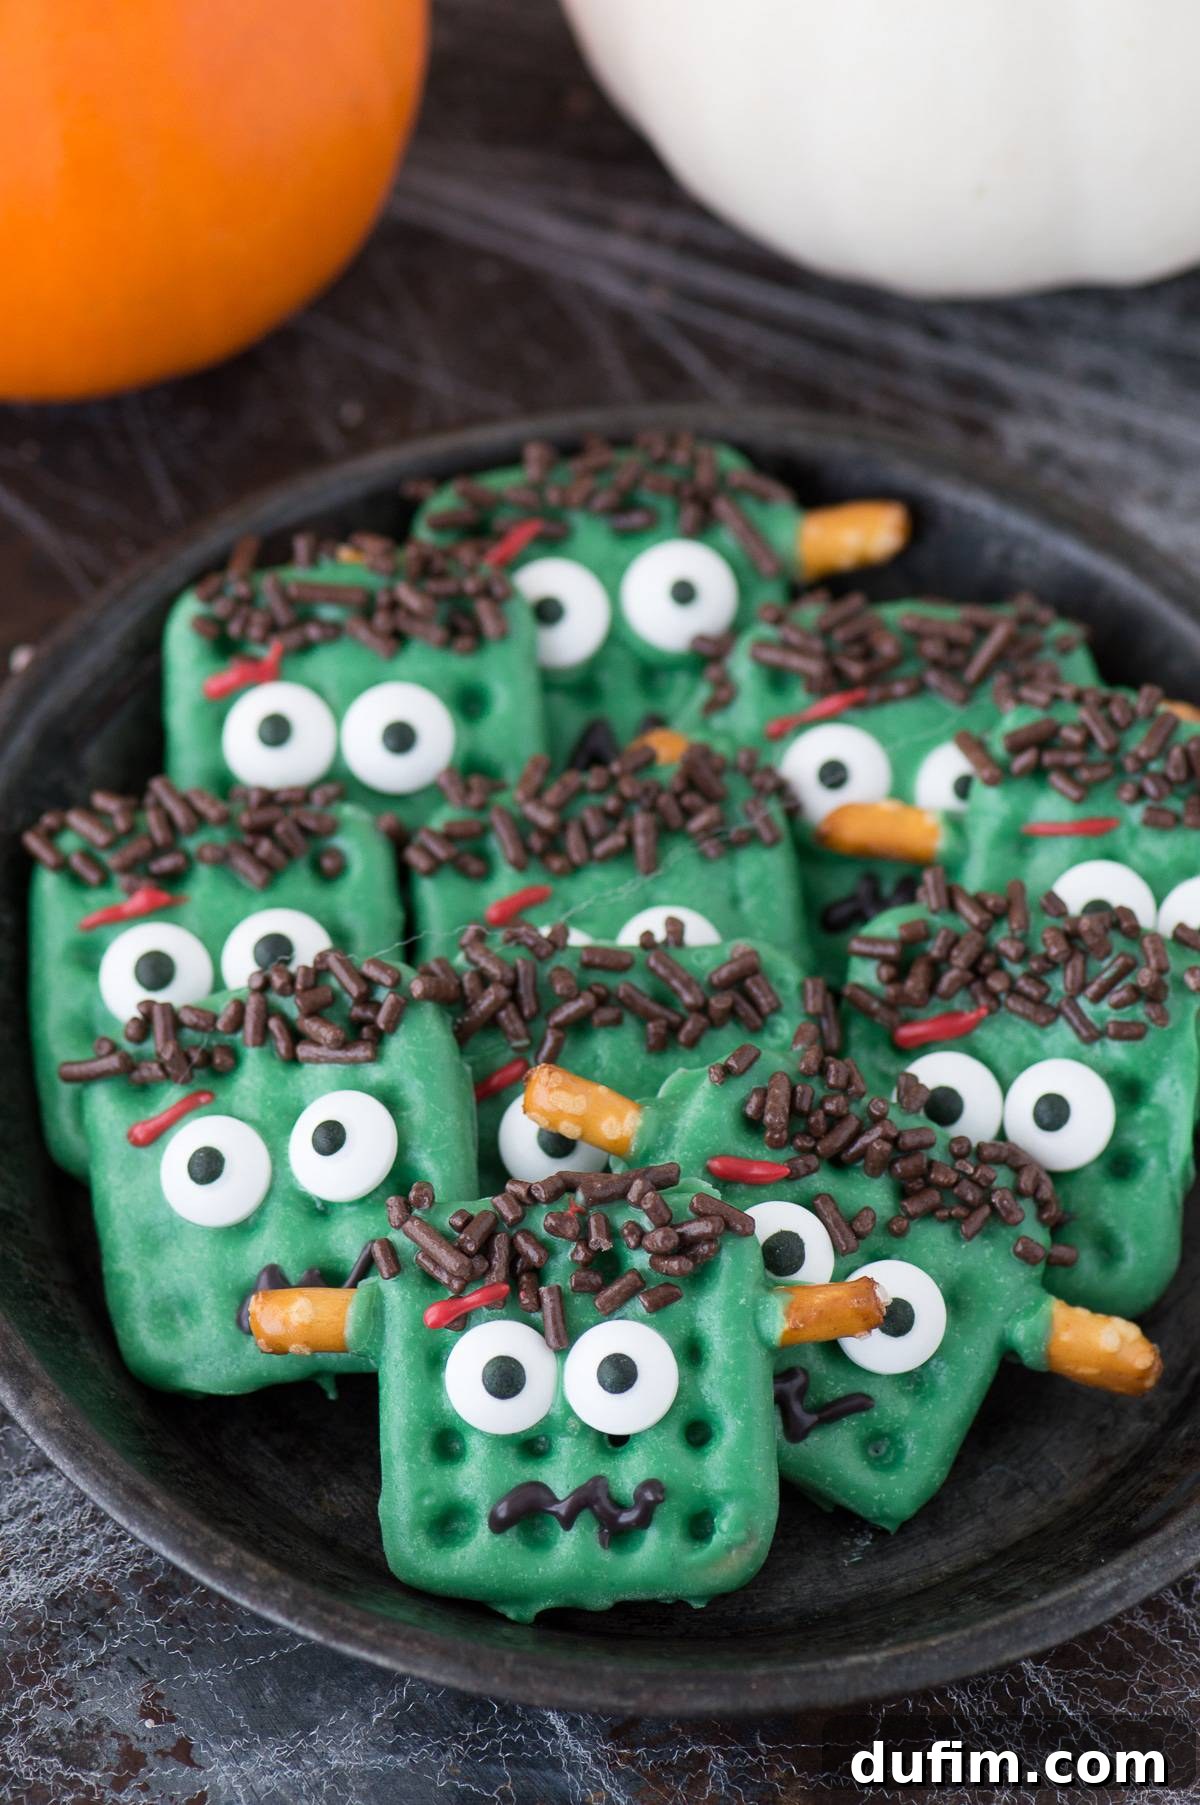
Spooky & Sweet: How to Make Easy Frankenstein Pretzels for Halloween!
Halloween is a magical time of year, filled with costumes, decorations, and, of course, plenty of treats! While pumpkin carving and elaborate costumes are traditional, sometimes the best memories are made in the kitchen, crafting edible delights with loved ones. If you’re searching for an incredibly fun, easy, and no-bake Halloween recipe that’s perfect for involving the whole family, look no further than these adorable Frankenstein Pretzels. They are an absolute explosion of Halloween cuteness that will captivate both young and old!
Forget complicated baking or intricate designs. These Frankenstein monsters are brought to life using the humble square or waffle pretzel and a medley of colorful candy melts. It’s truly amazing what you can create with these versatile ingredients. After discovering the endless possibilities with candy corn pretzels, it became clear that pretzels and candy melts are a match made in Halloween heaven. The flat, broad surface of square or waffle pretzels makes them the ideal canvas for transforming into our favorite green monster with minimal effort and maximum charm.
Why These Frankenstein Pretzels Are a Must-Make Halloween Treat
These spooky sweet treats aren’t just delicious; they offer a host of benefits that make them ideal for your Halloween celebrations:
- Kid-Friendly & Fun: This recipe is designed for maximum fun and minimal fuss. Kids can easily participate in dipping pretzels, adding sprinkles for hair, and placing the candy eyeballs. It’s a fantastic hands-on activity that fosters creativity and excitement for the holiday, making memories as sweet as the treats themselves.
- No-Bake & Easy: Say goodbye to hot ovens and complex steps! All you need is a microwave or a double boiler to melt the candy melts. The assembly process is straightforward, making it perfect for busy parents, beginner decorators, or anyone looking for a quick win in the kitchen.
- Quick to Prepare: From melting to decorating, you can whip up a batch of these spooky snacks in remarkably little time, leaving more precious moments for trick-or-treating adventures, pumpkin patch visits, or classic Halloween movie nights.
- Customizable & Creative: While we’re making Frankenstein, the basic concept of dipping pretzels in colored candy melts can be adapted for other monsters or spooky themes. Plus, you can personalize each Frankenstein with different expressions, making every single one unique!
- Perfect for Parties & Gifting: These vibrant green monsters are guaranteed to be a hit at any Halloween party, school event, or simply as a festive snack for your family. They’re bite-sized, easy to grab, and incredibly delicious, making them excellent party favors or additions to a dessert platter.
- Affordable Ingredients: Most of the ingredients are inexpensive and widely available, making this a budget-friendly option for a crowd-pleasing Halloween treat.
Frankenstein Halloween Pretzel Ingredients: What You’ll Need to Gather
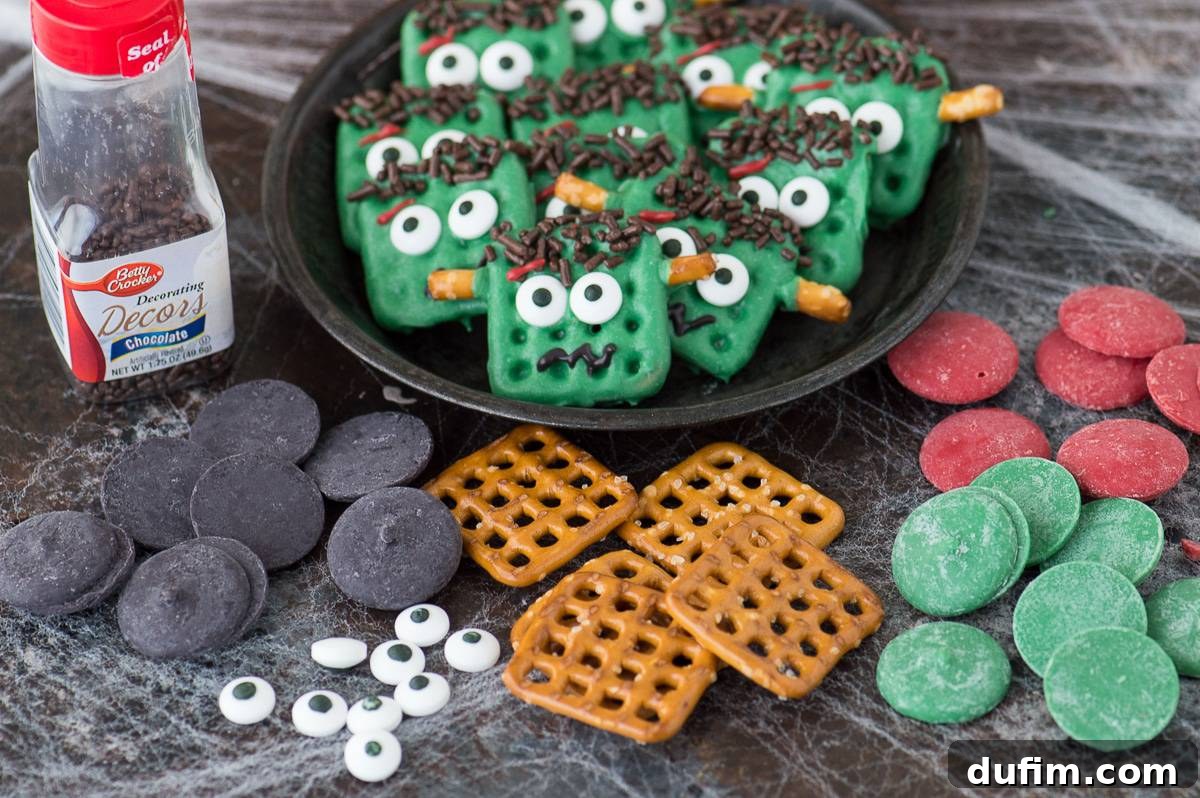
Creating these adorable monsters requires only a handful of readily available ingredients. Here’s a detailed look at what you’ll need to gather to bring your edible Frankensteins to life:
- Square or Waffle Pretzels: These are the undisputed heroes of our recipe! Their flat, square shape is absolutely perfect for forming Frankenstein’s head, providing a stable and broad canvas for decoration. You might also find them labeled as “pretzel snaps” in the snack aisle. Ensure they are fresh and relatively intact for the best results.
- Green Candy Melts: This is the iconic hue for our Frankenstein’s skin. Candy melts are specifically formulated to melt smoothly and harden quickly, providing a professional-looking, vibrant finish without the need for tempering. Popular brands like Wilton or Ghirardelli offer a wide range of colors.
- Black Candy Melts: Essential for Frankenstein’s signature stitched mouth and, if you’re feeling adventurous and prefer a homemade touch, for creating the pupils of your monster’s eyes.
- Red Candy Melts: To add those classic, slightly eerie stitched scars and a touch of gruesome yet playful charm to our Frankenstein’s face.
- Vegetable Shortening (e.g., Crisco): A little bit goes a long way! Adding a small amount of vegetable shortening to your candy melts helps thin them out, making them much easier to dip and ensuring a smooth, even, and thin coating on your pretzels. This prevents your Frankensteins from looking too clumpy or thick.
- Brown Sprinkles: These will serve as Frankenstein’s unruly, textured hair. Any type of brown sprinkle will work wonderfully – jimmies, nonpareils, or even finely crushed chocolate cookies for a more rustic, textured look.
- Candy Eyeballs: These are a game-changer for quick and expressive faces! Look for them in the baking aisle of most grocery stores, craft stores, or specialty candy shops. They instantly bring your Frankensteins to life with minimal effort. Alternatively, for a truly homemade touch, you can use white candy melts for the base of the eye and then add a tiny dot of black candy melts for the pupils once the white has slightly set.
- Broken Pretzel Sticks: These will be strategically placed on the sides of our monster’s head to mimic Frankenstein’s iconic neck bolts, adding an extra layer of authentic detail. Break them into small, manageable pieces about 1/2 to 1 inch long.
Essential Kitchen Tools for Easy Decorating
Having the right tools can make all the difference in ensuring a smooth and enjoyable decorating experience. Here’s what we recommend to streamline your Frankenstein pretzel production:
- Baking Sheet Lined with a Silicone Baking Mat or Wax Paper: This is an absolute must! It prevents your dipped pretzels from sticking to the surface as they cool and harden, and makes for incredibly easy cleanup. Parchment paper is also a good alternative if you don’t have silicone mats.
- Small Pot and Stove (for double boiler method) or Microwave-Safe Bowls (for microwave method): You’ll need one for each color of candy melt. A double boiler offers more precise temperature control for melting, reducing the risk of scorching, while the microwave is a super quick and convenient option for melting smaller quantities.
- Fork and Toothpick: A sturdy fork is perfect for dipping and retrieving pretzels from the melted candy, allowing excess to drip off. A toothpick is invaluable for carefully sliding the dipped pretzels off the fork onto your prepared baking sheet without smudging the coating, and also for intricate detail work if needed.
- Squeeze Bottles or Ziploc Bags: These are fantastic for piping the fine facial details like mouths and scars. Squeeze bottles offer excellent precision and control, but a quart-sized Ziploc bag with a tiny corner snipped off is an excellent, readily available, and disposable alternative. Quart-sized bags are generally preferred over sandwich bags due to their thicker plastic, which is less prone to tearing under pressure.
Expert Tips and Tricks for Perfect Frankenstein Pretzels
Achieving picture-perfect Frankenstein pretzels is easy and fun when you follow these helpful hints and best practices:
- Melt Candy Melts Carefully: Whether you opt for the double boiler method on the stove or the convenience of a microwave, always melt your candy melts slowly over low heat. If using a microwave, heat in short 30-second intervals, stirring thoroughly after each interval, until the candy is completely smooth and free of lumps. Avoid the temptation to overheat, which can cause the candy melts to seize, become grainy, or burn.
- Thinning with Shortening is Key: For a smooth, even coating, your candy melts need to be the right consistency. Start with a small amount of vegetable shortening, about a teaspoon per bag of candy melts, and stir it in thoroughly. Add more if needed, a tiny bit at a time, until the consistency is smooth and pourable, similar to thick paint, but not too runny. This ensures a thin, professional-looking layer on your pretzels.
- Dip One Pretzel at a Time: To ensure proper, even coverage and to prevent the delicate pretzels from breaking, only dip one square or waffle pretzel into the green chocolate at a time. This allows you to focus on each monster individually.
- Remove Excess Chocolate: After dipping, use your fork to gently lift the pretzel out of the melted chocolate. Tap the fork gently against the side of the pot or bowl to allow any excess green chocolate to drip back into the pot. You’re aiming for a thin, even layer, not a thick, gloppy one. Scrape the bottom of the fork against the edge of the pot for an even cleaner finish.
- Transfer with Utmost Care: The dipped pretzels can be delicate. Use a toothpick to carefully help slide the green-dipped pretzel from the fork onto your prepared baking sheet. This prevents accidental smudges and helps maintain the pretzel’s crisp, square shape.
- Work in Batches & Act Quickly: Green candy melts will begin to set relatively fast, especially in a cool kitchen. Once you’ve dipped a handful of pretzels (e.g., 3-5 at a time), immediately add the brown sprinkles (for hair), candy eyeballs, and broken pretzel sticks (for bolts) before the green chocolate hardens completely. If the chocolate sets, your decorations won’t stick properly.
- Decorating Details Last: Save the more intricate red scars and black mouths for the very end. Once all your green Frankensteins have their hair, eyes, and bolts firmly in place and the green chocolate has partially set, you can then melt the red and black candy melts (in separate small pots or bags) and add these finer, artistic details. Doing them all at once ensures a consistent look across your batch.
- DIY Eyeballs Option: If you find yourself without candy eyeballs, don’t fret! Create your own by piping two white circles where the eyes should be using white candy melts. Once these white circles have slightly set, add a smaller black dot in the center of each with black candy melts for the pupils.
- Piping with Precision: Whether you’re using dedicated squeeze bottles or a makeshift Ziploc bag, snip a very tiny corner off the bag. The smaller the hole, the finer the lines you can create. It’s always a good idea to practice on a piece of wax paper first to get the hang of controlling the flow and pressure.
- Allow Full Hardening Time: Patience is a virtue here! Allow the decorated Frankenstein pretzels to sit undisturbed at room temperature until the chocolate is fully hardened and firm to the touch. This can take about 15-30 minutes. You can speed up the setting process by carefully placing the baking sheet in the refrigerator for 5-10 minutes, though be aware that condensation can sometimes form on the chocolate in humid environments.
Creative Variations & Customizations for Your Spooky Treats
While Frankenstein pretzels are incredibly charming on their own, don’t hesitate to get creative and customize them! Here are a few ideas to spark your imagination and make your Halloween treats even more unique:
- Other Monster Friends: Use this same technique with different colored candy melts to create a whole host of monster friends. White candy melts are perfect for ghosts, orange for pumpkins, purple for witches, or even blue for a swamp monster. The square pretzel base is incredibly versatile for various character shapes.
- Sprinkle Swap: Instead of traditional brown sprinkles for Frankenstein’s hair, try black sanding sugar for a different texture, shredded coconut dyed green for a more “mossy” look, or even green edible glitter for an extra spooky sparkle and shimmer.
- Flavor Boost: For an unexpected twist, add a drop or two of food-grade flavoring extract (like peppermint, almond, or even a hint of rum extract for adult parties) to your green candy melts before dipping. Always use oil-based extracts, as water-based ones can cause candy melts to seize.
- Mini Bites: If square pretzels are hard to find in your local store, you can still use mini pretzel twists or pretzel rods for a different take. While you might not achieve the classic Frankenstein head shape, you can still dip them in green and add black and red details for a fun monster-themed treat on a stick.
- Edible Decorations: Beyond sprinkles and candy eyeballs, consider other small edible decorations. Mini chocolate chips can be used for pupils, or small colored candies for buttons or tiny scars.
- Display Fun: Arrange your finished Frankenstein pretzels on a spooky-themed platter alongside other Halloween snacks. You can also individually wrap them in clear cellophane bags with festive orange or black ties for adorable party favors or classroom treats.
Serving and Storage Tips for Your Frankenstein Pretzels
These Frankenstein Pretzels are best enjoyed fresh, but they also store beautifully for several days, making them perfect for preparing in advance for your Halloween festivities.
- Serving: Once completely hardened, carefully arrange your delightful Frankenstein pretzels on a decorative Halloween platter. They make a fantastic centerpiece for a dessert table or a charming addition to a school bake sale. Pair them with other themed treats like Melted Witch Brownies or Bubbling Witch’s Cauldron Brownies for a truly impressive spread.
- Storage: To maintain their freshness and crispness, store the completely hardened Frankenstein pretzels in an airtight container at room temperature. They will remain fresh and delicious for up to one week. It’s generally best to avoid refrigeration if possible, as it can sometimes cause condensation to form on the candy melt coating, which might affect its appearance and texture.
- Gifting: For a thoughtful Halloween gesture, pack a few Frankensteins into small treat bags, tie them with an orange, black, or purple ribbon, and hand them out as festive gifts to neighbors, friends, or teachers.
Frequently Asked Questions About Making Frankenstein Pretzels
- Can I use regular chocolate chips instead of candy melts?
- While you can melt regular chocolate chips, they don’t always behave the same way as candy melts. Chocolate chips often require a process called tempering to achieve a smooth, shiny finish that hardens well at room temperature without blooming (developing white streaks). Candy melts, on the other hand, are specifically formulated to melt easily and set quickly without tempering, making them much more forgiving and ideal for this type of decorative project.
- My candy melts are too thick to dip. What should I do?
- If your candy melts are too thick, they can be challenging to work with. To thin them out, add a small amount of vegetable shortening (like Crisco) or a specialized “EZ-Thin” product designed for candy melts. Start with just 1/2 teaspoon and stir it in thoroughly. Continue adding tiny amounts (1/4 teaspoon at a time) and stirring until you reach the desired smooth, dippable consistency. Be extremely careful not to add water or any water-based liquids, as even a drop can cause the chocolate to seize and become unusable.
- How long do these Frankenstein pretzels last?
- When stored correctly in an airtight container at room temperature, these delightful Frankenstein pretzels will stay fresh, crisp, and delicious for up to a week. The candy melt coating helps to seal and protect the pretzels, preventing them from going stale quickly.
- Can I make these Frankenstein pretzels ahead of time for a party?
- Absolutely! These treats are perfect for making a day or two in advance of your Halloween party, school event, or family gathering. Just ensure they are fully set and hardened before carefully transferring them to an airtight container for storage.
- What if I can’t find square or waffle pretzels?
- While square or waffle pretzels provide the absolute best “head” shape for Frankenstein, you can still get creative if you can’t find them. You can use mini pretzel twists or even pretzel rods for a different take. You might not achieve the exact classic Frankenstein head, but you can still dip them in green candy melts and add black and red details for a fun, monster-themed treat.
They turned out ridiculously adorable! A little labor intensive, but so worth it! I brought them to a Halloween movie night! Thanks!
-Kara
More Spooktacular Halloween Treat Ideas to Explore
Looking for more festive treats to complement your Frankenstein Pretzels and complete your Halloween spread? Explore these other fantastic Halloween recipes that are sure to delight your guests and family:
- Ghost Popcorn Balls
- Melted Witch Brownies
- Spider Rice Krispie Treats
- Bubbling Witch’s Cauldron Brownies
Tap stars to rate!
Frankenstein Pretzels
Beth
15 minutes
30 minutes
24
servings
Equipment
-
Candy Melting Pot (optional, but recommended for larger batches)
-
Squeeze Bottles (or Ziploc bags)
-
Small Pot or Microwave-Safe Bowls (for melting)
-
Baking Sheet with Silicone Mat or Wax Paper
-
Fork and Toothpicks
Ingredients
- Square or waffle pretzels
- Green candy melts
- Black candy melts
- Red candy melts
- 1-2 teaspoons vegetable shortening (to thin candy melts)
- Brown sprinkles
- Candy eyeballs (or white and black candy melts for DIY eyes)
- Broken pretzel sticks (for Frankenstein’s bolts)
Instructions
-
Prepare Green Candy Melts: In a small pot over very low heat on the stove (or using a microwave in 30-second intervals, stirring between each), melt the green candy melts with 1-2 teaspoons of vegetable shortening. Stir occasionally until the mixture is completely smooth and liquid enough for dipping. The shortening helps thin the candy for a smooth, even coating.
-
Set Up Work Area: Line a baking sheet with a silicone baking mat or wax paper and place it near your melted green chocolate. Have your pretzels, sprinkles, candy eyeballs, and broken pretzel sticks ready and within reach.
-
Dip Pretzels: Dip one square or waffle pretzel into the melted green candy melts at a time, ensuring it’s fully coated. Use a fork to carefully lift the dipped pretzel out of the chocolate.
-
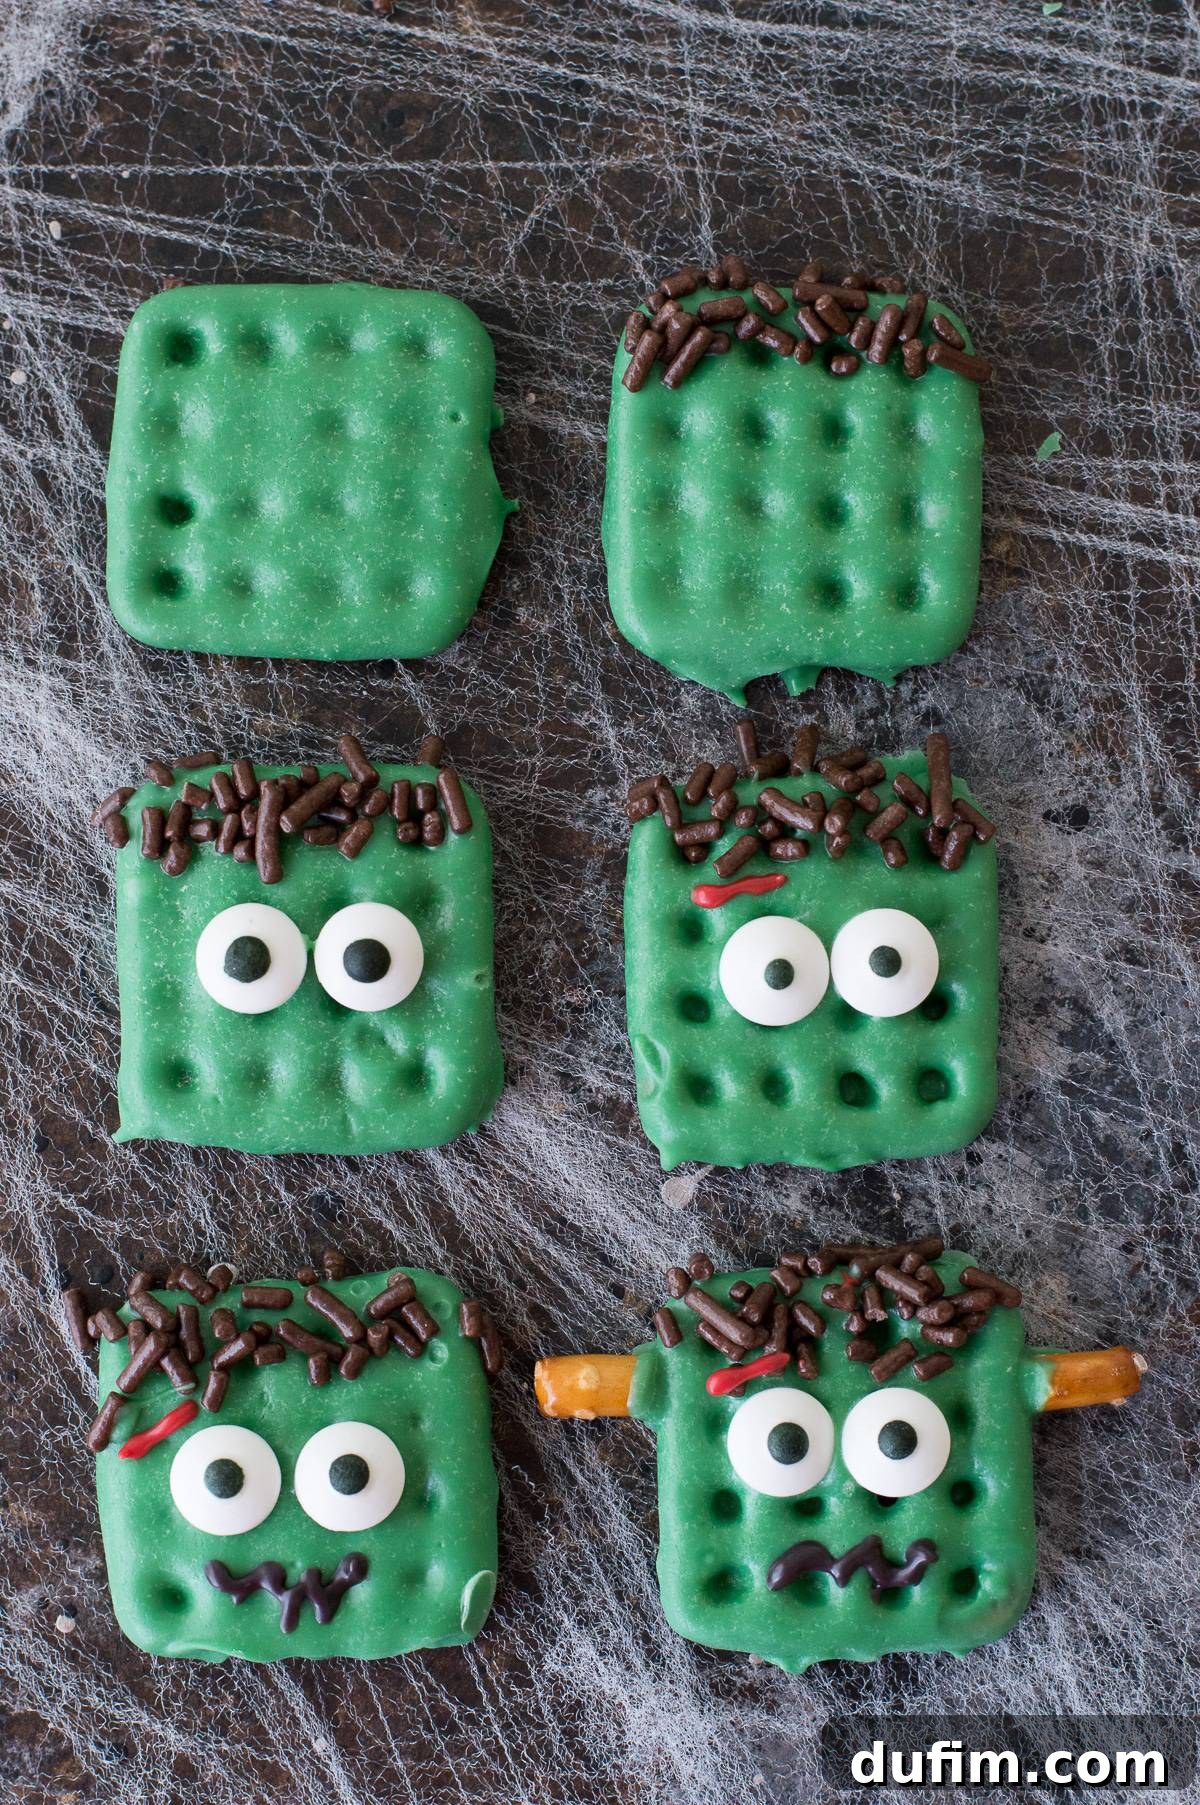
Remove Excess & Decorate: Gently tap the fork against the side of the pot to allow any excess green chocolate to drip off. Scrape the bottom of the fork on the edge of the pot for a cleaner finish. Using a toothpick to assist, gently slide the green-dipped pretzel from the fork onto the prepared baking sheet. Work quickly in small batches (3-5 pretzels at a time). Before the green chocolate sets, immediately place brown sprinkles on top for hair, add candy eyeballs, and insert broken pretzel sticks on the sides for Frankenstein’s iconic bolts. Repeat until all pretzels are dipped and decorated with hair, eyes, and bolts.
-
Add Facial Details: Once the green chocolate on all pretzels has partially set, melt your red and black candy melts in separate small pots or microwave-safe bowls (adding a touch of shortening if needed for consistency). Using squeeze bottles or Ziploc bags with tiny snips, pipe small black mouths and red stitched scars onto each Frankenstein’s face. If you opted to make DIY eyes, now is the time to pipe tiny black dots for pupils onto the white bases.
-
Harden & Serve: Allow all the chocolate details to harden completely. This can be done at room temperature for about 15-30 minutes, or you can place the baking sheet in the refrigerator for 5-10 minutes to speed up the setting process. Once firm, carefully remove them from the baking sheet and serve your adorable Frankenstein Pretzels!
Notes
Nutrition
Calories:
25
kcal
|
Carbohydrates:
3
g
|
Protein:
1
g
|
Fat:
1
g
|
Saturated Fat:
1
g
|
Polyunsaturated Fat:
1
g
|
Monounsaturated Fat:
1
g
|
Sodium:
17
mg
|
Potassium:
1
mg
|
Fiber:
1
g
|
Sugar:
3
g
|
Calcium:
1
mg
|
Iron:
1
mg
Nutrition Disclosure
All nutritional values are approximate and provided to the reader as a courtesy. Changing ingredients and/or quantities will alter the estimated nutritional calculations.
Did you love this recipe? Please rate and leave a comment below!