
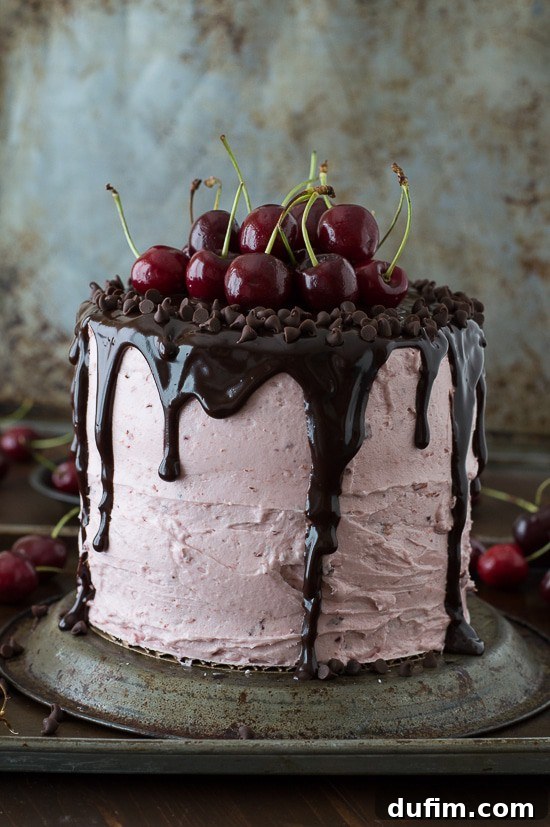
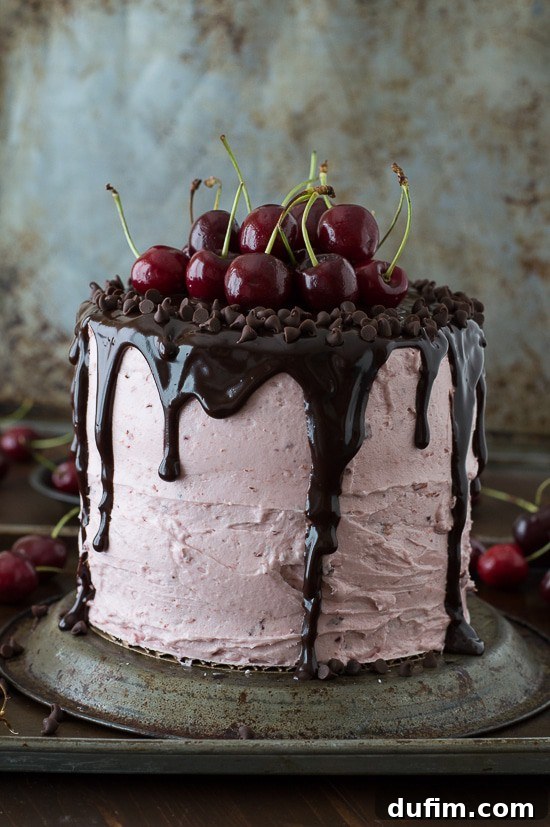
Indulge in Pure Delight: The Ultimate Fresh Cherry Cake with Rich Chocolate Ganache
There’s a special kind of magic in seasonal baking, and when cherries are in abundance, it’s a call to create something truly spectacular. This fresh cherry cake with chocolate ganache isn’t just a dessert; it’s a celebration of flavors, combining light, fluffy white cake layers with a vibrant cherry buttercream, packed with real chopped cherries, and crowned with a decadent chocolate ganache. It’s a dessert that promises to impress, whether for a special occasion or simply to treat yourself to an exquisite homemade delight. But before we dive into the delicious details, let’s address a common baking conundrum: the beloved yet often challenging cherry.
The Sweet Struggle: Mastering Cherry Pitting for Your Cake
Cherries hold a unique place in the culinary world – they are both a baker’s best friend and, at times, a formidable nemesis. Popping a fresh cherry into your mouth and spitting out the pit is pure, unadulterated joy. However, when a recipe calls for pitted cherries that need to remain somewhat intact for a beautiful filling, the task can quickly turn challenging. We’ve all been there, covered in sticky cherry juice, wishing for a simpler solution. The thought of investing in a dedicated cherry pitter often crosses the mind, but for many, it feels like an unnecessary kitchen gadget destined to gather dust for most of the year. Especially for those of us with compact kitchen spaces, every appliance must earn its keep!
The good news is, you don’t need a fancy gadget to effectively pit cherries for your cherry cake recipe. There are several clever, common household item methods that work wonderfully. My usual approach involves simply cutting the cherry in half and then carefully digging out the pit with a small knife or spoon. It’s effective but can be a bit messy. My partner, Ryan, favors a more precise technique: he cuts around the pit four times, essentially creating a square or rectangle of cherry flesh around the stone. Both methods achieve the goal, but sometimes, a bit of innovation can save time and reduce mess.
Clever DIY Cherry Pitting Techniques You Need to Try
Before embarking on this delightful chocolate cherry cake project, I explored various inventive ways to pit cherries without a specialized tool. It turns out, the internet is a treasure trove of brilliant hacks! Here are some of the most effective and surprising methods I discovered, which I highly recommend for your next baking adventure:
- The Paper Clip Method: This is surprisingly effective. Unbend a standard paper clip into an ‘S’ shape. Use the larger, curved end to gently hook into the cherry where the stem was. Guide it around the pit, and with a slight twist, you can usually pop the pit right out, leaving the cherry mostly intact. This method is great for preserving the cherry’s shape for garnishes.
- The Bottle and Skewer/Chopstick Trick: This ingenious method is a game-changer. Place a cherry stem-side-up on the mouth of a narrow-necked bottle (like an empty soda bottle or glass beer bottle). Then, using a sturdy skewer or a chopstick, push directly down on the stem indentation. The pit will fall cleanly into the bottle, leaving a perfectly pitted cherry on top. This technique is incredibly efficient for processing large batches of cherries.
- The Piping Tip Technique: If you’re a baker, you likely have piping tips. Choose a small, round piping tip (like a Wilton 1A or 12). Insert the narrow end of the piping tip into the cherry where the stem was. Push it through until the pit is extracted through the wider end of the tip. This creates a neat hole and quickly removes the pit.
I’m particularly excited to try the bottle and skewer method next time I make this cherry cake with chocolate ganache. It seems like the quickest and cleanest way to prepare the fruit without the need for another kitchen appliance cluttering up my tiny home. Experiment with these methods to find your favorite, and you’ll find that fresh cherry recipes become a joy, not a chore!
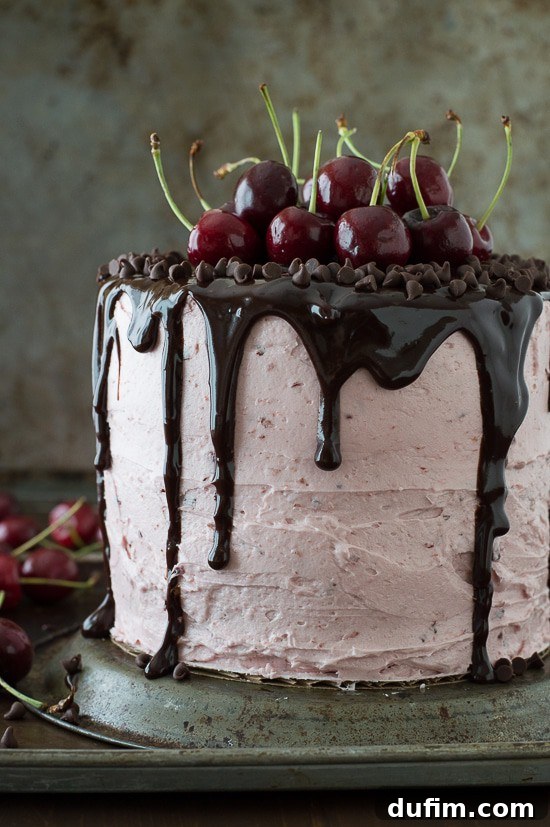
Crafting Your Masterpiece: A Step-by-Step Guide to the Fresh Cherry Cake
Creating this stunning fresh cherry cake is a rewarding process that can be broken down into four manageable steps: baking the cake layers, filling, frosting, and garnishing. Each stage contributes to the final masterpiece, ensuring a delightful visual and taste experience. For those new to baking, or anyone looking to perfect their technique, we have dedicated resources to guide you. Be sure to check out our comprehensive tutorial on how to bake a cake, and keep an eye out for our upcoming guide on mastering homemade buttercream. These tutorials are invaluable tools to help you achieve bakery-quality results in your own kitchen.
Step 1: Baking the Perfect White Cake Layers
The foundation of any great layer cake is, of course, perfectly baked, level cake layers. For this white cake recipe, I highly recommend using a homemade bake-even strip. These strips, made from a wet towel or fabric wrapped around your cake pan, help the cake layers bake evenly, preventing doming and ensuring a flat surface ideal for stacking. Simply cut a strip of towel or old t-shirt fabric to fit around your pan, get it thoroughly wet (but not dripping), and secure it with a safety pin. This simple trick makes a significant difference in the final appearance and structure of your cake.
Ensuring your ingredients are at room temperature, carefully mixing your batter without overworking it, and baking until a toothpick comes out clean are all crucial steps. Once baked, allow your cake layers to cool completely on a wire rack before handling. This prevents crumbling and ensures the cake is sturdy enough to withstand the filling and frosting process. Properly cooled and leveled cakes are the secret to a professional-looking finish.
Step 2: Layering the Delicious Cherry Filling
Once your cake layers are cool and ready, it’s time to assemble the cake with its vibrant cherry buttercream filling. This step is where the cake truly comes alive with the flavor of fresh cherries. To begin, place your first cake layer on a cardboard cake circle. A small smear of buttercream on the circle acts as an adhesive, preventing your cake from sliding around during assembly and transportation. Then, generously spread your homemade cherry buttercream over the first layer. The key here is an even coating, preparing for the star of the show: the chopped cherries.
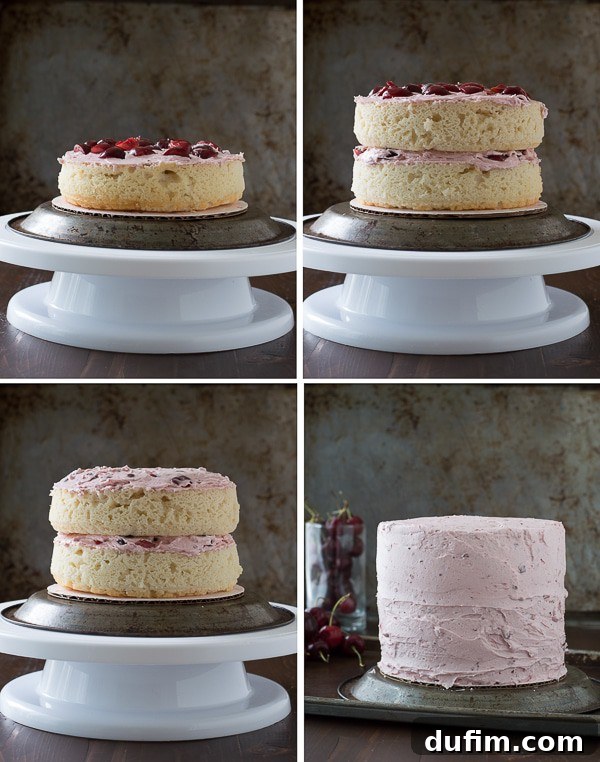
Scatter a handful of your freshly chopped cherries evenly across the buttercream. These little bursts of flavor are what make this cherry layer cake so special. After distributing the cherries, carefully add a bit more buttercream on top of them. This extra layer serves a critical purpose: it helps to “seal in” the cherries, creating a protective barrier that prevents their vibrant juice from seeping into the white cake layers and potentially staining them. This ensures your cake maintains its beautiful appearance and distinct layers. For consistent and beautiful layers, a helpful tip is to measure the amount of buttercream you use between each layer. For example, using ¼ cup of buttercream for each layer will ensure uniform height and distribution throughout the cake.
Step 3: Flawless Frosting with Cherry Buttercream
Now for the satisfying step of frosting your cake. Apply an even, generous coat of your delectable cherry buttercream to both the sides and the top of the cake. Don’t be shy with the frosting here; a good amount ensures a smooth finish and a delicious eating experience. The first layer of frosting should be a “crumb coat” – a thin layer designed to trap any loose cake crumbs, preventing them from mixing into your final, pristine outer layer of frosting. This is a crucial step for a professional-looking cake. After applying the crumb coat, place the cake in the refrigerator for 20-30 minutes to chill. This allows the crumb coat to firm up, making it much easier to apply the final, thicker layer of frosting smoothly and without picking up crumbs. Once chilled, apply the second, thicker coat of buttercream, aiming for the smoothest possible finish. Another brief chill after this step can further set the frosting, preparing it for the final touches.
Step 4: The Grand Finale – Drizzling and Garnishing with Chocolate Ganache
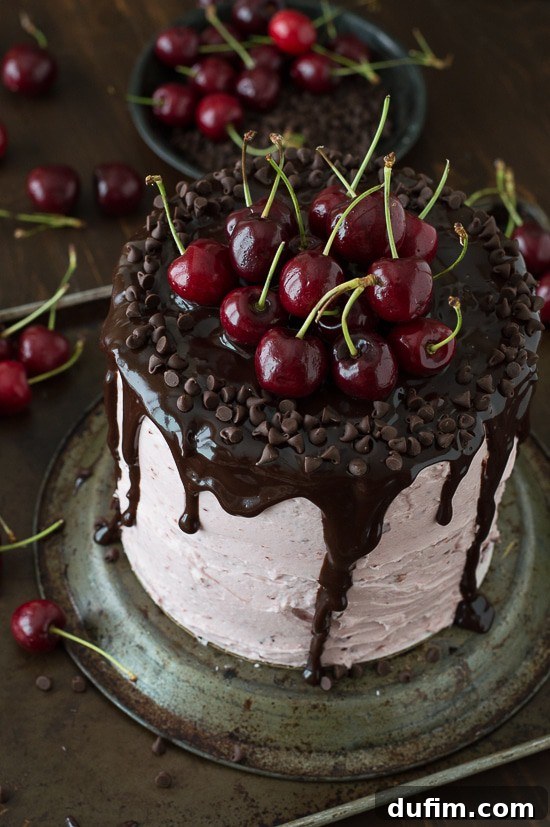
The final step brings all the elements together: garnishing your fresh cherry cake with luxurious chocolate ganache and additional fresh cherries. Ensure your ganache has cooled to room temperature; this ensures it’s the perfect consistency for drizzling without melting the buttercream. Using a spoon, carefully drizzle the ganache around the edges of the chilled cake, allowing it to gracefully drip down the sides, creating an elegant visual effect. Once the edges are adorned, fill in the middle of the cake with more ganache, using the back of your spoon to spread it smoothly and evenly. Allow the ganache to set for about 10-15 minutes, giving it a chance to firm up slightly.
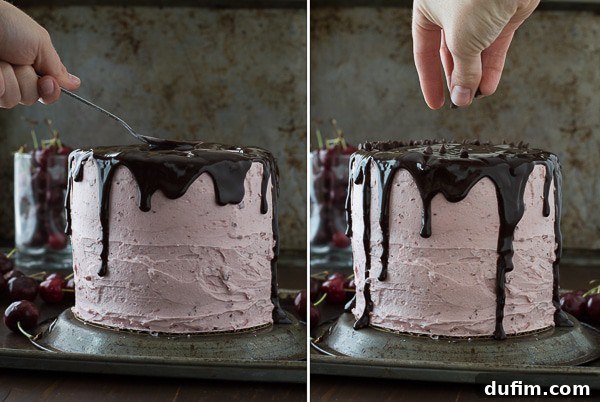
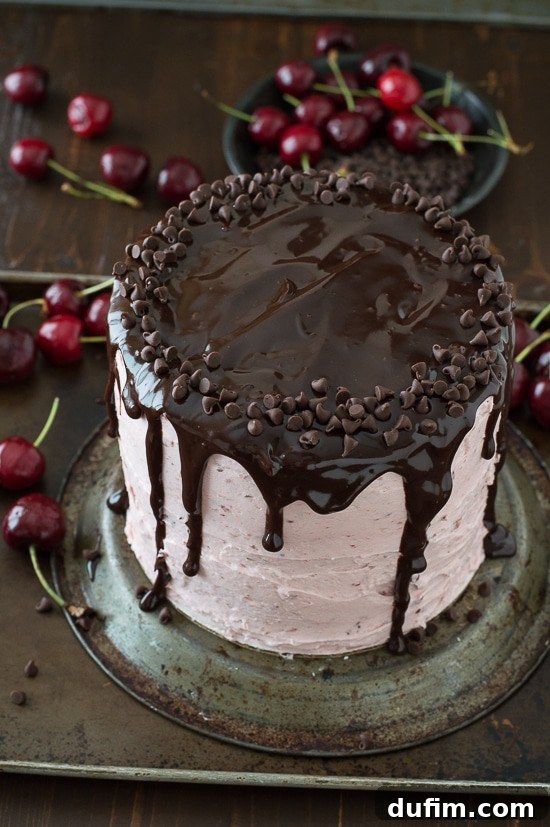
To complete the look, sprinkle mini chocolate chips around the outer edge of the ganache-covered top. These add a delightful textural contrast and reinforce the classic chocolate and cherry flavor combination. Finally, artfully arrange a cluster of fresh, whole cherries in the center of the cake. The vibrant red of the fresh cherries against the dark chocolate ganache and light buttercream is absolutely captivating, making this cake not just a dessert but a stunning centerpiece. This careful garnishing transforms your homemade cake into a professional-level dessert that will be the highlight of any gathering.
Fresh Cherry Cake with Chocolate Ganache Recipe
Tap stars to rate!
Fresh Cherry Cake with Chocolate Ganache
Rate
Equipment
-
Glass Mixing Bowl
-
KitchenAid 9-Speed Mixer
-
My favorite spatula!
-
Kitchen Scale
Ingredients
White Cake (repeat this recipe for each layer – that way you can decide how many layers you want)
- 3 Tbsp (43g) butter, softened
- 5 ½ Tbsp (68g) sugar
- 1 ½ large egg whites
- ¼ cup (57g) sour cream
- ½ tsp vanilla extract
- ½ cup + 1 Tbsp (68g) all purpose flour
- ¾ tsp baking powder
- ¼ tsp salt
Cherry Buttercream (this recipe makes enough frosting for a 3 layer cake)
- 1 cup (226g) butter, 2 sticks
- ½ cup (118ml) vegetable shortening
- 1 tsp vanilla extract
- 7 cups (791g) powdered sugar
- ½ cup cherry puree
- ¼ cup (40g) chopped cherries, to go in-between each layer
Chocolate Ganache
- ½ cup (85g) chocolate chips
- ¼ cup (59ml) heavy cream
To top the cake
- Mini chocolate chips
- Cherries
Instructions
White Cake
-
Preheat the oven to 350º F (175°C).
-
Prepare a 6-inch round cake pan or springform pan by greasing the bottom and sides with butter. Line the bottom with a round piece of parchment paper to prevent sticking. For perfectly level cakes, create a homemade bake-even strip: cut a towel or shirt to fit your pan’s circumference, thoroughly wet it (squeezing out excess water but leaving it damp), and secure it around the pan with a safety pin. This helps the cake bake evenly and prevents doming.
-
In a large mixing bowl, combine the softened butter and granulated sugar. Using an electric mixer, beat on medium speed until the mixture is light and fluffy, about 2-3 minutes. Gradually add the egg whites, beating well after each addition until fully incorporated and smooth.3 Tbsp (43g) butter, 5 1/2 Tbsp (68g) sugar, 1 1/2 large egg whites
-
Fold in the sour cream and vanilla extract until the mixture is completely smooth and well combined. Ensure there are no lumps.1/4 cup (57g) sour cream, 1/2 tsp vanilla extract
-
In a separate, smaller bowl, whisk together the all-purpose flour, baking powder, and salt. Gradually add half of this dry mixture to the wet ingredients, gently folding it in with a spatula until just combined. Avoid overmixing, as this can lead to a tough cake. Repeat with the remaining half of the flour mixture, scraping the sides and bottom of the bowl to ensure all ingredients are thoroughly incorporated. Pour the batter into the prepared cake pan, spreading it evenly with a spatula.1/2 cup + 1 Tbsp (68g) all purpose flour, 3/4 tsp baking powder, 1/4 tsp salt
-
Bake for 23-25 minutes, or until a wooden toothpick inserted into the center of the cake comes out clean. Baking times may vary slightly depending on your oven.
-
Once baked, allow the cake to cool in the pan on a wire cooling rack for 10 minutes. After 10 minutes, carefully invert the cake onto the cooling rack and remove it from the pan. If using a springform pan, simply release the sides and bottom. Allow the cake to cool completely before proceeding. Once cool, remove the parchment paper from the bottom. If your cake has a slight dome, use a serrated knife or a cake leveler to carefully level the top, creating a flat surface for stacking. Wrap the completely cooled cake layers tightly in plastic wrap and refrigerate. This ensures the cake remains moist and firm, and can be stored for up to one week.
Cherry Buttercream
-
Begin by preparing your cherry puree. Pit enough fresh cherries to yield approximately ½ cup of puree. Place the pitted cherries into a blender or food processor and blend until completely smooth. Measure out ½ cup of this vibrant cherry puree and set it aside for later use in the buttercream.
-
In a large mixing bowl, combine the softened butter and vegetable shortening. Using an electric mixer, beat on medium-high speed for about 2 minutes, until the mixture is light, fluffy, and well aerated. Scrape down the sides of the bowl as needed to ensure even mixing.1 cup (226g) butter, 1/2 cup (118ml) vegetable shortening
-
Add the vanilla extract and the reserved ½ cup of cherry puree to the butter mixture. Beat again with the electric mixer until these wet ingredients are fully incorporated and the mixture is smooth and fragrant. The puree will give the buttercream a beautiful, natural pink hue and a burst of cherry flavor.1 tsp vanilla extract, 1/2 cup cherry puree
-
Gradually begin adding the powdered sugar, about 1-2 cups at a time. It’s best to start by mixing gently by hand with a spatula to prevent a “sugar cloud,” then switch to the electric mixer on low speed. Continue adding powdered sugar until the frosting reaches your desired consistency for spreading and piping, and tastes perfectly sweet with a lovely cherry flavor. Adjust the amount of powdered sugar to achieve a firm yet spreadable buttercream.7 cups (791g) powdered sugar
Chocolate Ganache
-
Place the chocolate chips in a medium-sized, heat-proof bowl. Ensure the bowl is completely dry to prevent the chocolate from seizing.1/2 cup (85g) chocolate chips
-
In a small saucepan over low heat, gently warm the heavy cream until it just begins to simmer around the edges, but do not allow it to boil vigorously. The goal is hot, but not boiling, cream.1/4 cup (59ml) heavy cream
-
Immediately pour the hot heavy cream over the chocolate chips in the heat-proof bowl. Let the mixture stand undisturbed for 1-2 minutes. This allows the heat from the cream to melt the chocolate chips thoroughly.
-
After the standing time, use a spatula or whisk to gently stir the mixture starting from the center and working your way out, until it becomes completely smooth, glossy, and uniform. Continue stirring until all chocolate is melted and fully emulsified.
-
Allow the ganache to cool to room temperature before applying it to the cake. It should be thick enough to drizzle but still fluid. If it’s too thick, gently warm it slightly; if too thin, let it cool longer.
To assemble the cake
-
Place a small dollop of buttercream onto a 6-inch round cardboard cake circle to act as an adhesive. Center your first cooled cake layer on the cardboard. Spread your desired amount of cherry buttercream evenly over this layer using an offset spatula. You can choose a thinner or thicker layer of frosting based on your preference for each tier.
-
Arrange the chopped cherries evenly over the buttercream, extending almost to the edge. This ensures every slice gets a burst of fresh cherry flavor.1/4 cup (40g) chopped cherries
-
Add another thin layer of buttercream directly on top of the chopped cherries. This crucial step helps to encase the cherries, preventing their juices from bleeding into the cake layers and maintaining a clean look, while also stabilizing the filling.
-
Repeat this layering process with your remaining cake layers, alternating between cake, buttercream, and chopped cherries. Once all layers are stacked, apply a thin “crumb coat” of buttercream around the sides and top of the entire cake using an offset spatula. The crumb coat acts as a sealant, trapping loose cake crumbs and providing a smooth base for your final frosting layer. It’s often easier to apply a little more frosting than needed and then smooth it down, scraping off the excess.
-
Transfer the entire cake to the refrigerator and chill for at least 20 minutes. This allows the crumb coat to firm up, making the final frosting application much easier and cleaner, ensuring no crumbs contaminate your pristine outer layer.
-
After the crumb coat is firm, apply the second, thicker layer of cherry buttercream. Start by frosting the top of the cake, then work your way down the sides, striving for an even and smooth finish. Take your time to achieve the best possible result. Return the cake to the fridge for another 20-30 minutes to allow this final layer of buttercream to set.
-
Once your chocolate ganache has reached room temperature and is of a pourable yet slightly thick consistency, use a spoon to artfully drizzle it around the perimeter of the cake top, allowing gravity to pull beautiful drips down the sides. Then, fill the center of the cake top with the remaining ganache, spreading it smoothly and evenly with the back of the spoon. Let the ganache set for about 10 minutes to firm up slightly.
-
Gently press mini chocolate chips around the outer edge of the cake’s top, just inside the ganache drizzle, creating a lovely border and adding texture.Mini chocolate chips
-
Arrange a cluster of fresh, whole cherries attractively in the very center of the cake, creating a focal point and a final burst of color.Cherries
-
Serve this stunning fresh cherry cake with chocolate ganache and enjoy the sweet rewards of your baking efforts!
Notes
Nutrition
Carbohydrates: 63g |
Protein: 1g |
Fat: 23g |
Saturated Fat: 12g |
Polyunsaturated Fat: 2g |
Monounsaturated Fat: 7g |
Trans Fat: 1g |
Cholesterol: 44mg |
Sodium: 188mg |
Potassium: 39mg |
Fiber: 1g |
Sugar: 58g |
Vitamin A: 498IU |
Vitamin C: 4mg |
Calcium: 24mg |
Iron: 1mg
Nutrition Disclosure
All nutritional values are approximate and provided to the reader as a courtesy. Changing ingredients and/or quantities will alter the estimated nutritional calculations.
Like this recipe? Rate and comment below!