
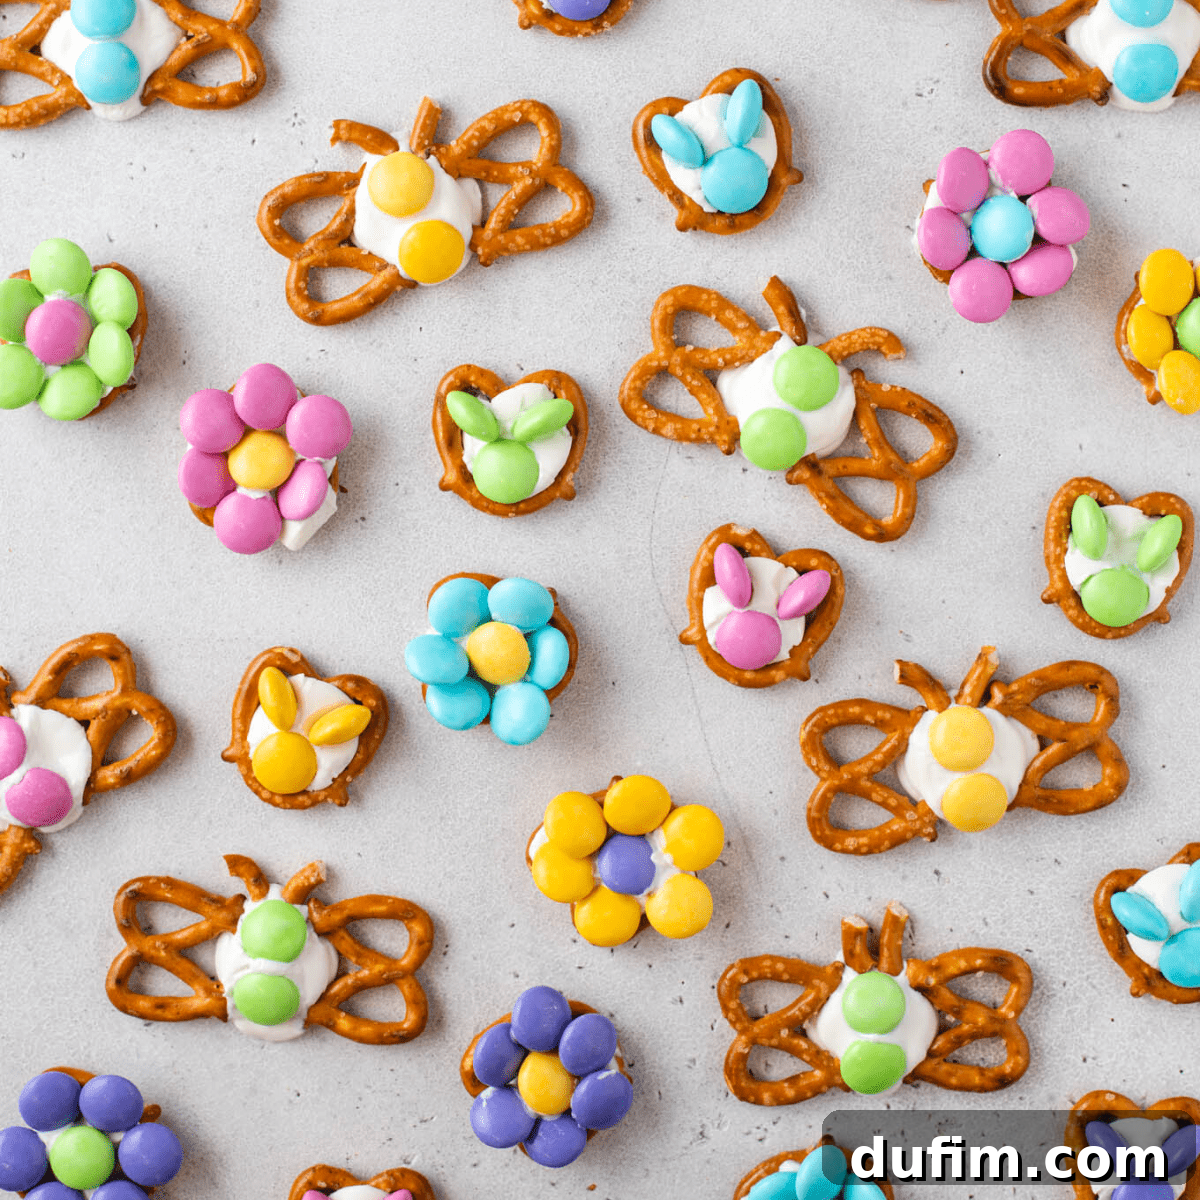
Hop into spring with these delightful Easter pretzels! Crafted with just three simple ingredients—pretzels, candy melts, and M&M’s—you can magically transform ordinary pretzels into adorable bunnies, whimsical butterflies, and vibrant flowers. This recipe offers a super easy and incredibly fun activity for the whole family, perfect for celebrating the Easter season!
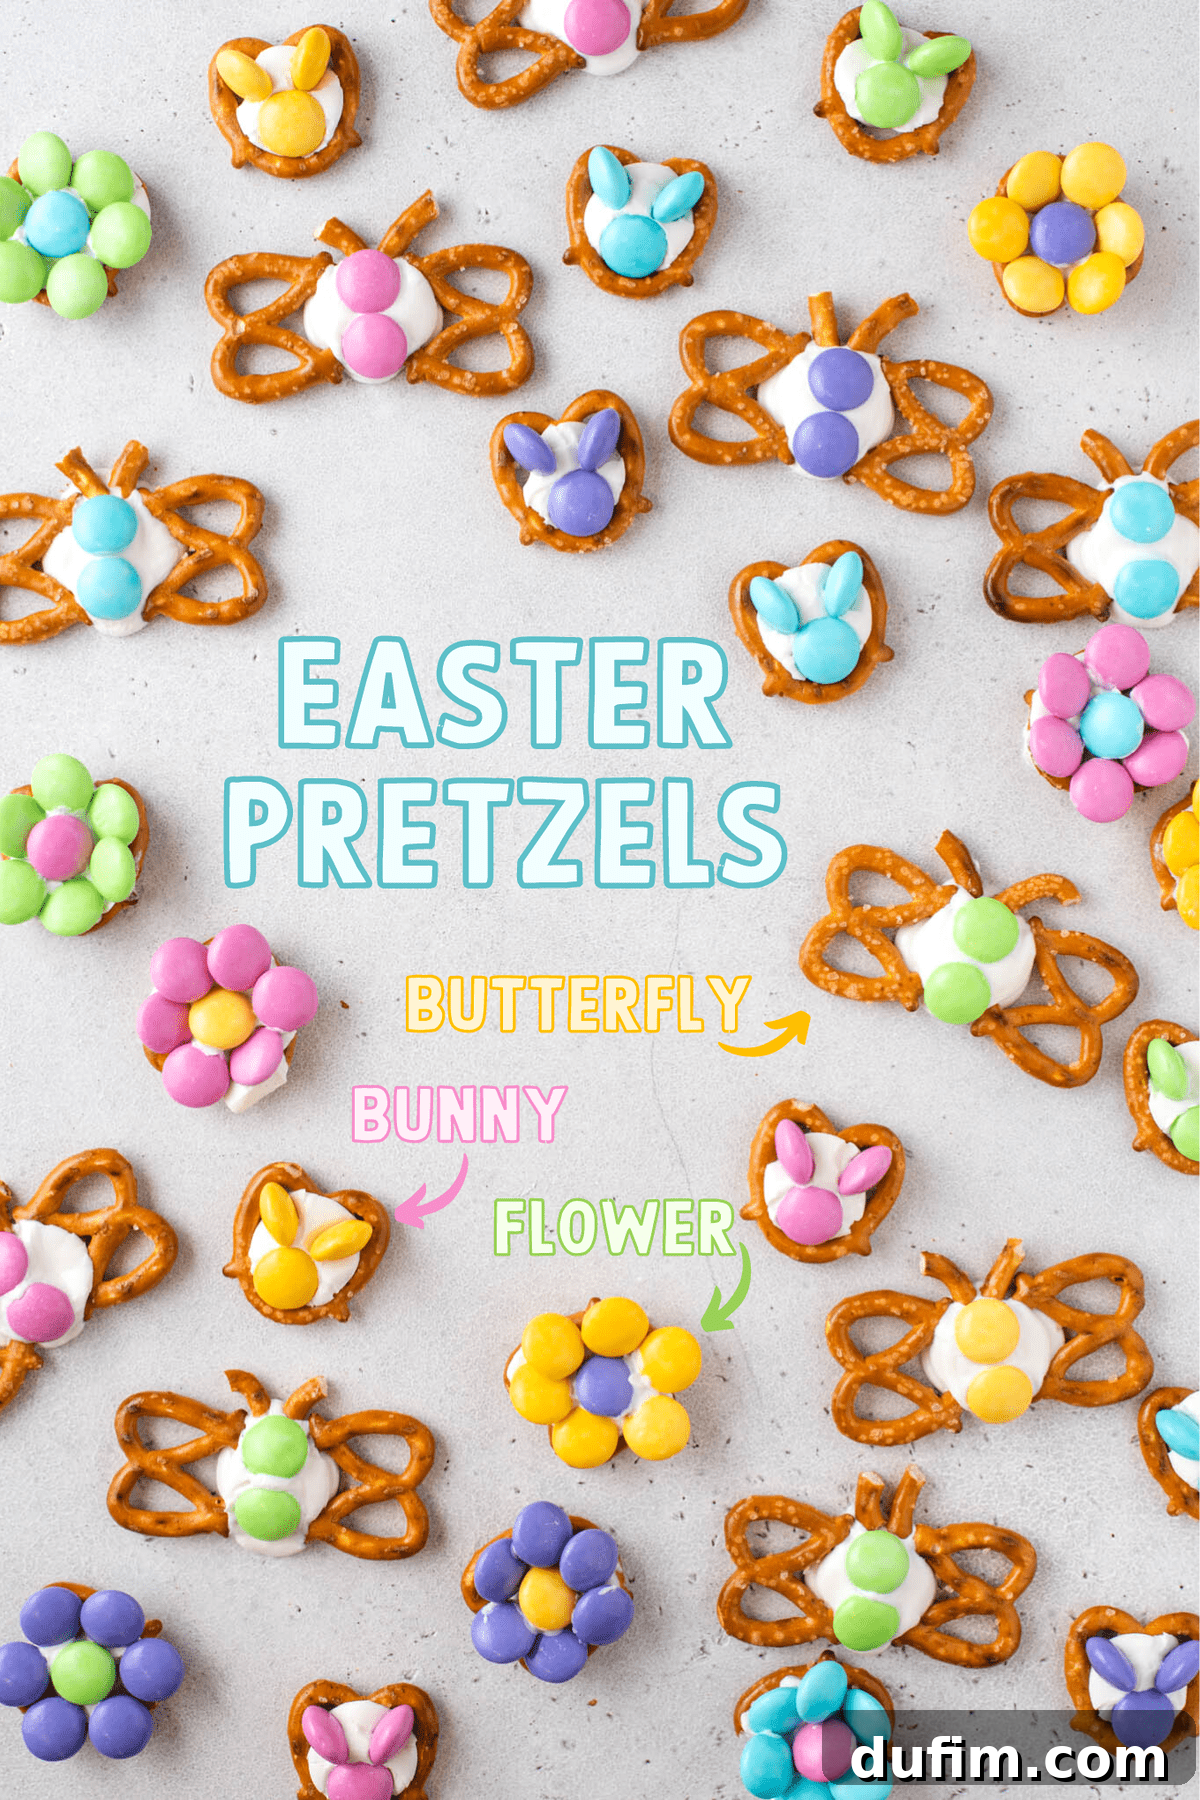
There’s something uniquely special about creating holiday-themed treats, and Easter is no exception. Beyond these charming pretzels, some of our other cherished Easter dessert ideas include festive swimming peeps jello cups and decadent Cadbury creme egg brownies. These recipes bring joy and a touch of seasonal cheer to any gathering.
If your search for an Easter dessert leads you to crave minimal ingredients and maximum impact, these spring-inspired pretzels are your perfect match. They are not only incredibly easy to prepare but also provide a wonderful opportunity for creativity and family bonding in the kitchen.
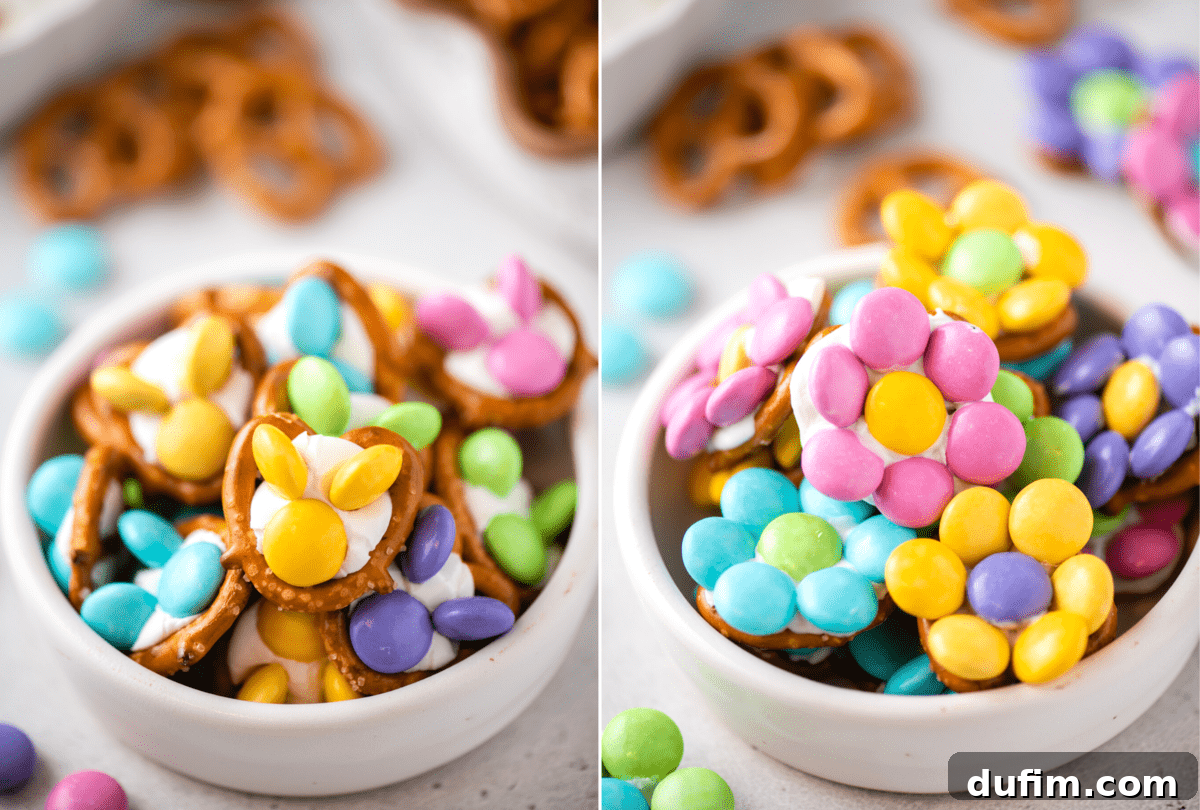
You have the freedom to choose your favorite design from the three adorable variations—bunnies, butterflies, and flowers—or embrace the challenge and make a colorful batch of all three! Each design offers its own unique charm, allowing for personalized Easter gifts or a vibrant display on your dessert table.
Why You’ll Adore These Easy Easter Pretzels
These Easter pretzels aren’t just a treat; they’re an experience! Here’s why they’re destined to become a new family favorite:
- Effortlessly Simple: With only three ingredients and no baking required (beyond a quick melt), this recipe is as straightforward as it gets. Perfect for beginner bakers or a last-minute dessert idea.
- Kid-Friendly Fun: Little hands can easily participate in arranging pretzels, melting candy, and decorating with M&M’s. It’s a fantastic way to engage children in holiday preparations and create lasting memories.
- Customizable Creativity: Explore different candy melt colors, mix and match M&M hues, or even add sprinkles for extra sparkle. Each pretzel becomes a miniature work of art!
- Perfect for Any Occasion: Whether you’re filling Easter baskets, preparing treats for a school party, decorating your Easter brunch table, or simply enjoying a sweet snack, these pretzels fit seamlessly.
- Quick & Convenient: From start to finish, these treats come together in under an hour, making them ideal for busy schedules without compromising on festive charm.
The Magic Trio: Ingredients for Easter Pretzels
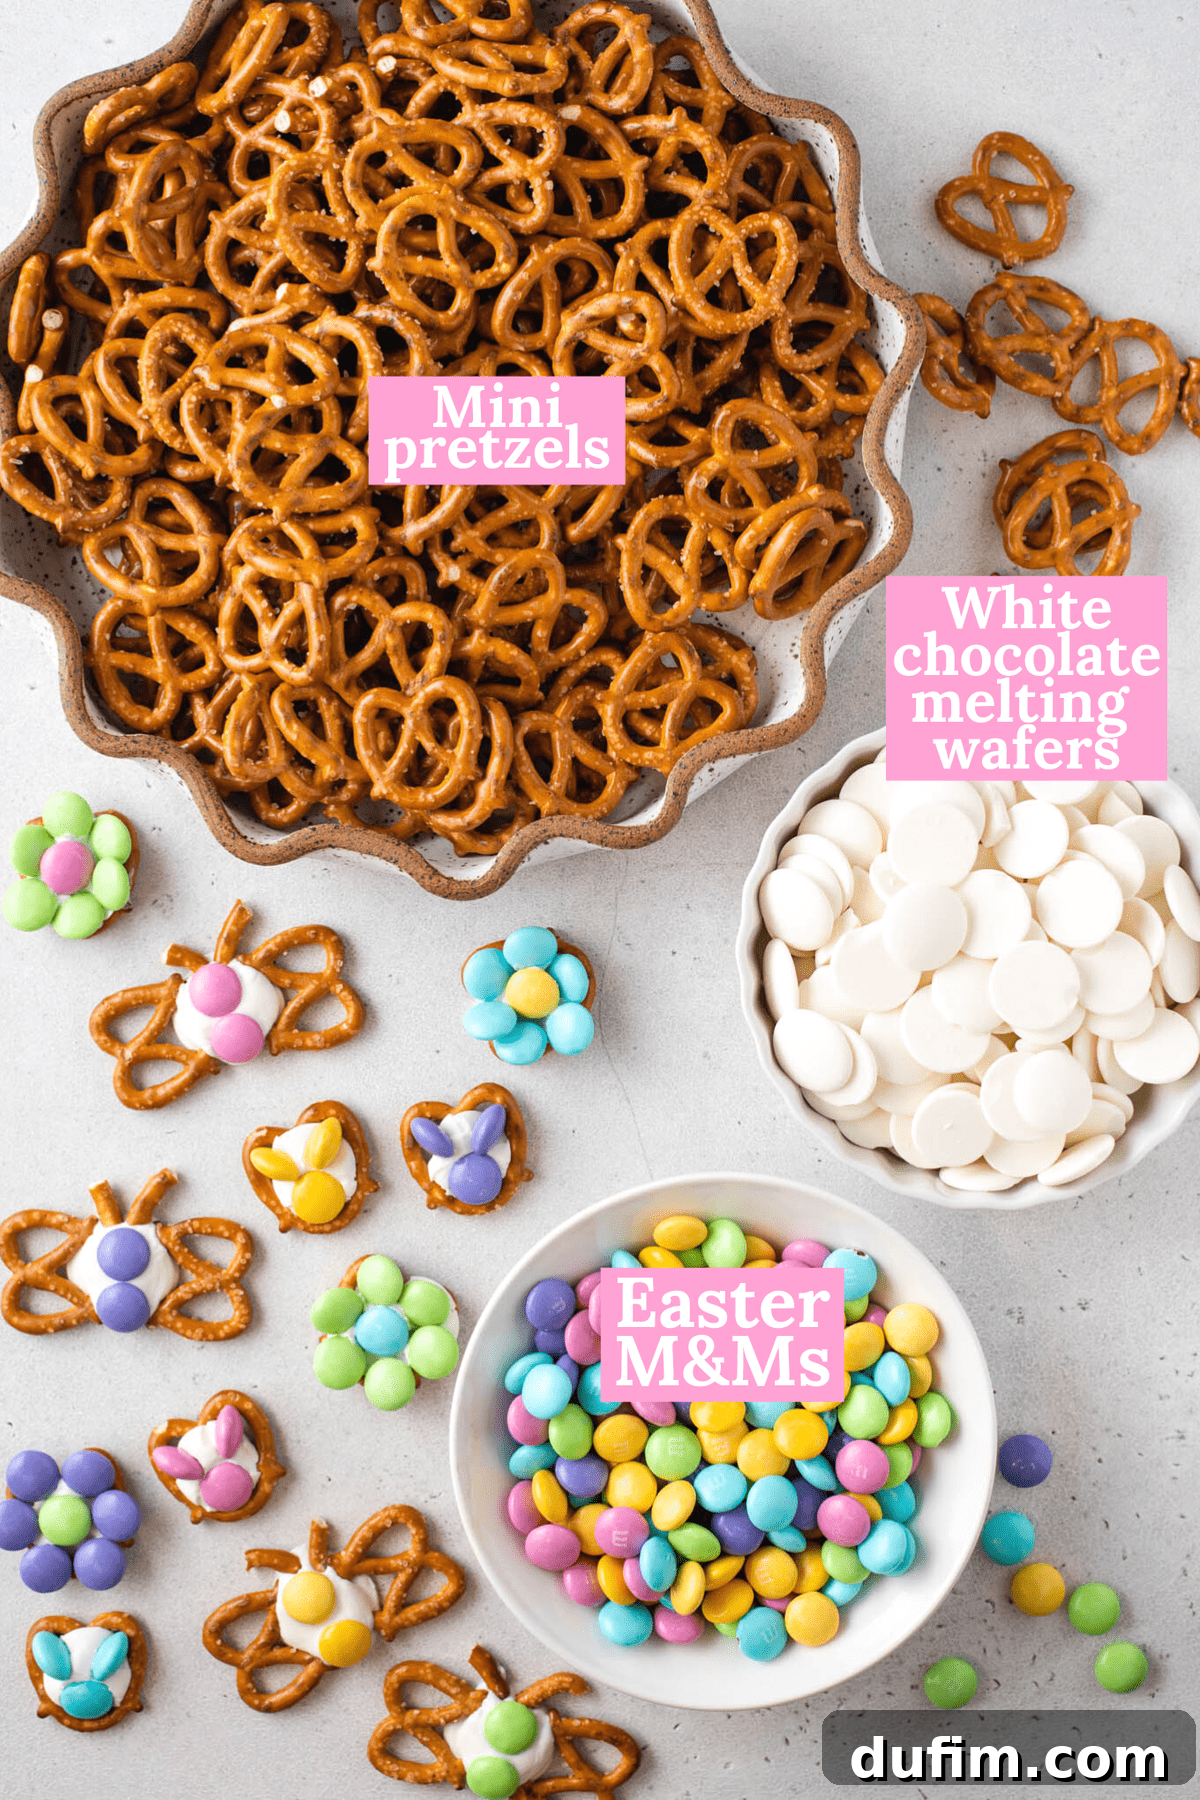
The beauty of this recipe lies in its simplicity. You only need three core ingredients to bring these adorable Easter pretzels to life:
- Pretzels: We recommend using mini pretzels for their perfect size and classic shape, which forms an excellent base for our designs. However, don’t limit yourself! Waffle pretzels or pretzel snaps can also work wonderfully, offering a slightly different texture and aesthetic. For those with dietary restrictions, gluten-free pretzels are an excellent substitute and will yield equally delicious results.
- Candy Melts: These vibrant melting wafers are the key to the colorful coating. Wilton candy melts are widely available in various colors, including bright white, at most major retailers like Meijer and Walmart. They are specifically formulated to melt smoothly and set firmly, providing a beautiful, glossy finish. If you can’t find candy melts, high-quality white chocolate melting wafers are a great alternative. For a more budget-friendly option, white chocolate chips can be used, but you might need to add a teaspoon of coconut oil or vegetable shortening per cup of chocolate to achieve a smoother consistency and prevent seizing when melting.
- Easter M&M’s: The pastel hues of Easter-colored M&M’s truly bring these treats to life. Typically, you can find the special Easter mix in a light blue bag on grocery store shelves shortly after Valentine’s Day. If Easter M&M’s are out of season or unavailable, feel free to get creative! Regular M&M’s, other small pastel candies, colorful sprinkles, or even mini jelly beans can be used to decorate your pretzels.
Essential Equipment for Your Easter Pretzel Project
Gathering your tools before you start will make the process even smoother. You’ll need:
- Baking Sheets: For arranging your pretzels and melted candy.
- Silicone Baking Mat or Parchment Paper: Absolutely essential for easy removal and hassle-free cleanup. This prevents the melted candy from sticking to your baking sheet.
- Microwave-Safe Bowl: If you choose to melt your candy melts in the microwave.
- Spoon or Spatula: For handling the melted candy and placing M&M’s.
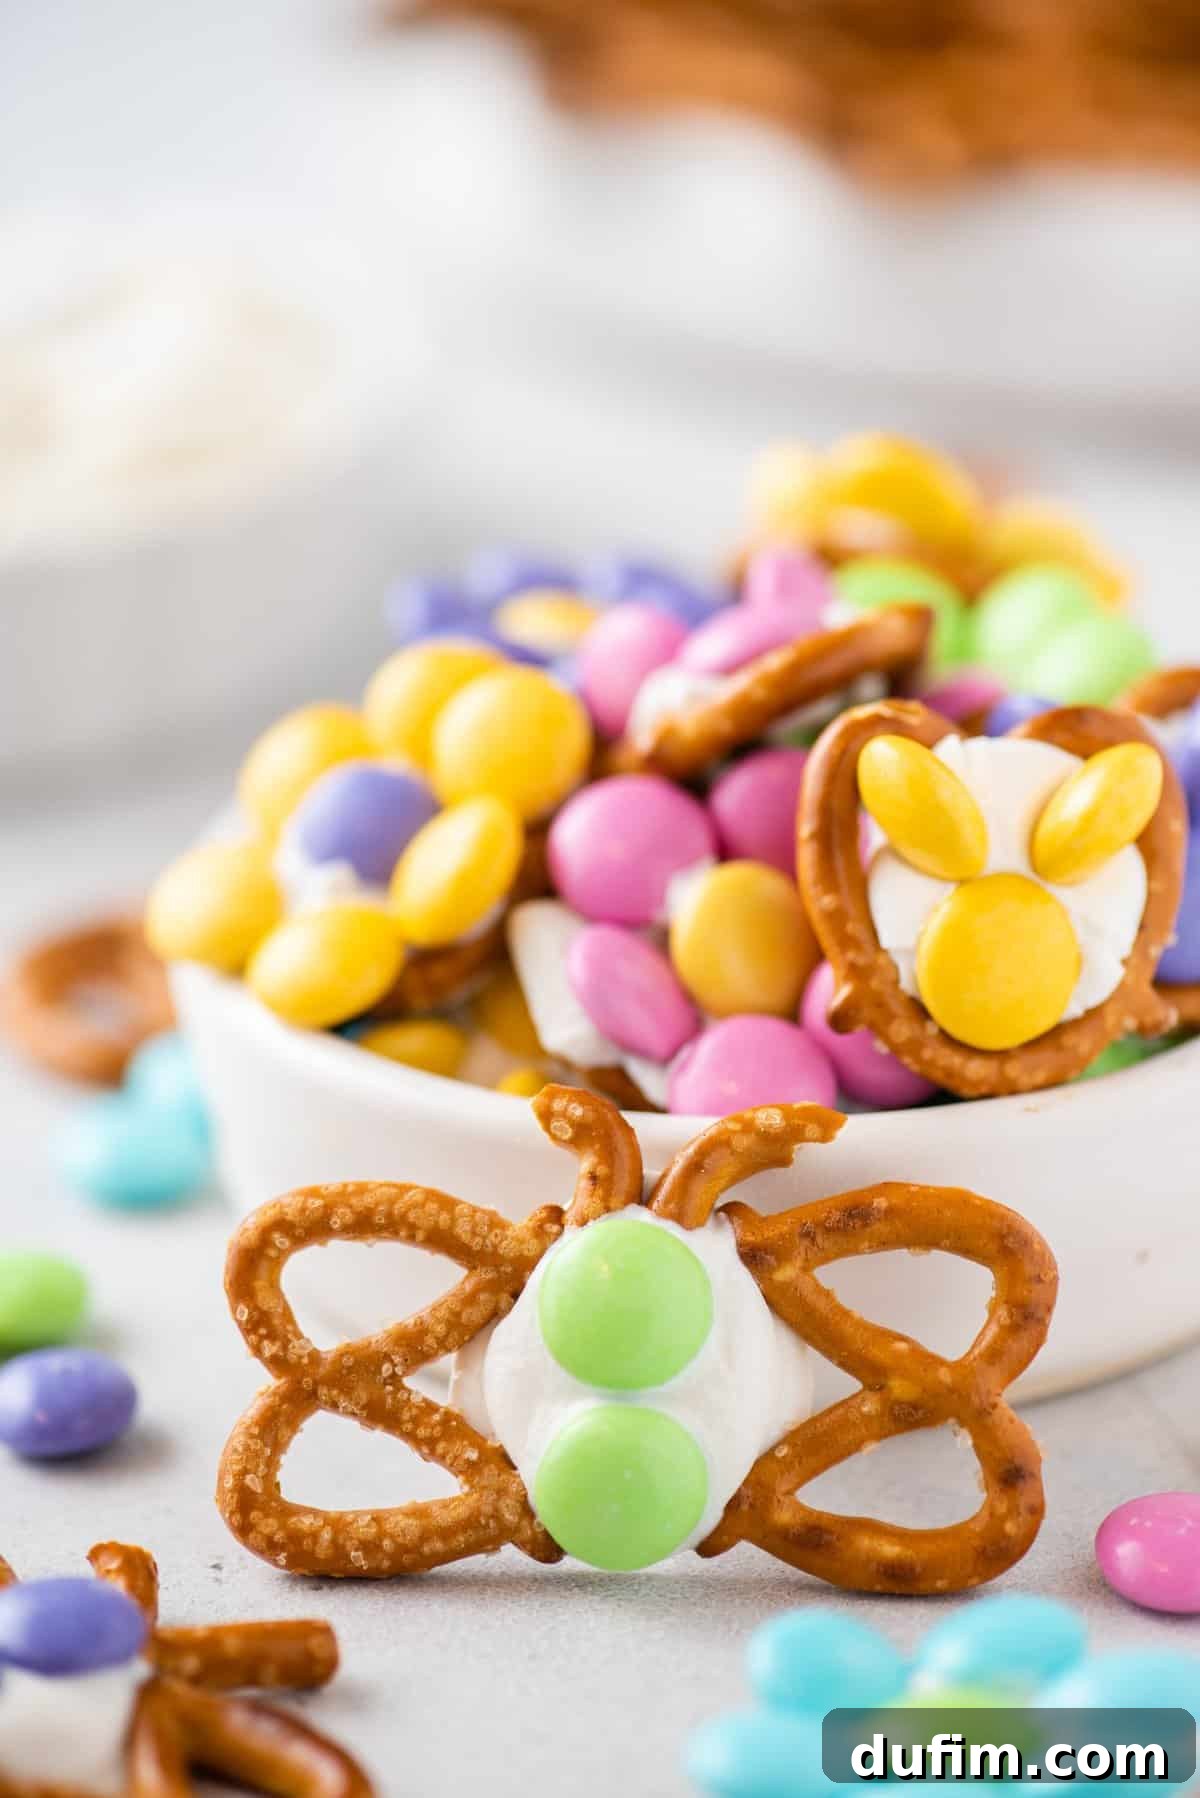
Follow along with our step-by-step photos for a visual guide on how to make these delightful Easter pretzels!
Crafting Adorable Bunny Pretzels
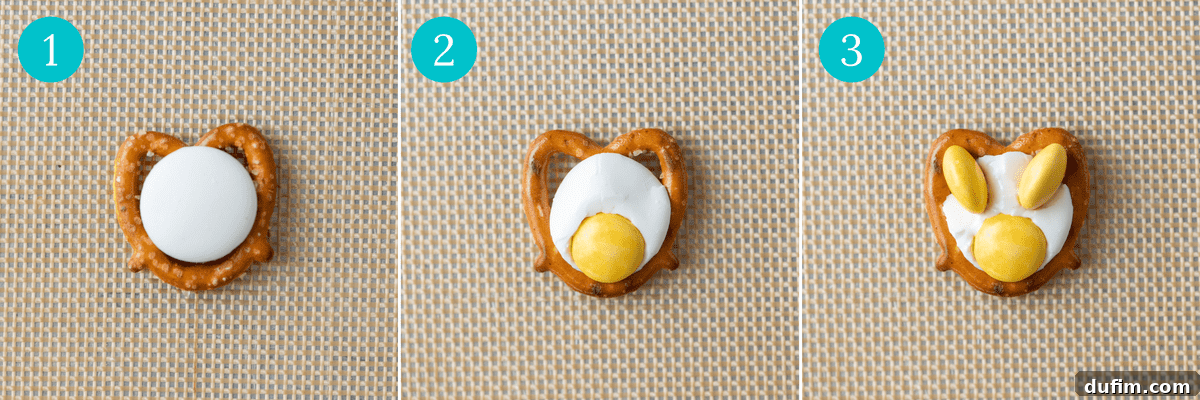
- Begin by preheating your oven to a low 225ºF (107ºC). While the oven preheats, line a baking sheet with either a silicone baking mat or parchment paper. This crucial step ensures your pretzels won’t stick and makes cleanup a breeze.
- Arrange your mini pretzels in a single layer on the prepared baking sheet, leaving a little space between each.
- Place one candy melt squarely on top of each pretzel.
- Carefully transfer the baking sheet into the preheated oven for just 2-3 minutes. The goal is to slightly soften and melt the candy melts, not to fully liquefy them. They should be just soft enough to press candies into.
- Promptly remove the baking sheet from the oven. Working quickly, immediately add the M&M’s to form your bunny designs.
- For each bunny, place one M&M near the bottom curve of the pretzel; this will serve as the bunny’s head. Then, take two additional M&M’s and place them on their sides, slightly above the “head,” positioning them as the bunny’s adorable ears.
- Allow the candy melts to harden completely at room temperature or by placing them in the refrigerator for a quicker set, before carefully removing the bunny pretzels from the baking sheet.
Designing Whimsical Butterfly Pretzels
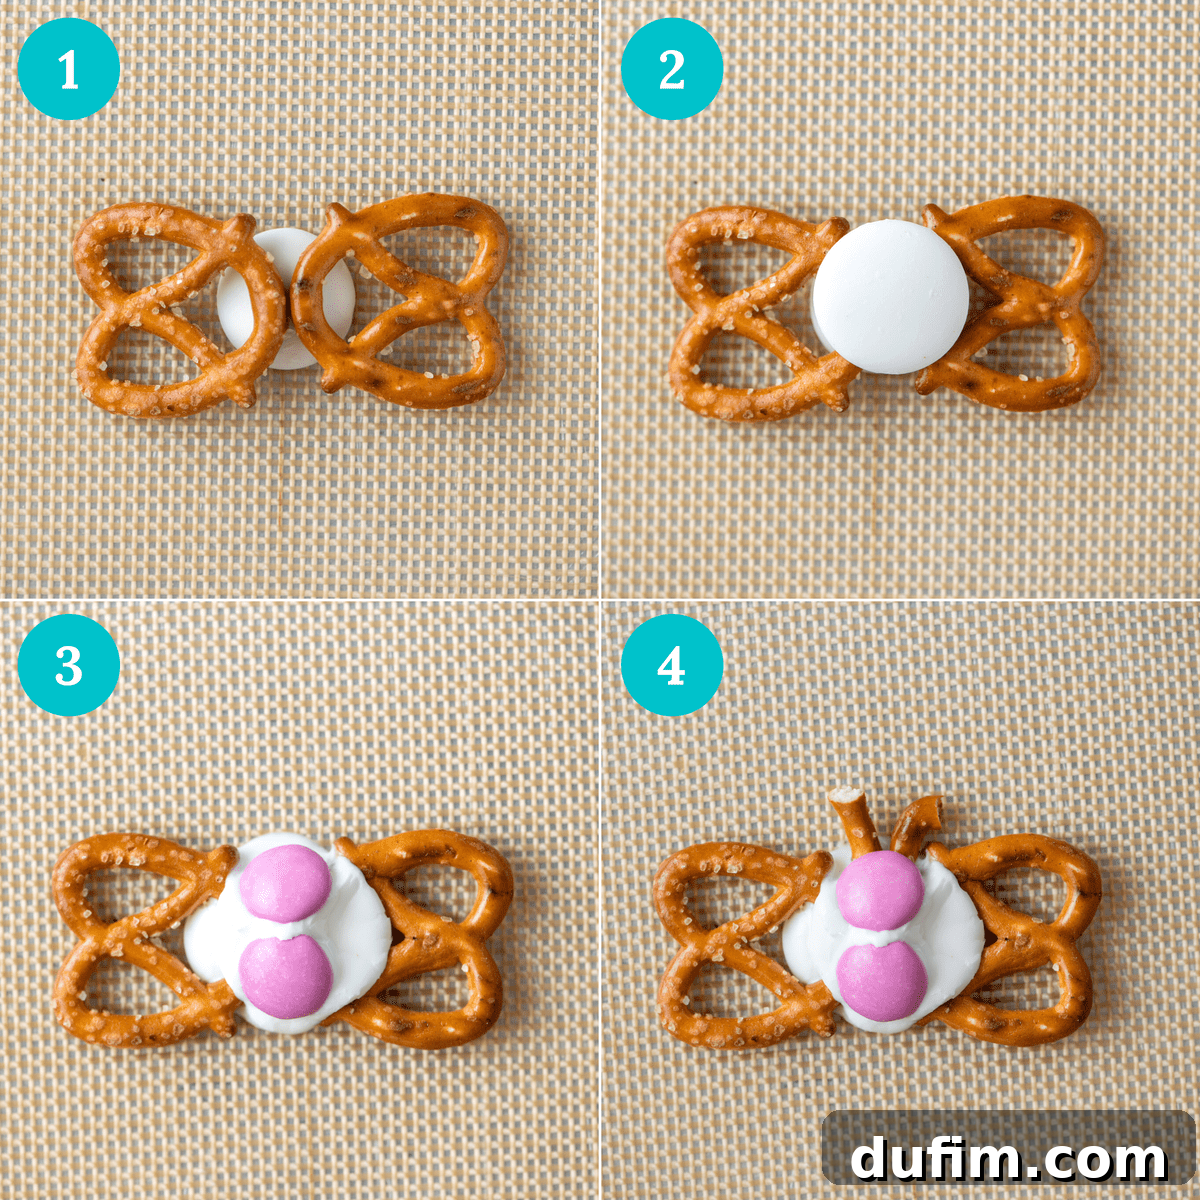
- Preheat your oven to 225ºF (107ºC) and line a baking sheet with a silicone baking mat or parchment paper.
- For each butterfly, you’ll start with one candy melt. Place this candy melt directly on the lined baking sheet.
- Carefully place two mini pretzels on top of this single candy melt, positioning one on the right side and one on the left side, slightly angled to resemble wings. The candy melt should be partially visible in the middle.
- Place a second candy melt directly on top of where the two pretzels meet in the center. This will secure the pretzels and form the body base.
- Transfer the baking sheet to the oven for 2-3 minutes until the candy melts are slightly softened.
- Remove from the oven and immediately add the M&M’s and pretzel antennas.
- Place two M&M’s directly in the center of the top candy melt; these will form the butterfly’s colorful body. Then, carefully break a mini pretzel into two small, curved pieces and place them above the M&M’s to create delicate antennas.
- Allow the candy melts to harden completely before gently transferring your beautiful butterfly pretzels.
Creating Vibrant Flower Pretzels
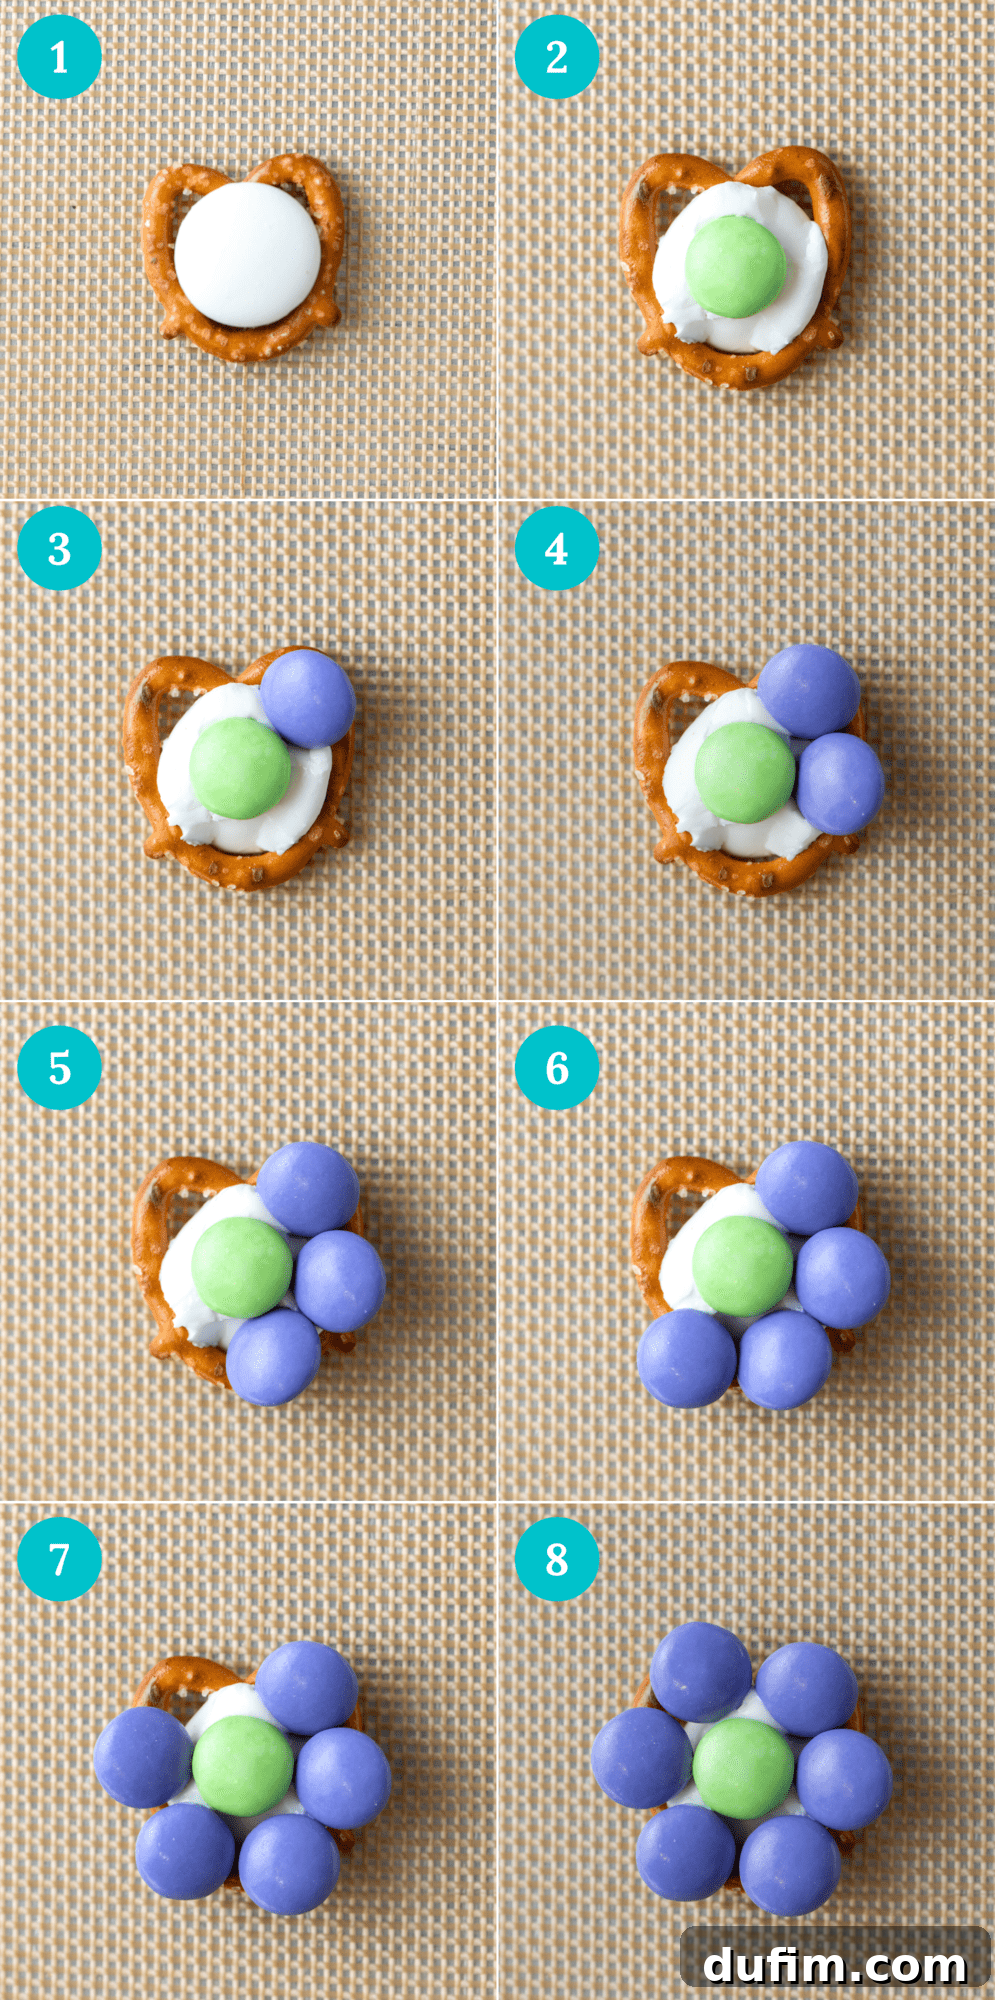
- As with the other designs, preheat your oven to 225ºF (107ºC) and line a baking sheet.
- Arrange individual mini pretzels in a single layer on the prepared baking sheet.
- Place one candy melt on top of each pretzel.
- Bake for 2-3 minutes until the candy melts are softened.
- Remove the baking sheet from the oven and immediately begin decorating.
- For each flower, place one M&M directly in the center hole of the pretzel; this forms the heart of your flower.
- Next, arrange six M&M’s around the central M&M to create vibrant flower petals. You may need to slightly overlap some M&M’s to fit them perfectly, creating a fuller, more realistic petal effect.
- Allow the candy melts to harden completely before carefully removing your blooming flower pretzels from the tray.
“Fun and easy gift for children and adults. Thank you for these recipes!”
-Pam
Expert Tips for Perfect Easter Pretzels
Elevate your Easter pretzel game with these helpful hints:
- Sort Your M&M’s by Color: Before you start melting, take a few minutes to sort your Easter M&M’s into separate bowls by color. This seemingly small step will save you a lot of time and frantic searching when the candy melts are warm and you need to work quickly. It also allows kids to easily pick their favorite colors for each design, making the process even more enjoyable and organized.
- Line Your Baking Sheet with Silicone or Parchment: This is a non-negotiable step for easy cleanup and preventing your precious pretzels from sticking. A silicone baking mat offers a reusable, non-stick surface, while parchment paper is a convenient disposable option. Either will ensure your finished pretzels lift off effortlessly once hardened.
- Place M&M’s “M” Side Down: For a super clean and professional-looking presentation, try to place your M&M’s with the “M” logo facing downwards. This gives your bunnies, butterflies, and flowers a smooth, consistent color palette without the distraction of the candy branding.
- Work Quickly and in Batches: Once the candy melts are removed from the oven, they will start to re-harden relatively quickly. To ensure you can place all your M&M’s precisely, it’s best to work efficiently. If you’re making a large quantity, consider working in smaller batches. Prepare and decorate one baking sheet at a time before placing the next in the oven.
- Focus on One Design at a Time: To streamline the process, especially when involving children, it can be helpful to complete all of one design (e.g., all the bunnies) before moving on to the next (butterflies or flowers). This keeps your focus clear and helps maintain consistency in your creations.
- Allow Candy Melts to Harden Completely: Patience is key! Resist the urge to move or pick up the pretzels before the candy melts have fully set. If they are still soft, your designs might shift or break. Once completely hardened, they will be sturdy and easy to handle. Speed up this process by placing the baking sheet in the refrigerator for 10-15 minutes.
- Troubleshooting Seized Candy Melts: If your candy melts become thick or crumbly (known as seizing), it usually means they’ve been overheated or have come into contact with water. To fix this, you can try adding a teaspoon of vegetable shortening or coconut oil, stirring until smooth. Avoid adding water.
- Storage is Key: Once hardened, store your Easter pretzels in an airtight container at room temperature. They will stay fresh and delicious for up to 1-2 weeks.
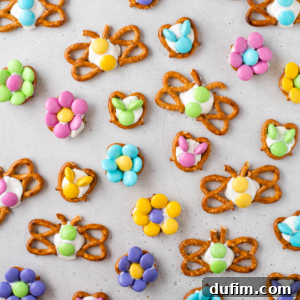
Easter Pretzels
By: Beth
Prep Time: 15 minutes
Servings: 50 treats
Easter pretzels are an easy Easter treat to make with your family! With 3 ingredients (pretzels, candy melts and M&M’s) you can make bunnies, butterflies and flowers!
Equipment
- Baking Sheet
- Silicone Baking Mat or Parchment Paper
- Microwave-safe Bowl (optional, for melting)
- Spoon or Spatula
Ingredients
- 16 oz bag mini pretzels
- 12 oz bag bright white Wilton candy melts, or melting white chocolate wafers
- Two 10 oz bags Easter M&M’s
Instructions
Bunny Pretzels
- Preheat the oven to 225ºF (107ºC). Line a baking sheet with a silicone baking mat or parchment paper. Arrange pretzels in a single layer.
- Place one candy melt on top of each pretzel. Place the baking sheet in the oven for 2-3 minutes to slightly melt the candy melt.
- Remove from the oven and immediately add the M&M’s. Place 1 M&M near the bottom of the pretzel (bunny’s head), then add two M&M’s on their side (bunny’s ears).
- Allow the candy melts to harden completely before removing the pretzels.
Butterfly Pretzels
- Preheat the oven to 225ºF (107ºC). Line a baking sheet with a silicone baking mat or parchment paper.
- Arrange white candy melts in a single layer on the baking sheet. Place 2 pretzels on top of each candy melt – one on the right side and one on the left side, angled as wings.
- Place another candy melt directly on top of where the pretzels meet.
- Place the baking sheet in the oven for 2-3 minutes to slightly melt the candy melts.
- Remove from the oven and immediately add the M&M’s. Place 2 M&M’s in the center of the candy melt (butterfly’s body). Then add 2 broken pretzel pieces as antennas.
- Allow the candy melts to harden completely before removing the pretzels.
Flower Pretzels
- Preheat the oven to 225ºF (107ºC). Line a baking sheet with a silicone baking mat or parchment paper. Arrange pretzels in a single layer.
- Place one candy melt on top of each pretzel. Place the baking sheet in the oven for 2-3 minutes to slightly melt the candy melt.
- Remove from the oven and immediately add the M&M’s. Place 1 M&M in the center pretzel (center of the flower).
- Next, add six M&M’s around the center M&M. Some M&M’s may have to overlap to fit (flower petals).
- Allow the candy melts to harden completely before removing the pretzels.
Notes
- Sort the M&M’s by color for easier assembly.
- Line your baking sheet with a silicone baking mat or parchment paper for easy clean-up.
- Place the “M” side down for a cute, clean presentation.
- Work quickly when adding M&M’s once candy melts are melted. Working in batches is best!
- Focus on making all of one thing at a time – e.g., all the bunnies, then all the flowers, or all the butterflies.
- Allow the candy melts to harden completely before removing the pretzels from the tray.
Nutrition
Calories: 50kcal | Carbohydrates: 9g | Protein: 1g | Fat: 1g | Saturated Fat: 1g | Polyunsaturated Fat: 1g | Monounsaturated Fat: 1g | Sodium: 116mg | Potassium: 20mg | Fiber: 1g | Sugar: 2g | Vitamin C: 1mg | Calcium: 2mg | Iron: 1mg
Nutrition Disclosure: All nutritional values are approximate and provided to the reader as a courtesy. Changing ingredients and/or quantities will alter the estimated nutritional calculations.
Variations and Customizations for Your Easter Pretzels
While the classic bunny, butterfly, and flower designs are charming, don’t hesitate to let your imagination soar!
- Color Palette: Use different colored candy melts (pastel pink, blue, yellow, green) to create an even more vibrant array of treats. You can even drizzle contrasting colors once the base has set.
- Other Toppings: Replace or supplement M&M’s with other small candies. Mini chocolate chips, chopped nuts, shredded coconut, or a variety of spring-themed sprinkles can add different textures and flavors.
- Chocolate Drizzle: For an extra touch of elegance, once your pretzels are completely set, melt a small amount of dark or milk chocolate and drizzle it decoratively over your finished treats.
- Seasonal Shapes: Beyond Easter, this concept can be adapted for other holidays! Think ghosts for Halloween, hearts for Valentine’s Day, or snowflakes for Christmas.
Serving and Gifting Your Easter Pretzels
These adorable treats are not just for eating; they make fantastic gifts and festive decorations!
- Easter Baskets: Individually wrap them in small cellophane bags tied with a pretty ribbon to add a homemade touch to any Easter basket.
- Party Favors: Hand them out as charming favors at your Easter brunch or spring-themed party.
- Dessert Platters: Arrange a colorful assortment on a large platter for a stunning centerpiece that’s as delicious as it is beautiful.
- School Treats: A wonderful option for classroom parties (check for nut allergies first!).
- Neighborly Gifts: Share the joy by packaging a small selection for friends and neighbors.
Frequently Asked Questions About Easter Pretzels
- Q: Can I use regular chocolate chips instead of candy melts?
- A: Yes, you can, but there’s a trick! Chocolate chips don’t melt as smoothly or set as firmly as candy melts. To achieve a better consistency, melt your chocolate chips slowly and stir in a teaspoon of coconut oil or vegetable shortening per cup of chocolate. This will help prevent seizing and give you a smoother coating.
- Q: How long do these Easter pretzels last?
- A: When stored in an airtight container at room temperature, these pretzels will stay fresh for about 1-2 weeks. For best quality and crispness, consume them within the first week.
- Q: Are these truly kid-friendly to make?
- A: Absolutely! This recipe is perfect for kids of all ages. Younger children can help arrange pretzels and place M&M’s, while older children can assist with melting (with supervision) and more intricate decorating. It’s a fantastic hands-on activity.
- Q: What if my candy melts seize or become too thick?
- A: Candy melts can seize if they get too hot or if even a tiny drop of water gets into them. If they become too thick, try adding 1/2 to 1 teaspoon of vegetable shortening or paramount crystals (specifically designed for thinning candy melts) and stir until smooth. Do not add water.
- Q: Can I use other types of small candies for decoration?
- A: Yes, definitely! Feel free to experiment with any small, colorful candies you have on hand. Mini jelly beans, sprinkles, or even small chocolate candies can work well. The key is to add them immediately after the candy melts come out of the oven so they stick properly.
These 3-ingredient Easter pretzels offer an unbeatable combination of ease, fun, and deliciousness. Whether you’re whipping up a quick treat for your family or crafting beautiful gifts, these bunnies, butterflies, and flowers are sure to bring smiles and sweetness to your Easter celebration. Get creative, have fun, and enjoy the magic of making these simple yet enchanting spring desserts!