

Ultimate Reese’s Stuffed Oreo Balls: The No-Bake Peanut Butter Chocolate Dream
Prepare to elevate your dessert game! These aren’t just any ordinary Oreo balls; they are an extraordinary fusion, reimagined and made ten times better by being **generously stuffed with creamy Reese’s Peanut Butter Cups**. The result is a truly unforgettable treat: Reese’s Oreo Balls! Whether you stick to classic Oreos or venture into your favorite flavor, these cookie balls promise a symphony of textures and tastes.

Oreo balls have long been a beloved no-bake dessert, cherished for their simplicity and decadent flavor. Over the years, this humble treat has evolved into countless variations, from festive holiday shapes to intriguing surprises hidden within. Our recipe takes this tradition to a new level, transforming a simple dessert into a spectacular indulgence that’s perfect for any occasion.
Like many classic Oreo ball recipes, this journey begins with the irresistible blend of crushed Oreo crumbs and softened cream cheese, forming a rich and pliable cookie dough. But here’s where the magic truly happens: each individual Oreo ball harbors a delightful secret – a mini Reese’s Peanut Butter Cup. Imagine biting into a crisp chocolate shell, followed by the smooth, dense Oreo-cream cheese mixture, only to discover a gooey, peanut buttery core. It’s a flavor explosion that will captivate your taste buds!
Once molded around their peanut butter surprise, these decadent spheres are then enveloped in a luscious chocolate coating, typically using easy-melt options like chocolate candiquik or almond bark. To add a final touch of gourmet elegance, we adorn each ball with complementary toppings. A sprinkle of chopped Reese’s Pieces introduces an extra layer of peanut butter crunch, while a delicate drizzle of melted peanut butter candy melts creates a visually stunning and flavor-enhancing flourish. This harmonious combination of flavors and textures makes these Reese’s Oreo Balls an absolute showstopper.

Why You’ll Love This Recipe
- **Effortlessly Delicious:** A no-bake wonder that requires minimal effort for maximum flavor.
- **Peanut Butter & Chocolate Perfection:** The classic combo gets an upgrade with a hidden Reese’s cup.
- **Crowd-Pleaser:** Guaranteed to be a hit at parties, gatherings, or as a thoughtful homemade gift.
- **Customizable:** Easily adapt with different Oreo flavors or chocolate coatings to suit any taste.
- **Make-Ahead Friendly:** Perfect for preparing in advance, saving you time and stress.
Ingredients for Your Ultimate Reese’s Oreo Balls
Gathering the right ingredients is the first step to creating these phenomenal no-bake treats. The beauty of this recipe lies in its simplicity and the distinct flavors of each component.
- **Oreos:** One 14.3 oz package. While classic chocolate Oreos are always a winner, consider experimenting with peanut butter Oreos for an even more intense flavor, or golden Oreos for a different twist.
- **Cream Cheese:** One 8 oz (226g) package, softened to room temperature. This is crucial for achieving a smooth, well-blended mixture without lumps.
- **Peanut Butter Cups:** You’ll need one for each Oreo ball you plan to make. Mini Reese’s Peanut Butter Cups are ideal as they fit perfectly within the formed cookie dough. Ensure they are chilled to maintain their shape during the rolling process.
- **Chocolate Coating:** Approximately 16 oz of chocolate candiquik, almond bark, or your favorite melting chocolate. These options are formulated for easy melting and smooth dipping. Alternatively, good quality chocolate chips or baking bars can be used, but may require tempering for a truly smooth, glossy finish without streaks.
- **Optional Toppings:** For an extra flourish, consider chopped Reese’s Pieces for added crunch and visual appeal, and/or peanut butter candy melts for a decorative drizzle. White chocolate or sprinkles also make great additions.
Essential Equipment
While the recipe is simple, having the right tools can make the process even smoother:
- **Food Processor or Blender:** Essential for crushing Oreos into fine crumbs quickly and efficiently.
- **Large Mixing Bowl:** For combining the Oreo crumbs and cream cheese.
- **Hand Mixer:** Highly recommended for achieving a perfectly smooth and uniform dough.
- **Baking Sheets:** For chilling and setting the Oreo balls.
- **Silicone Baking Mat or Parchment Paper:** To prevent sticking and make cleanup a breeze.
- **Small Cookie Scoop (optional but recommended):** Helps create uniform-sized Oreo balls.
- **Small Pot or Microwave-Safe Bowl:** For melting your chocolate coating.
- **Fork or Dipping Tools:** For dipping the balls in chocolate without leaving excessive marks.
Step-by-Step Instructions: Crafting Your Reese’s Oreo Balls
- **Soften the Cream Cheese:** Begin by allowing your 8 oz package of cream cheese to come to room temperature. This ensures it blends smoothly with the Oreo crumbs, preventing a lumpy texture.
- **Crush the Oreos:** Place about half of the 14.3 oz package of Oreos into a food processor or high-powered blender. Pulse until they are finely ground into crumbs. Add the remaining Oreos and continue pulsing until all cookies are uniformly fine. Consistency is key here; you want no large chunks.
- **Combine Ingredients:** Transfer the fine Oreo crumbs to a large mixing bowl. Add the softened cream cheese. Using a hand mixer on medium speed, beat the mixture until thoroughly combined and smooth. The dough should be thick and pliable.
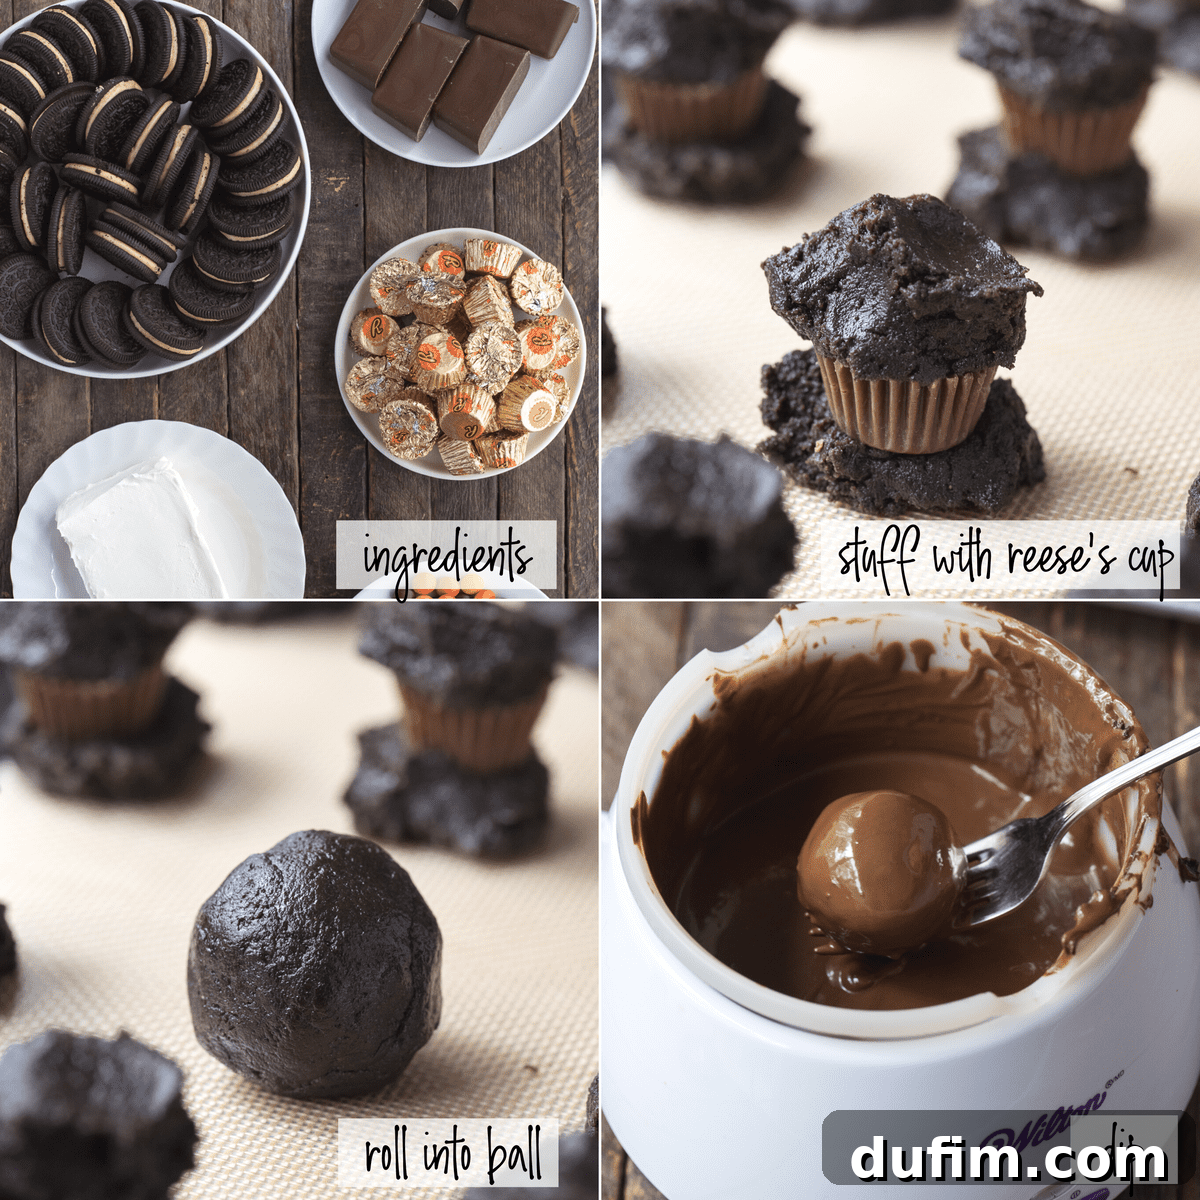
- **Stuff and Roll:** Line a baking sheet with a silicone baking mat or parchment paper. Use a small cookie scoop (or about 1.5 tablespoons) of the Oreo mixture and flatten it slightly in your hand. Place one mini Reese’s Peanut Butter Cup in the center. Carefully mold the Oreo dough around the peanut butter cup, ensuring it is completely enclosed, then roll it into a smooth, even ball. Place the formed balls onto the prepared baking sheet.
- **Chill for Firmness:** Once all the Oreo balls are formed, place the baking sheet in the refrigerator to chill for at least 20-30 minutes. This step is crucial; it firms up the balls, making them easier to dip and preventing the chocolate coating from cracking due to temperature shock.
- **Melt the Chocolate Coating:** While the Oreo balls are chilling, prepare your chocolate. In a small, deep pot over very low heat, gently melt your chocolate candiquik or almond bark, stirring occasionally. Alternatively, melt in a microwave-safe bowl in 30-second intervals, stirring between each, until smooth and fully melted. Be careful not to overheat the chocolate, as it can seize.
- **Dip the Oreo Balls:** Remove the chilled Oreo balls from the fridge. One at a time, gently drop an Oreo ball into the melted chocolate. Use a fork (or a specialized dipping tool) to carefully roll the ball, ensuring it’s fully coated. Lift the ball out with the fork, tapping the side of the pot gently to allow any excess chocolate to drip off. This creates a thin, even coating.
- **Decorate and Set:** Immediately return the dipped Oreo ball to the silicone baking mat. If adding chopped Reese’s Pieces, sprinkle them on top while the chocolate is still wet enough for them to adhere. Allow the chocolate coating to set completely at room temperature or by placing them back in the fridge for a quicker set. If you plan to drizzle with peanut butter candy melts, ensure the chocolate is fully hardened before drizzling.
- **Serve and Enjoy:** Once the chocolate has hardened, your Reese’s Oreo Balls are ready to be served! Store any leftovers in the refrigerator.
Pro Tips for Perfect Reese’s Oreo Balls Every Time
Achieving bakery-quality Oreo balls is simpler than you think with these expert tips:
Optimal Chilling for Dipping
The temperature of your Oreo balls before dipping is paramount to preventing cracked chocolate coatings. If your balls are frozen or excessively cold, the rapid temperature change when dipped into warm chocolate will cause the chocolate to contract and crack as it sets. The best approach is to chill the formed Oreo balls in the refrigerator for about 20-30 minutes. This makes them firm enough to handle and hold their shape but not so cold that they shock the chocolate.
Mastering the Chocolate Dip
- **Chocolate Choice:** While candiquik and almond bark are easy to use, quality melting wafers or even tempered chocolate can give a superior finish. If using chocolate chips, a touch of coconut oil or shortening can help thin the chocolate for a smoother dip.
- **Dipping Technique:** Don’t just dunk! Place one Oreo ball in the melted chocolate. Use a spoon to gently spoon chocolate over the top if needed, ensuring complete coverage. To remove, use a fork, letting excess chocolate drip off back into the pot. Gently scrape the bottom of the fork on the pot’s edge to remove any remaining drips, then carefully slide the ball onto your lined baking sheet. Work quickly but precisely.
- **Adding Toppings:** For toppings like chopped Reese’s Pieces or sprinkles, add them immediately after dipping while the chocolate is still wet. If you wait too long, the chocolate will begin to set, and toppings won’t adhere properly. For drizzles, always wait until the primary chocolate coating is completely hardened to avoid smudging.
Maintaining Dough Consistency
Ensure your cream cheese is genuinely at room temperature – not cold, not melted. This allows it to blend seamlessly with the fine Oreo crumbs, creating a smooth, workable dough. If the dough seems too sticky, chill it for 10-15 minutes before rolling. If it’s too dry, you might need a tiny bit more softened cream cheese, but typically, the ratio is perfect.

Storage and Freezing Guidelines
These Reese’s Oreo Balls are so delicious, they rarely last long! However, if you’re lucky enough to have leftovers or prefer to make them ahead, here’s how to store them:
Do Oreo Balls Need to Be Refrigerated?
Yes, Reese’s Oreo balls should generally be kept in the refrigerator until you’re ready to serve them. The cream cheese base benefits from chilling, both for texture and food safety. Many people also find that Oreo balls taste best when cold. According to FDA guidelines, cream cheese-based items can be left at room temperature for up to 2 hours, making them safe for a dessert table or party, but refrigerate promptly after this window.
How Long Will Oreo Balls Keep?
When stored in an airtight container in the refrigerator, your Reese’s Oreo Balls will stay fresh and delicious for up to 1 week. For longer storage, consider freezing them!
How to Freeze Oreo Balls
Oreo balls freeze exceptionally well, making them an excellent make-ahead dessert. For best results, arrange 5-6 Oreo balls in a single layer on a piece of plastic wrap, then wrap them tightly. Place these wrapped bundles into an airtight freezer-safe bag or container. They can be frozen for up to 3 months.
When thawing, move them from the freezer to the refrigerator a few hours before serving. Be aware that the temperature change from freezer to fridge (during thawing) might occasionally cause some minor cracking in the chocolate coating. This is purely cosmetic and won’t affect the taste or texture.

Frequently Asked Questions (FAQ)
Got questions? We’ve got answers to help you perfect your Reese’s Oreo Balls!
Can I use other types of Oreos?
Absolutely! The beauty of Oreo balls is their versatility. Feel free to experiment with Golden Oreos, Mint Oreos, or any other flavor that strikes your fancy. Each will bring a unique twist to the classic recipe.
My chocolate coating is too thick. What should I do?
If your melting chocolate seems too thick for smooth dipping, you can often thin it out. For chocolate chips or baking bars, add a small amount (1/2 to 1 teaspoon) of coconut oil, vegetable shortening, or paramount crystals (for candy melts) and stir until smooth. Do this incrementally to avoid making it too thin.
Can I use homemade peanut butter cups?
Certainly! If you enjoy making your own confections, homemade peanut butter cups would be an amazing addition to this recipe, offering an extra layer of personalized deliciousness.
Delicious Variations to Try
Once you’ve mastered the basic Reese’s Oreo Ball, unleash your creativity with these exciting variations:
- **Mint Chocolate Delight:** Use Mint Oreos and dip them in dark chocolate, then sprinkle with crushed candy canes or mint chips.
- **Salted Caramel Dream:** Stuff with a small caramel square instead of a Reese’s, dip in milk chocolate, and sprinkle with sea salt.
- **White Chocolate Raspberry:** Use Golden Oreos, a white chocolate coating, and a raspberry preserve or fresh raspberry in the center. Drizzle with white chocolate and crushed freeze-dried raspberries.
- **Cookie Dough Surprise:** For a double-cookie treat, stuff the Oreo balls with a small scoop of edible cookie dough before dipping.
More Irresistible Oreo Ball Recipes
If you’re a fan of these no-bake wonders, you’ll love exploring other variations from our collection:
- Candy Cane Oreo Balls
- Christmas Present Oreo Balls
- Turtle Oreo Balls
- Oreo Acorn Balls
Reese’s Oreo Balls
By: Beth
Prep Time: 1 hour
Total Time: 1 hour
Servings: 20 balls
These Reese’s Oreo Balls are a delightful twist on a classic no-bake treat, featuring a surprise peanut butter cup center!
Equipment
- Glass Mixing Bowl
- Food Processor or Blender
- Hand Mixer
- Baking Sheets
- Silicone Baking Mat or Parchment Paper
- Small Cookie Scoop (optional)
- Small Pot or Microwave-Safe Bowl
- Fork or Dipping Tools
Ingredients
- 1 package Oreos, 14.3 oz (try peanut butter Oreos for extra flavor!)
- 8 oz (226g) cream cheese, 1 package, softened
- Peanut butter cups, one for each Oreo ball (mini Reese’s work best)
- Chocolate candiquik or almond bark, approximately 16 oz
- Toppings (optional): chopped Reese’s Pieces and/or peanut butter candy melts
Instructions
- Allow the cream cheese to come completely to room temperature.
- Put half of the Oreos in the food processor or blender and pulse until you have fine crumbs. Add the other half of the Oreos and pulse again until all are fine crumbs.
- Transfer the Oreo crumbs to a mixing bowl. Add the softened cream cheese and use a hand mixer to blend until smooth and well combined.
- Line a baking sheet with a silicone baking mat or parchment paper. Use a small cookie scoop (or about 1.5 tablespoons) of the Oreo mixture and flatten. Place a peanut butter cup in the center, then mold the Oreo dough around it to form a smooth ball. Place on the baking sheet. Refrigerate the Oreo balls for 20-30 minutes.
- After chilling, begin to melt the chocolate candiquik or almond bark in a small pot over low heat on the stove, stirring occasionally until completely smooth. Alternatively, melt in a microwave-safe bowl in 30-second intervals.
- Remove the Oreo balls from the fridge. To dip, place one Oreo ball in the melted chocolate. Use a fork to lift it out, gently tapping the fork on the edge of the pot to remove excess chocolate. Place the dipped ball back on the silicone baking mat. If adding chopped Reese’s Pieces, sprinkle them immediately. For peanut butter drizzle, allow the chocolate to set completely first.
- Allow the chocolate coating to harden completely at room temperature or in the refrigerator. Serve and enjoy!
Nutrition Facts (per ball, estimated)
Calories: 145kcal | Carbohydrates: 16g | Protein: 2g | Fat: 8g | Saturated Fat: 4g | Polyunsaturated Fat: 1g | Monounsaturated Fat: 3g | Trans Fat: 1g | Cholesterol: 12mg | Sodium: 140mg | Potassium: 64mg | Fiber: 1g | Sugar: 10g | Vitamin A: 152IU | Calcium: 16mg | Iron: 2mg
All nutritional values are approximate and provided to the reader as a courtesy. Changing ingredients and/or quantities will alter the estimated nutritional calculations.
We hope you enjoyed crafting these delightful Reese’s Stuffed Oreo Balls as much as we enjoyed sharing the recipe! Their irresistible combination of crunchy cookie, creamy filling, and gooey peanut butter surprise makes them a truly special treat. Don’t forget to share your creations and let us know what you think!