

Welcome to your definitive guide for creating the most delightful cut-out sugar cookies! If you’ve been searching for a recipe that consistently delivers perfectly chewy cookies, reliably holds its intricate shapes through baking, and is genuinely fun to make even with your kids, your quest ends here. We’ve cracked the code to making sugar cookies an effortless and enjoyable experience for every baker.
This master recipe goes beyond the basics, offering a suite of flexible options tailored to your needs: a convenient *no-chill* method for when time is short, a fantastic *gluten-free* alternative that doesn’t compromise on taste or texture, and detailed recipes for both classic *buttercream* and elegant *royal icing*. Prepare to transform your baking with our step-by-step instructions, expert tips, and creative variations to make every batch uniquely yours!

“These cookies came out perfect, holding their shape beautifully and tasting absolutely delicious. Thank you so much for this recipe!”
-Lo
Crafting the Perfect Cut-Out Sugar Cookies: A Baker’s Ultimate Guide
Embark on a delightful baking journey and master the art of exquisite cut-out sugar cookies. Have you ever wondered how to achieve those picture-perfect shapes and a delectable chewy texture that makes everyone ask for more? This isn’t just another cookie recipe; it’s the ultimate guide to creating sugar cookies that are truly a cut above the rest, ensuring success for both novice and experienced bakers alike.
We delve into every crucial aspect of cookie perfection: from rolling the dough to the optimal thickness for ideal texture, to advanced techniques for freezing both baked cookies and raw dough for future enjoyment. Forget the guesswork of flour measurement; our detailed instructions ensure you get it right every time, preventing dry or crumbly results. Plus, we unveil insider tips for a convenient no-chill option and present a phenomenal gluten-free adaptation that promises to impress even the most discerning palates. Get ready to elevate your cookie-making prowess and create memorable treats with this comprehensive guide – a baking adventure you simply cannot afford to miss!
Why This Recipe Stands Out: Your Go-To For Every Occasion
What makes our cut-out sugar cookie recipe so exceptional? It’s meticulously engineered for success, consistently delivering superior results that address common baking challenges:
- Flawless Shape Retention: Say goodbye to frustrating spread-out, unrecognizable cookies. Our expertly formulated dough is designed to hold intricate cookie cutter shapes beautifully, ensuring your decorated creations truly shine.
- Perfectly Chewy Texture: No more dry or crumbly cookies that disappoint. These sugar cookies boast a soft, tender interior with just the right amount of chewiness that simply melts in your mouth with every bite.
- Effortless Preparation: From the initial mixing to the final bake, each step is straightforward and clearly explained, making this recipe accessible and enjoyable for bakers of all skill levels. It’s also a fantastic, mess-friendly activity to share with children.
- Versatile Baking Options: Whether you’re in a hurry or catering to specific dietary needs, our recipe offers a highly effective no-chill alternative and a proven, delicious gluten-free modification, ensuring everyone can enjoy these treats.
- Smart Freezing Solutions: Learn how to effectively freeze both baked and unbaked cookies, providing ultimate flexibility. This means you can always have delicious treats on hand or prep ahead for busy holiday seasons and special events.
- Two Delicious Frosting Favorites: We provide reliable and easy-to-follow recipes for both rich, creamy buttercream and smooth, pipeable royal icing, allowing you to choose the perfect finish for your festive cookie creations.
This recipe is truly your secret weapon for successful holiday baking, memorable celebrations, or simply enjoying a sweet, homemade afternoon treat.
Essential Ingredients for Your Perfect Cut-Out Cookies
Gathering the right ingredients, with accurate measurements, is the crucial first step to ensuring baking success. Here’s what you’ll need for our exceptional sugar cookies and their delightful frosting options.
For the Ultimate Cut-Out Sugar Cookies
- All-purpose flour (properly measured using the spoon and level method)
- Baking powder (for a soft lift)
- Salt (to balance sweetness)
- Unsalted butter, softened (or cold for the no-chill option, ensures richness and texture)
- Granulated sugar (for sweetness and tender crumb)
- Large egg (for binding and moisture)
- Vanilla extract (essential for classic flavor)
- Almond extract (adds a subtle, professional bakery note)
For the Classic Creamy Buttercream Frosting
- Unsalted butter, softened (the base for a rich frosting)
- Powdered sugar (confectioners’ sugar, for smooth consistency)
- Vanilla extract (for a universally loved flavor)
- Almond extract (enhances overall flavor)
- Milk or heavy cream (adjusts consistency)
For the Easy & Elegant Royal Icing
- Powdered sugar (confectioners’ sugar, sifted for ultimate smoothness)
- Milk or warm water (for desired consistency)
- Corn syrup (adds sheen and prevents brittleness)
- Vanilla or almond extract (for delicate flavoring)
Creative Variations to Elevate Your Sugar Cookies
While our classic cut-out sugar cookie recipe is fantastic on its own, don’t hesitate to get creative with these delightful variations. They’re perfect for adding a unique twist and personalizing your cookies for any season, holiday, or special celebration.
- Zesty Citrus Infusion: Introduce a bright, tangy note by adding finely grated zest from lemons, oranges, or limes (about 1-2 teaspoons per batch) directly to your cookie dough during the creaming stage. Citrus zest pairs beautifully with the sweetness of sugar cookies, offering a refreshing contrast that’s especially wonderful in warmer months.
- Warm Spiced Wonders: Transform your cookies into comforting treats perfect for fall and winter by incorporating warm spices. A pinch (1/2 to 1 teaspoon) of cinnamon, nutmeg, ginger, or even a blend of pumpkin pie spice or chai spice can add a cozy, aromatic dimension that evokes holiday cheer.
- Flavorful Extracts Exploration: Beyond vanilla and almond, experiment with other extracts to completely change the flavor profile. Coconut extract for a tropical twist, maple extract for a hint of autumn, or even a touch of peppermint for vibrant holiday cookies can make a significant difference. Remember to start with a small amount (1/4 to 1/2 teaspoon) and adjust to your preferred taste.
- Sparkling Sugar and Sprinkle Toppings: For an instant boost of visual appeal and delightful crunch, before baking, roll your cut-out dough shapes in colorful sanding sugar, edible glitter, or your favorite sprinkles. Finely chopped nuts like pecans or walnuts can also be pressed onto the dough for a lovely texture and nutty flavor.
- Decadent Sandwich Cookies: After baking and allowing the cookies to cool completely, pair two cookies together with a luscious filling. Think homemade jam, a rich chocolate ganache (find a great ganache recipe here), or a generous dollop of your favorite buttercream frosting. These make for a more substantial and indulgent treat.
- Dazzling Stained Glass Cookies: For a truly magical effect, cut out shapes as usual, then use a smaller cookie cutter or knife to create a “window” in the center of each. Fill these centers with crushed hard candies (like Jolly Ranchers or peppermints) before baking. As the cookies bake, the candies melt into a translucent, jewel-like “stained glass” window, creating stunning edible art.
- Elegant Dipped or Drizzled Designs: Once your cookies are completely cooled, dip them halfway into melted chocolate (white, milk, or dark chocolate works beautifully) or drizzle them with a simple glaze made from powdered sugar and a touch of milk or lemon juice. This adds a sophisticated touch, an extra layer of flavor, and beautiful contrast.
- Seasonal Shapes and Themes: Embrace the spirit of any occasion by using a variety of cookie cutters. Hearts for Valentine’s Day, bunnies for Easter, spooky bats or ghosts for Halloween, intricate snowflakes or stars for winter holidays, or even simple circles for custom designs – the possibilities are endless and add to the festive fun.
- Dietary Adaptations: Make these cookies accessible to everyone. Our recipe includes specific guidance for achieving delicious gluten-free cookies using quality flour blends. For vegan options, you can experiment with plant-based butter and egg replacers (like flax eggs or commercial substitutes), though results may vary slightly in texture and spread.
These creative variations empower you to transform a simple sugar cookie into a unique and memorable treat, perfect for impressing guests, delighting family, or simply enjoying a customized snack. Let your imagination guide you!
Step-by-Step Guide: How to Bake Perfect Cut-Out Sugar Cookies
Follow these detailed instructions to create beautifully shaped, deliciously chewy sugar cookies every time. Precision and patience are your best allies in achieving cookie perfection!
- Combine Dry Ingredients: In a large mixing bowl, whisk together the all-purpose flour, baking powder, and salt until thoroughly combined. This step ensures that the leavening agent and seasoning are evenly distributed throughout the dough. Set this mixture aside.
- Cream Butter and Sugar: In a separate, larger mixing bowl, combine the room temperature unsalted butter and granulated sugar. Using an electric mixer, beat them together on medium speed for approximately 90 seconds until the mixture becomes light, fluffy, and pale in color.
- Add Wet Ingredients: Add the large egg, vanilla extract, and almond extract to the creamed butter and sugar mixture. Continue to beat with the electric mixer for another minute, scraping down the sides of the bowl as needed, until all ingredients are well combined and smooth.
- Gradually Incorporate Flour: Add the reserved dry flour mixture to the wet ingredients in three separate additions. Mix on low speed just until the flour is incorporated after each addition. Initially, the dough may appear crumbly and almost sandy. Continue mixing until the mixture comes together into a thick, cohesive mass. To ensure full incorporation without overworking, finish by gently kneading the dough together with your hands for only 20-30 seconds. Overworking the dough can lead to tough cookies.
- Chill the Dough (Crucial Step): Divide the prepared dough into two equal, flat discs. Wrap each disc tightly with plastic wrap to prevent drying. Place the wrapped dough discs in the refrigerator for at least 1 hour. This chilling step is absolutely vital for developing flavor and, more importantly, for ensuring the cookies hold their intricate shapes during baking. The dough can be left in the fridge to chill for up to 2 days, making it ideal for make-ahead baking.
- Prepare for Baking: Once the dough has sufficiently chilled, remove one disc from the refrigerator. Preheat your oven to 350ºF (175ºC). Line a baking sheet with a silicone baking mat or parchment paper to prevent sticking and aid in even baking.
- Roll Out the Dough: On a very lightly floured surface (and we mean minimal flour to avoid toughening the dough), use a rolling pin to roll the dough to an even 1/4 inch thickness. For consistent results, consider using a rolling pin with thickness guides or a set of dowels. Alternatively, rolling the dough directly on a silicone baking mat can effectively eliminate the need for extra flour entirely, preventing sticky situations.
- Cut and Transfer Shapes: Use your desired cookie cutters to cut out various shapes from the rolled dough. Carefully remove the excess dough around the cut-out shapes. Using a thin, flat spatula, gently transfer the cut-out cookies to your prepared baking sheet. Re-roll dough scraps only once or twice; excessive re-rolling can make cookies tough.
- Bake to Perfection: Bake the cookies for 9-10 minutes. The cookies should appear pale in color with possibly very lightly golden edges. Keep a close eye on them, as baking times can vary significantly between ovens. If your oven has known hot spots, rotate the baking sheet halfway through the baking process to ensure uniform cooking.
- Cool Completely: Once baked, allow the cookies to cool on the baking sheet for at least 10 minutes. This critical step allows them to firm up before handling, preventing breakage. After 10 minutes, carefully transfer them to a wire cooling rack to cool completely to room temperature. If your remaining dough becomes too warm and soft during this process, re-wrap it and chill it in the fridge for 15 minutes before continuing.
- Frost When Fully Cooled: Ensure your cookies are entirely cool before attempting to apply any frosting or icing. Applying frosting to warm cookies will cause it to melt, slide off, and ruin your beautiful decorations.
The Golden Rule: Why Cold Dough Ensures Perfect Cookie Shapes Every Time
The secret to achieving perfectly shaped cut-out sugar cookies that retain their intricate designs and don’t spread into amorphous blobs lies unequivocally in one simple principle: cold cookie dough! When the butter within the dough is firm and cold, it holds its structure. This prevents the cookies from spreading excessively in the oven. As the cookies bake, the butter melts slowly, allowing the flour structure to set and solidify before the fats fully disperse. Here are the most effective methods to achieve and maintain that crucial cold temperature throughout your baking process:
- Pre-Chill the Dough After Mixing: After you’ve mixed all your ingredients and formed the dough, divide it into a few flat discs, wrap each tightly, and refrigerate for a minimum of 1 hour (or up to 2 days). This initial chill firms up the butter and makes the dough much easier to roll and cut without sticking, which is a common frustration for bakers.
- Freeze Cut-Out Shapes Before Baking: For an extra layer of insurance, especially with delicate designs or if you’re baking in a warm kitchen, once you’ve cut out your shapes, place them on a baking sheet and freeze them for 10-15 minutes immediately before transferring them to the hot oven. This quick freeze solidifies the butter even further, significantly minimizing any unwanted spreading.
- Utilize Cold Butter for a No-Chill Method: If you’re opting for a no-chill recipe (as detailed in the section below), it’s imperative to start with cold, firm butter in your dough. This method relies on the butter already being in a solid state. Work efficiently to mix, roll, and cut the cookies, transferring them directly to the oven before the dough has a chance to warm up to room temperature. This technique harnesses the initial coldness of the butter to prevent immediate spreading.
By consistently prioritizing cold dough, you ensure that your beautiful cookie cutter designs emerge from the oven as crisp, defined, and picture-perfect as they went in, ready for flawless decorating!
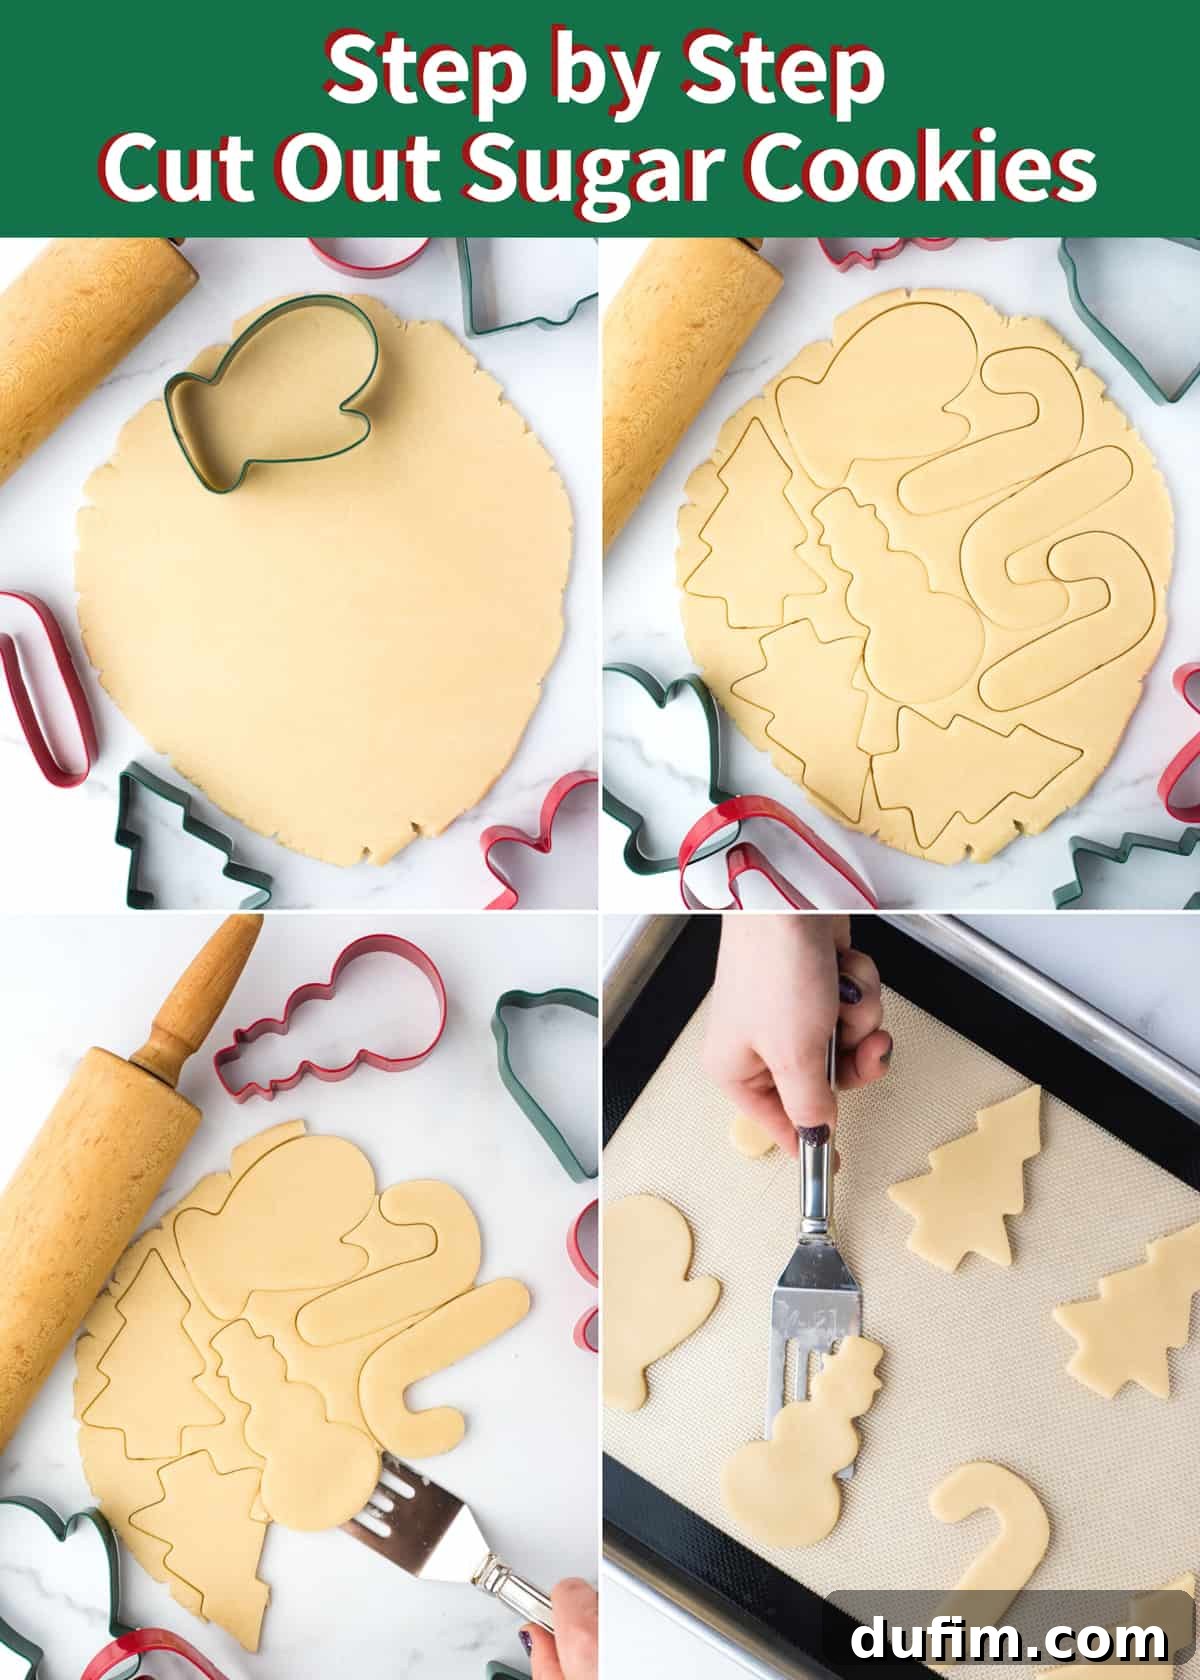
Baking on Demand: The Convenient No-Chill Cut-Out Sugar Cookie Option
Yes, you read that right! For those moments when you’re short on time but still craving homemade, beautifully shaped cut-out sugar cookies, there’s a fantastic no-chill option that yields impressively consistent results. This method is a total game-changer for spontaneous baking sessions, last-minute party preparations, or simply when you can’t bear to wait for dough to chill.
The key to making no-chill sugar cookies work effectively lies in one critical modification to the classic recipe: you must use cold butter straight from the refrigerator, rather than softened butter. When you begin with cold, firm butter and work efficiently through the mixing and rolling process, the dough remains sufficiently cool to maintain its shape during baking. The primary goal is to get the cookies into the preheated oven before the butter has a chance to fully soften and cause the dough to spread prematurely.
Here’s how to successfully adapt our recipe for a no-chill experience:
- Start with Cold Butter: Instead of allowing your butter to soften at room temperature, use it directly from the fridge. Cut the cold butter into small cubes (about 1/2-inch pieces) before adding it to your mixing bowl.
- Mix Quickly and Efficiently: Beat the cold butter with the granulated sugar until just combined. The mixture won’t be as light and fluffy as with softened butter, but it should still be well integrated. Quickly add the other wet ingredients and then the flour, mixing just until the dough comes together.
- Roll Immediately: As soon as the dough is formed and cohesive, divide it and immediately roll it out on a lightly floured surface or, even better, directly on a silicone baking mat or between two sheets of parchment paper. The cooler dough will be slightly stiffer, but more manageable for rolling without sticking.
- Cut and Bake Swiftly: Cut out your desired shapes and transfer them to the baking sheet without delay. Place them in the preheated oven as quickly as possible. Speed is your friend here to keep the dough cool.
While this method allows for immediate baking, for the best consistency and shape retention, we still recommend giving any leftover dough or subsequent batches a quick chill (15-20 minutes) in the refrigerator if they start to feel too warm or soft while you’re working. This ensures optimal results across all your cookies.

Achieving the Perfect Thickness: Rolling Your Cookie Dough for Optimal Texture
The thickness of your cookie dough plays a more significant role than you might imagine in the final texture, chewiness, and bake time of your cut-out sugar cookies. While personal preference certainly comes into play, aiming for consistency is key to a uniform batch. A standard thickness of 1/4 inch is generally recommended for a balanced and versatile result.
- 1/4 inch thickness: This is our recommended standard. It yields a cookie that is neither too thin (which can become overly crisp and delicate, prone to breaking) nor too thick (which might result in a slightly underbaked, doughy center). Cookies rolled to 1/4 inch thickness bake evenly, hold their shape beautifully, and provide a sturdy yet tender base for all your decorating needs.
- Thicker cookies (e.g., 3/8 inch): If you prefer a chewier, softer, and more substantial cookie, rolling the dough a bit thicker can achieve this desired texture. These are often favored for a richer, more “cookie-like” bite, especially if you plan to decorate them minimally or enjoy them plain. Be aware that thicker cookies will require a slightly longer baking time (add 2-4 minutes) and may spread a tiny bit more due to the increased mass and longer time in the oven.
- Thinner cookies (e.g., 1/8 inch): If your preference leans towards a crispier, snappier cookie, rolling your dough thinner will achieve this. These cookies will bake faster (reduce bake time by 1-2 minutes) and be more delicate. They can be great for intricate designs where a delicate, snappy texture is desired, but be very careful not to overbake them, as they can quickly become brittle.
Regardless of your chosen thickness, aiming for consistency across your entire batch is paramount. Unevenly rolled dough will inevitably lead to some cookies being underbaked, while others become overbaked and dry. Utilizing rolling pin guides, an adjustable rolling pin, or even simple dowels placed on either side of your dough can help achieve a perfectly uniform thickness every time, ensuring consistent results from your oven.
Decorate with Style: Choosing Your Perfect Frosting for Cut-Out Cookies
Once your beautifully shaped cut-out sugar cookies have completely cooled, it’s time for the most creative and fun part: decorating! The choice between buttercream and royal icing is often a matter of personal preference, as both offer distinct advantages and a deliciously different finish. To ensure you have all options covered, we’ve included reliable recipes for both so you can pick the one that best suits your vision, desired aesthetic, and occasion.
Buttercream Frosting: Rich, Creamy, and Incredibly Versatile
Buttercream is a universally beloved classic, renowned for its rich, creamy texture and delightful sweetness. It’s incredibly forgiving and easy to work with, making it a go-to favorite for many home bakers, especially for those new to cookie decorating.
- Texture: Buttercream is soft, smooth, and melts in your mouth, providing a luxurious contrast to the cookie.
- Flavor: It offers a rich, buttery, and satisfyingly sweet flavor that complements the sugar cookie wonderfully.
- Application: This frosting is perfect for spreading smoothly with an offset spatula or knife, and it pipes beautifully for soft, decorative swirls, borders, and fills. It can be easily colored with gel food coloring to achieve vibrant hues.
- Drying Time: Buttercream remains soft even after setting, though it will develop a slight crust on the exterior. It’s generally not ideal for stacking immediately after decorating unless refrigerated and handled very gently, as designs can smudge.
- Best for: Simple, rustic designs, adding fluffy peaks, or when you desire a rich, satisfying frosting that’s easy to achieve. It’s also fantastic for involving children in the decorating process, as it’s very forgiving.
Our buttercream recipe focuses on achieving that perfect balance of sweetness and a velvety smooth consistency that holds its shape well when piped, yet remains soft to eat.
Easy Royal Icing: Smooth, Shiny, and Perfect for Intricate Details
Royal icing is the undisputed champion for achieving professional-looking, intricately decorated cookies. Its unique properties allow it to dry hard and smooth, creating a beautiful, polished canvas for detailed designs, fine lines, and easy stacking.
- Texture: Royal icing dries completely hard and crisp, resulting in a smooth, matte or slightly shiny finish that protects your designs.
- Flavor: While sweet, royal icing is generally less rich and buttery than buttercream, allowing the delicate flavor of the sugar cookie to truly shine through.
- Application: This icing is ideal for outlining cookies, “flooding” (filling in outlined areas with thinner icing for a smooth surface), and creating very fine details, patterns, and lettering. Our recipe is specifically designed to be easy to work with for both beginners and experienced decorators.
- Drying Time: Royal icing dries completely hard, typically within several hours to overnight, depending on humidity and the thickness of the application. This makes the cookies incredibly durable, easy to stack, package, and transport without damage to the decoration.
- Best for: Intricate patterns, holiday themes, personalized cookies, elaborate edible art, and anything requiring a durable, polished, and long-lasting finish.
Traditional royal icing often uses fresh egg whites or meringue powder. However, we’ve provided a simplified royal icing recipe that achieves remarkably similar results without these specialized ingredients, making it much more accessible for the everyday home baker. This simplified version typically uses a touch of corn syrup, which helps give it a lovely sheen and elasticity, preventing it from becoming too brittle once dry.
No matter which frosting you choose, remember that gel food coloring works best for achieving vibrant hues without significantly thinning out your icing. Have fun, experiment, and let your creativity shine as you bring your beautiful cut-out sugar cookies to life!
Mastering the Freeze: Storing Your Sugar Cookies and Dough for Convenience
Freezing is a fantastic way to extend the shelf life of your delightful cut-out sugar cookies, whether they are already baked or still in dough form. It’s the perfect strategy for make-ahead baking, ensuring you’re always prepared for unexpected guests, upcoming celebrations, or simply to satisfy a sudden cookie craving. Here’s how to effectively freeze your cookies and dough, preserving their freshness and flavor.
How to Freeze Baked (Unfrosted) Cut-Out Cookies
If you’ve already baked a batch of cookies and want to store them for later enjoyment, freezing them unfrosted is the absolute best approach. This method helps preserve their delicate texture and prevents any potential damage or smudging to your frosting designs. Follow these simple steps for optimal results:
- Ensure Complete Cooling: This step is non-negotiable! Make sure your baked sugar cookies are entirely and thoroughly cool before freezing. Any residual warmth will create condensation within the packaging, leading to soggy, unappetizing cookies. This freezing method works exclusively for unfrosted cookies.
- Stack with Parchment: To prevent the cookies from sticking together and to protect their delicate edges, stack similar cookie shapes together (for example, group all candy canes together or stack gingerbread men). Place a small piece of parchment paper or wax paper between each cookie within the stack. Stacking 4-5 cookies high usually works well and maintains their integrity.
- Wrap Tightly: Wrap each individual stack of cookies securely in several layers of plastic wrap. Double-wrapping is highly recommended to create an airtight seal, which is crucial for preventing freezer burn and keeping unwanted freezer odors from permeating your delicious cookies.
- Container Storage: Place the wrapped cookie bundles inside a freezer-safe ziplock bag, removing as much air as possible, or within a rigid airtight freezer container. This provides an additional layer of protection against crushing and freezer elements.
- Thawing Instructions: When you’re ready to enjoy your frozen baked cookies, simply remove the desired quantity from the freezer bag or container (keeping them inside their plastic wrap). Allow them to thaw completely at room temperature on the kitchen counter for several hours. Once thawed, you can unwrap them and proceed with frosting and decorating as desired.
Baked, unfrosted sugar cookies can be stored in the freezer using this method for up to 2-3 months, maintaining their fresh taste and texture.
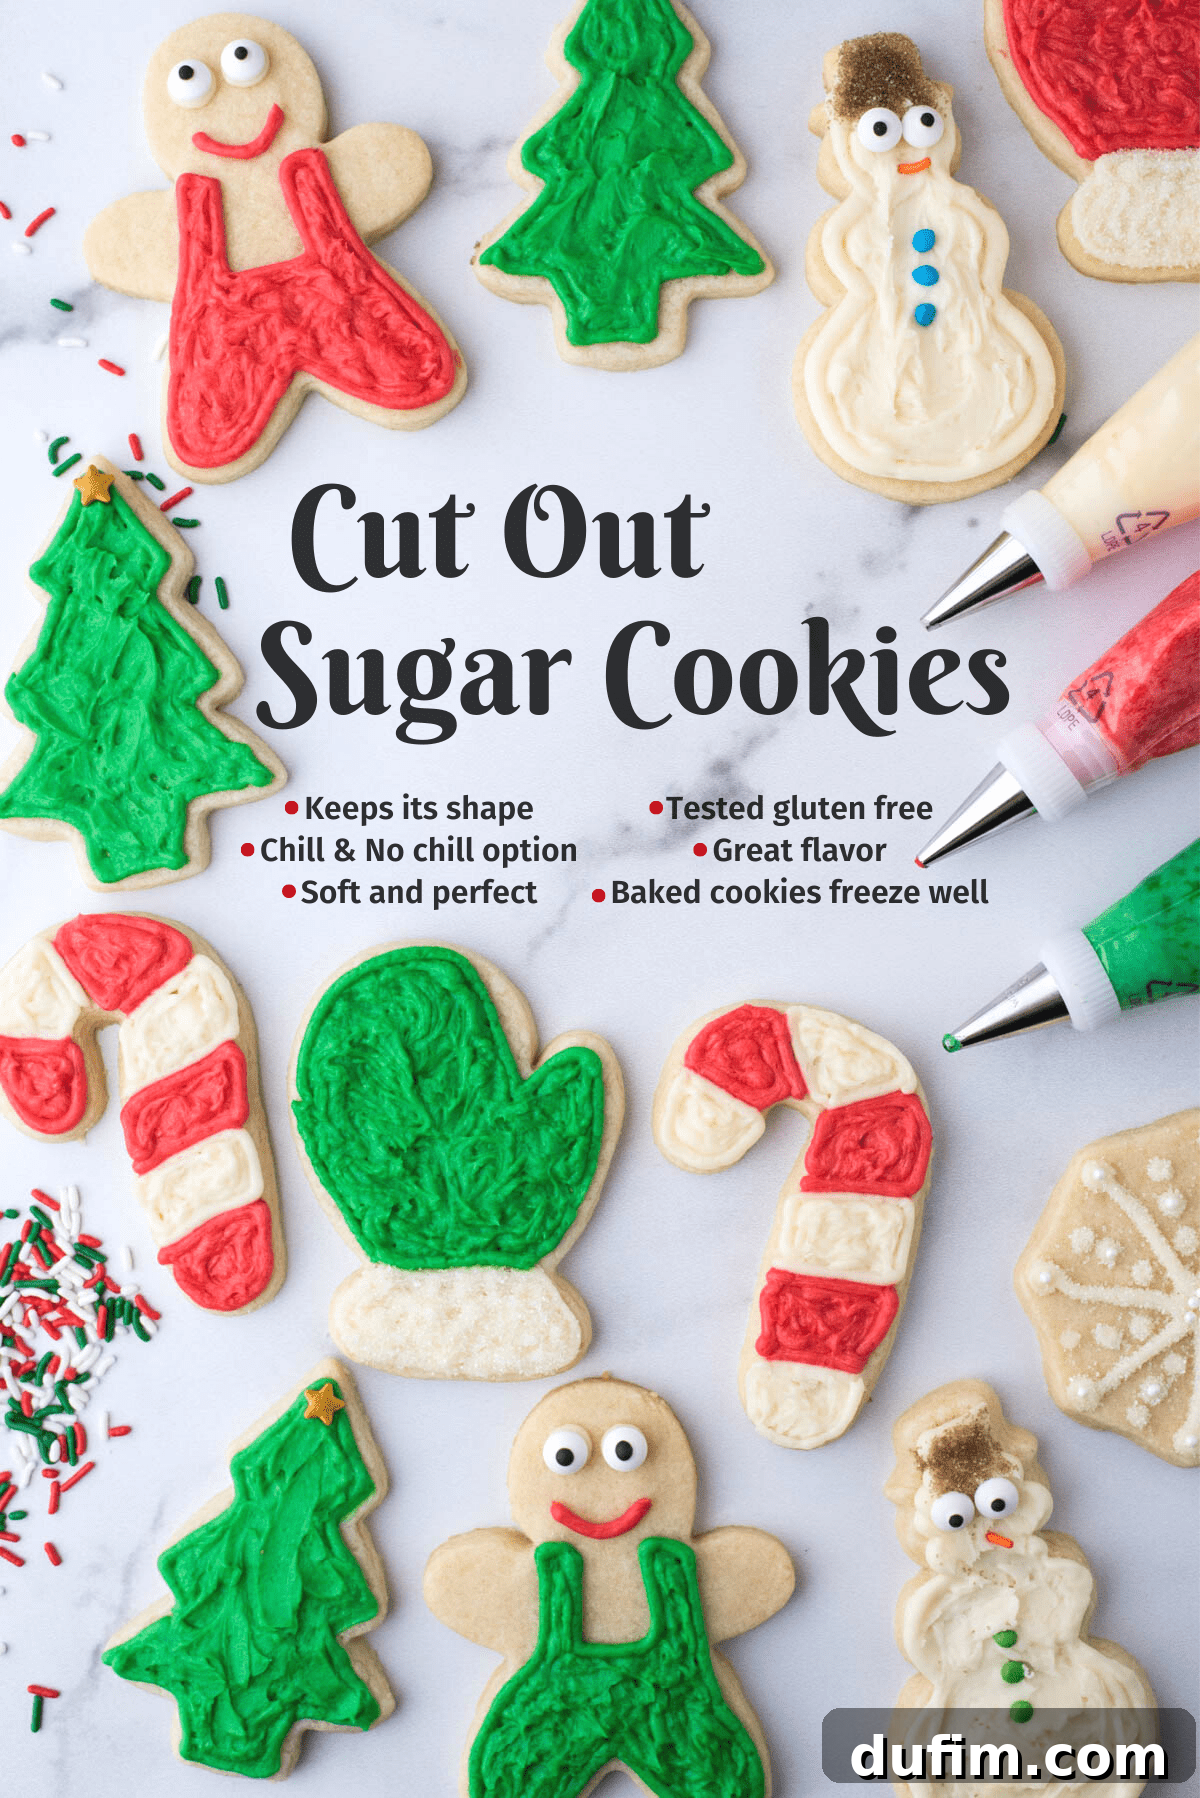
Freezing Cut-Out Sugar Cookie Dough for Future Baking
Preparing cookie dough in advance and freezing it is a fantastic time-saver that allows for fresh-baked cookies whenever the mood strikes. You have two excellent, highly effective methods for freezing this particular cut-out sugar cookie dough, depending on your preference for preparation.
Method 1: Freeze Dough as Flat Discs
This is a classic, space-efficient, and versatile way to store cookie dough. It’s ideal if you haven’t decided on your final cookie shapes yet or prefer the experience of rolling fresh dough just before baking.
- Prepare Discs: After mixing your dough, divide it in half (or into desired portions) and gently flatten each portion into a disc, approximately 1-inch thick. This shape helps the dough thaw more evenly.
- Wrap Securely: Wrap each dough disc thoroughly with several layers of plastic wrap, ensuring no air pockets remain. For maximum protection against freezer burn, you can then place the wrapped discs into a freezer-safe ziplock bag or an airtight container. Label with the date and type of dough.
- Thawing Instructions: To use the frozen dough, transfer the wrapped disc to the refrigerator and allow it to thaw slowly overnight (typically 8-12 hours). Once thawed, let it sit at room temperature for about 15-20 minutes to soften slightly, making it easier to roll and cut without cracking.
Dough discs can be stored safely in the freezer for up to 3 months, ready to be transformed into fresh cookies at your convenience.
Method 2: Freeze Pre-Cut Cookie Shapes
This method offers the ultimate in convenience, allowing you to bake perfectly shaped cookies directly from the freezer with minimal fuss and preparation time. It’s fantastic for impromptu baking sessions or when you need a quick batch of fresh cookies without the entire rolling process!
- Roll and Cut: After preparing your dough (and chilling it if the recipe typically requires, or using the no-chill method), roll it out to your desired thickness (1/4 inch is ideal) and cut into your chosen shapes using cookie cutters.
- Flash Freeze: Carefully place the raw, cut-out cookie shapes onto a baking sheet lined with parchment paper or a silicone baking mat. Ensure that the shapes are not touching each other. Transfer the entire baking sheet to the freezer for 1-2 hours, or until the cookie shapes are completely solid. This crucial “flash freezing” step prevents them from sticking together when stored.
- Package for Storage: Once frozen solid, remove the shapes from the baking sheet. Stack similar shapes together, placing a small piece of parchment paper or wax paper between each cookie to prevent them from fusing. Wrap these stacks tightly in plastic wrap, then store them in a freezer-safe ziplock bag or an airtight container. Label clearly with the date and cookie type.
- Baking from Frozen: To bake from frozen, simply unwrap the desired number of cookie shapes and place them directly onto a silicone-lined baking sheet. Allow them to sit on the kitchen counter for about 15-25 minutes. They should still be very cold, but not rock-hard frozen. Bake according to the recipe instructions, adding an extra 1-2 minutes to the total baking time if needed, as they are starting from a colder temperature.
Pre-cut frozen cookie shapes can be stored in the freezer for up to 3 months, offering unparalleled convenience for delicious, fresh-baked cookies whenever the craving strikes!

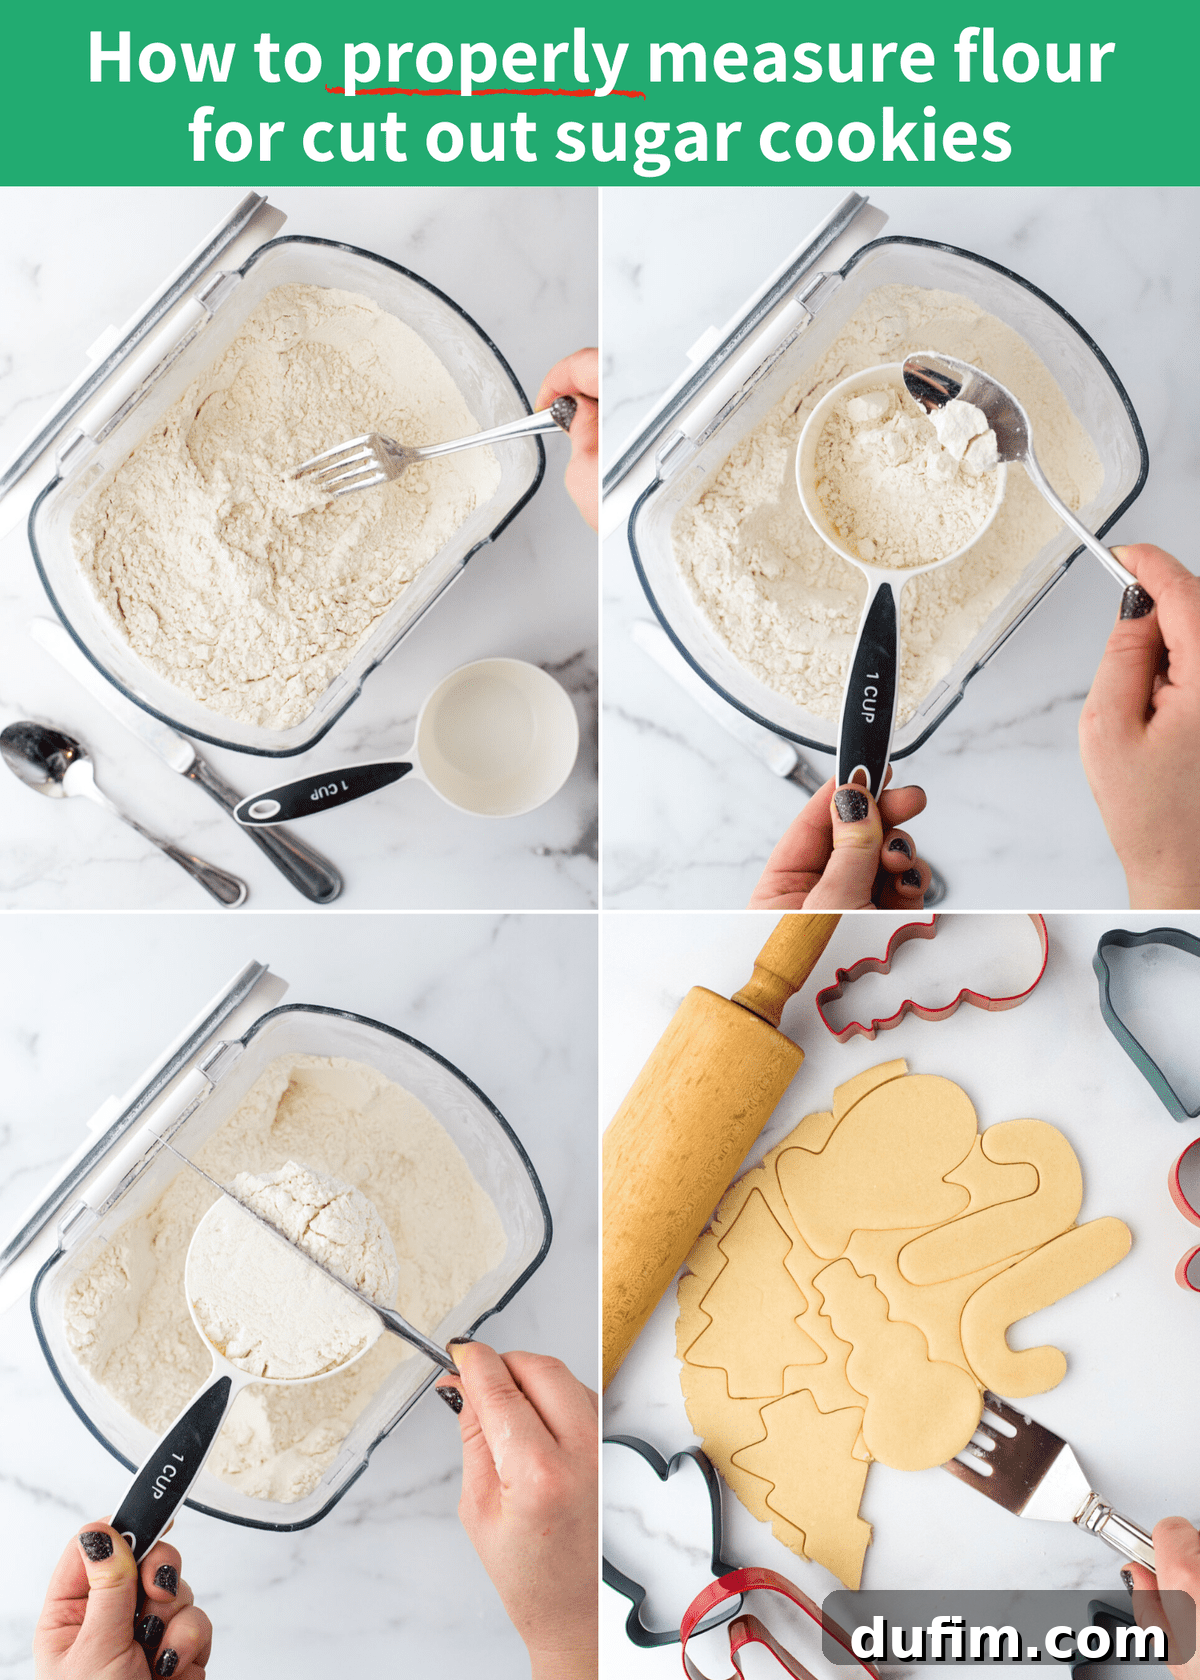
Precision in Baking: How to Properly Measure Flour for Perfect Cut-Out Cookies
Accurate flour measurement is unequivocally one of the most crucial steps in successful baking, especially for delicate recipes like sugar cookies where the final texture needs to be just right. Too much flour can drastically alter the outcome, leading to dry, crumbly, and tough cookies that don’t spread correctly in the oven. Conversely, too little flour can make the dough overly sticky, too soft, and difficult to handle or cut. The “spoon and level” method is universally recommended by professional bakers for achieving consistent and precise results every time.
- Fluff the Flour First: Before you even think about scooping, take a moment to gently fluff up the flour in its bag or container using a fork or whisk. Flour tends to settle and compact over time, particularly after being transported or sitting for a while. This simple but critical step lightens it up, preventing you from accidentally scooping significantly more flour than is actually required.
- Spoon into Measuring Cup: This is a common mistake! Do NOT scoop the measuring cup directly into the bag of flour. Plunging the cup straight into the flour compacts it significantly, leading to an over-measurement of up to 20-30% more flour than the recipe calls for. Instead, use a separate spoon (a large soup spoon works well) to lightly scoop the fluffed flour from its container and gently transfer it into your dry measuring cup until it overflows slightly.
- Level the Measuring Cup: Once your measuring cup is gently overflowing with flour, use the flat side of a butter knife or any straight edge (like the back of a ruler or a clean bench scraper) to level off the excess flour. Simply scrape across the top of the measuring cup, ensuring a precise, flat measure without pressing down on the flour.
By diligently following the spoon and level method, you guarantee that your flour measurement is accurate every time. This precision directly translates to perfectly balanced, wonderfully chewy, and reliably shape-retaining cut-out sugar cookies that everyone will love and ask you to make again and again.
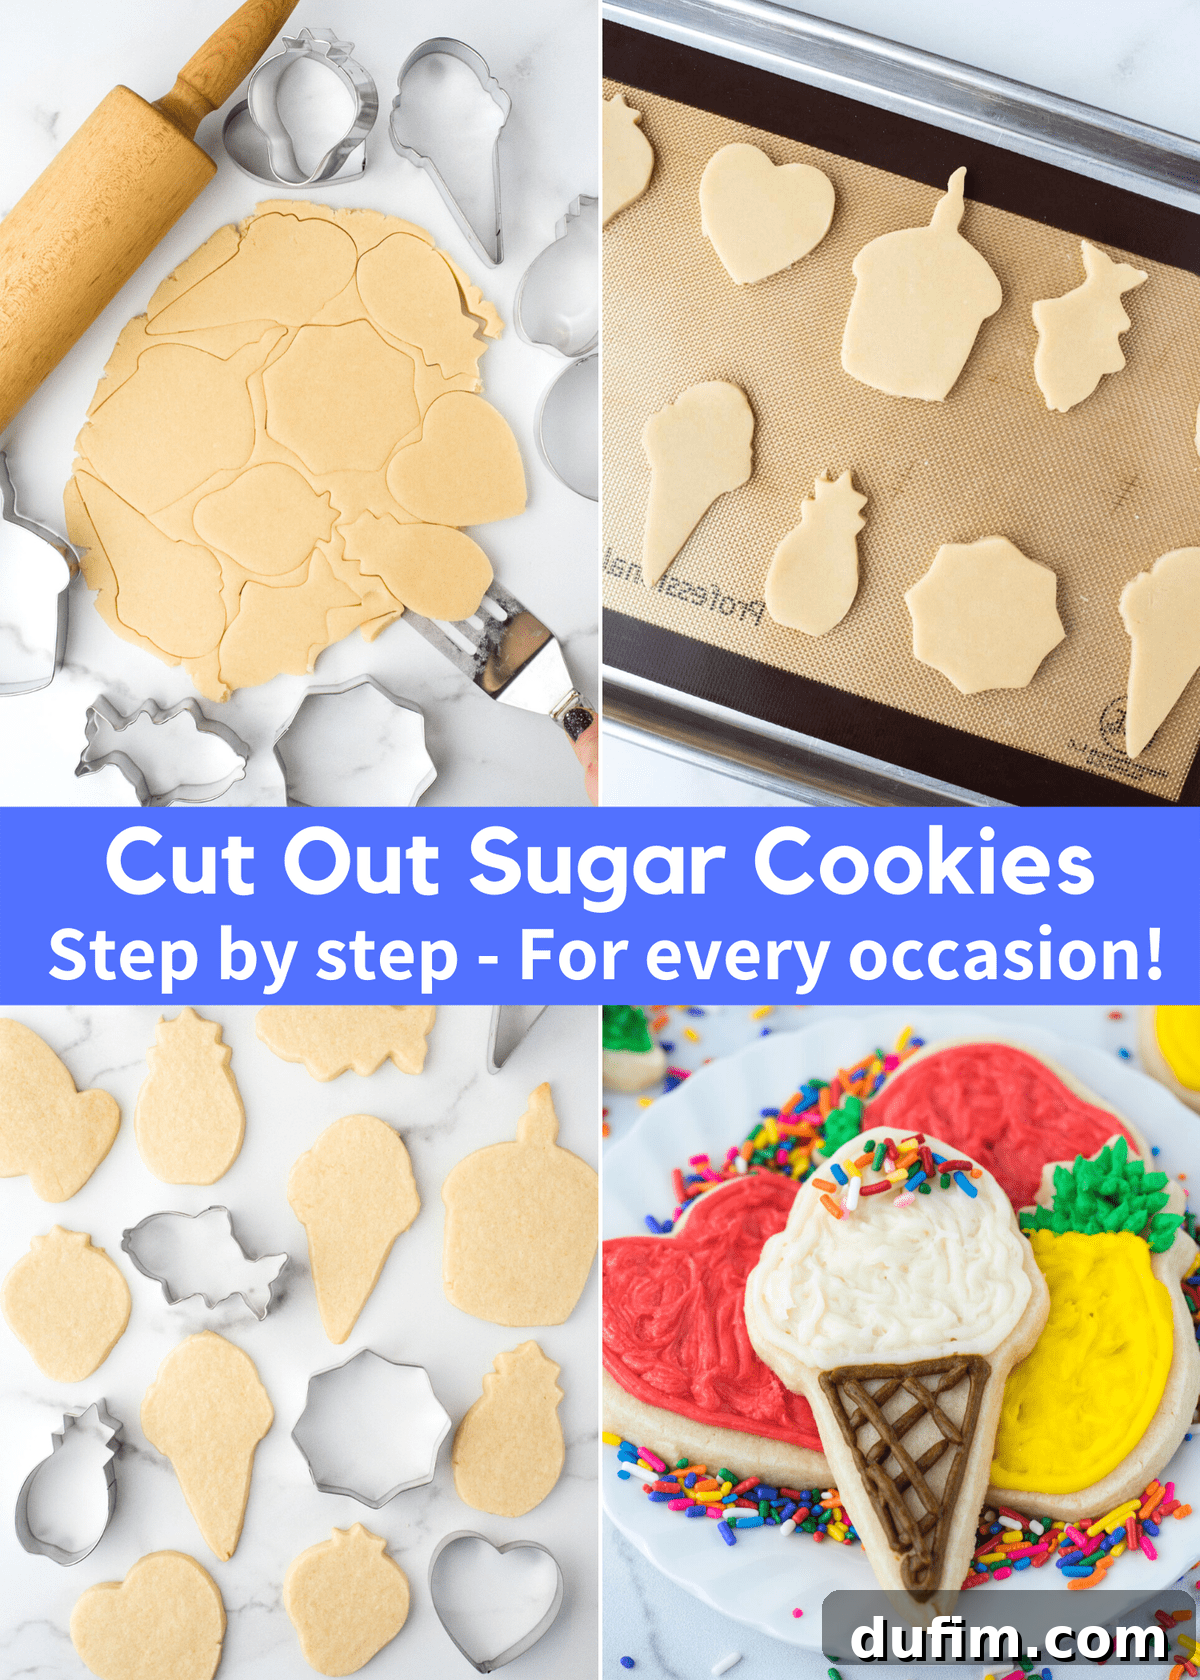
Delicious Gluten-Free Cut-Out Sugar Cookies: No Compromise on Taste or Texture!
For those managing a gluten-free diet, finding a reliable and truly delicious cut-out sugar cookie recipe can often feel like a significant challenge. Many gluten-free adaptations can unfortunately result in dry, crumbly, overly dense, or unpleasantly gritty cookies that disappoint rather than delight. However, we are absolutely thrilled to confirm that this versatile recipe adapts beautifully to be entirely gluten-free, without sacrificing that beloved chewy texture, crisp edges, or perfectly retained shapes!
As a gluten-free baker myself, I deeply understand the importance of having a truly excellent gluten-free base recipe that performs just as well as its traditional counterpart. The key to success here lies in selecting a high-quality, all-purpose gluten-free flour blend. Personally, I’ve achieved consistently fantastic results and rave reviews using King Arthur’s All-Purpose Gluten-Free Flour. This particular blend is expertly designed to be a one-for-one replacement for traditional wheat flour in most recipes, which significantly simplifies the conversion process and minimizes guesswork.
The best part about making these cookies gluten-free is that no other modifications are needed for this specific recipe! Simply substitute the regular all-purpose flour with an equal amount (one-for-one ratio by volume or weight) of your chosen high-quality gluten-free flour blend. Follow all other instructions as written, paying the usual attention to the dough’s consistency – some gluten-free flours might absorb liquids slightly differently, but with a good blend, the difference should be minimal and easily managed. Enjoy perfectly shaped, wonderfully chewy, and undeniably delicious gluten-free cut-out sugar cookies that everyone, regardless of dietary preference, can savor and enjoy!
Explore More Delicious Cookie Recipes
If you’ve enjoyed mastering these perfect cut-out sugar cookies, you’ll love exploring other delightful cookie creations from our kitchen. Expand your baking repertoire with these tried-and-true recipes:
- Maraschino Cherry Chocolate Chip Cookies: A vibrant, fruity, and delightfully chewy twist on a classic favorite.
- Double Chocolate Chip M&M Cookies: Indulge in rich, intensely chocolatey goodness loaded with colorful candy accents.
- Classic Peanut Butter Cookies: Simple, satisfying, and always a nostalgic crowd-pleaser with that signature criss-cross pattern.
- Stained Glass Church Window Cookies: A beautiful and unique cookie that’s as lovely to look at as it is delicious to eat, perfect for special occasions.

Sugar Cookie Cut Out Recipe
By: Beth
Prep Time: 15 minutes
Cook Time: 8 minutes
Additional Time: 2 hours (for chilling dough)
Total Time: 2 hours 23 minutes
Servings: 24 cookies
A perfectly chewy cut-out sugar cookie recipe that consistently holds its shape beautifully! This recipe is easy to follow and fantastic for baking with kids, offering versatile options for all skill levels.
Rate This Recipe
Print Recipe
Equipment You’ll Need
- Wilton Tip No.5 (for fine piping)
- Piping Bags
- Silicone Baking Mat (for non-stick baking)
- Squeeze Bottles (for flooding royal icing)
- Electric Mixer (stand or hand mixer)
- Rolling pin
- Cookie cutters
- Baking sheets
- Wire cooling rack
Ingredients List
For the Cut-Out Sugar Cookies
- 2 ½ cups (300g) all-purpose flour
- 1 tsp baking powder
- ¼ tsp salt
- ½ cup (113g) unsalted butter, softened (1 stick)
- 1 cup (198g) granulated sugar
- 1 large egg
- 1 tsp vanilla extract
- ½ tsp almond extract
For the Creamy Buttercream Frosting
- 1 ½ cups (339g) unsalted butter, softened (3 sticks)
- 4 cups (454g) powdered sugar
- 1 tsp vanilla extract
- 1 tsp almond extract
- 1 Tbsp milk (or heavy cream, as needed)
OR For the Easy & Elegant Royal Icing
- 2 cups (227g) powdered sugar, sifted
- 2 Tbsp milk or warm water
- 1 Tbsp corn syrup
- ½ tsp vanilla or almond extract
Step-by-Step Instructions
For the Cut-Out Sugar Cookies
- In a large bowl, whisk together the flour, baking powder, and salt. Set aside.
- In a mixing bowl, cream together the room temperature butter and granulated sugar with an electric mixer for 90 seconds until light and fluffy.
- Add in the egg, vanilla extract, and almond extract; beat for 1 minute until fully incorporated and smooth.
- Gradually add the flour mixture in thirds, mixing on low speed just until the flour is incorporated after each addition. The dough will initially look crumbly. Continue mixing until the mixture becomes thick and sticks together. Finish by gently kneading the dough with your hands for only 20-30 seconds to ensure it’s cohesive without overworking.
- Divide the dough into two flat discs. Wrap each tightly with plastic wrap and place in the refrigerator for at least 1 hour to chill. The dough can be chilled for up to 2 days.
- After chilling, remove one disc of dough and preheat your oven to 350ºF (175ºC).
- On a very lightly floured surface (use flour sparingly), use a rolling pin to roll the dough to 1/4 inch thick. Rolling on a silicone baking mat can eliminate the need for flour.
- Use cookie cutters to cut out your desired shapes. Carefully remove dough scraps and use a spatula to transfer the shapes to a baking sheet lined with a silicone baking mat or parchment paper. Bake for 9-10 minutes. If your oven has a hot spot, rotate the cookie sheet halfway through baking.
- The cookies will be pale in color but will continue to bake slightly after being removed from the oven. Allow them to cool on the baking sheet for at least 10 minutes before transferring to a wire cooling rack. Repeat the process with the remaining dough. If dough becomes too warm, re-chill for 15 minutes.
- Allow the cookies to cool completely on the cooling rack before frosting them.
For the Creamy Buttercream Frosting
- Place the softened unsalted butter in a mixing bowl and beat with an electric mixer for 90 seconds until creamy and smooth.
- Gradually add the powdered sugar (I recommend adding 2 cups at a time), along with the vanilla and almond extracts. Beat again until smooth and well combined, scraping down the bowl as needed.
- Taste the frosting and adjust sweetness if desired (4 cups of powdered sugar typically creates a balanced sweetness). If the frosting is too thick, add 1 tablespoon of milk or heavy cream and beat until it reaches a creamy, spreadable consistency.
- Decide on your desired colors and divide the frosting into separate bowls. Add a small amount of gel food coloring to each bowl and mix with a spoon or spatula until the color is uniform and vibrant.
- Transfer frosting to piping bags fitted with small round tips (like Wilton Tip No.5), or use spreaders to apply the frosting. Add sprinkles if desired for extra decoration.
- Allow the buttercream frosting to set for several hours or overnight. You can place frosted cookies on baking sheets and cover them with lids or tent loosely with aluminum foil to protect them.
For the Easy & Elegant Royal Icing
- In a medium-sized mixing bowl, combine all ingredients (sifted powdered sugar, milk or warm water, corn syrup, vanilla or almond extract). Mix with a spatula or electric mixer on low speed until completely smooth and lump-free.
- If the frosting is too thick for your desired consistency (e.g., for flooding), add more milk or warm water, 1 teaspoon at a time, until it reaches the desired flow. For outlining, you’ll want a thicker consistency; for flooding, a thinner one that smooths out on its own.
- Divide the icing into separate bowls for different colors. Add gel food coloring to each bowl and mix thoroughly until the color is uniform.
- Transfer the colored icing to piping bags with fine tips or squeeze bottles for easy and precise cookie decoration. Use a thicker consistency for outlines and a thinner one for flooding the centers.
Video Tutorial
Watch our step-by-step video guide to see exactly how to make these perfect cut-out sugar cookies, from mixing the dough to decorating with frosting! (Video available on the original blog post for visual learners).
Expert Tips and Notes for Success
No-Chill Cut-Out Sugar Cookies: Quick Baking Method
- For the convenient no-chill option, it is crucial to start with cold unsalted butter directly from the refrigerator instead of softened butter. Work quickly and efficiently to mix and roll the dough to keep it cold throughout the process.
- Even with the no-chill method, it’s highly recommended to chill any leftover dough or subsequent batches briefly (15-20 minutes) in the refrigerator if it starts to feel too warm or soft while you are working. This ensures consistent shape retention.
How to Freeze Baked (Unfrosted) Cut-Out Cookies for Future Enjoyment
- Ensure cookies are completely cool and unfrosted before freezing to prevent any condensation from forming and making them soggy.
- Stack similar shapes with a small piece of parchment paper between each cookie (stacking 4-5 cookies high works well). Wrap these stacks tightly in plastic wrap, then store them in a freezer-safe ziplock bag or an airtight container.
- To thaw, simply remove the wrapped cookies from the freezer and allow them to sit at room temperature on the counter until fully defrosted.
Can You Freeze Cut-Out Sugar Cookie Dough? Absolutely!
Yes, freezing cookie dough is a fantastic time-saving strategy. You have two highly effective methods for freezing this dough:
Option 1: Freeze Dough into Flat Discs
- Divide the prepared dough into halves, flatten each portion into a disc, and wrap each disc well with plastic wrap. Place them inside a freezer-safe bag or container.
- To thaw, transfer the dough discs to the refrigerator overnight. Once thawed, let them sit at room temperature for 15-20 minutes before rolling and baking.
Option 2: Freeze Pre-Cut Cookie Shapes
- Roll out your prepared dough and cut into your desired shapes. Place these raw shapes on a parchment-lined baking sheet and freeze for 1-2 hours, or until completely solid.
- Once frozen, remove the shapes from the pan, wrap like shapes together in plastic wrap, and store inside a freezer bag or container.
- To bake from frozen, unwrap the shapes, place them on a lined baking sheet, and allow them to thaw on the counter for 15-25 minutes (they should still be cold, but not rock-hard frozen) before baking. Add 1-2 minutes to the typical baking time.
Making These Cookies Deliciously Gluten-Free
This recipe performs exceptionally well when adapted to be gluten-free! I’ve personally had great success using King Arthur’s All-Purpose Gluten-Free Flour. The best part is that no other recipe adjustments are typically needed; simply substitute the regular all-purpose flour with an equal amount of your chosen high-quality gluten-free flour blend. Enjoy perfectly shaped and wonderfully chewy gluten-free cut-out sugar cookies!
Approximate Nutrition Information (per cookie, unfrosted)
Calories: 341 kcal | Carbohydrates: 49g | Protein: 2g | Fat: 16g | Saturated Fat: 10g | Polyunsaturated Fat: 1g | Monounsaturated Fat: 4g | Trans Fat: 1g | Cholesterol: 49mg | Sodium: 49mg | Potassium: 26mg | Fiber: 1g | Sugar: 39g | Vitamin A: 486 IU | Calcium: 20mg | Iron: 1mg
All nutritional values are approximate and provided to the reader as a courtesy. Please note that changing ingredients and/or quantities will alter these estimated nutritional calculations. This information is for general guidance only.
Loved this recipe? We’d love to hear from you!
We thrive on your feedback and enjoy seeing your baking successes! If you tried this recipe for perfect cut-out sugar cookies and loved it, please take a moment to rate it and share your thoughts in the comments section below. Your reviews and experiences help other bakers discover and enjoy these delightful cookies even more!