

Welcome to a recipe that promises to brighten your day and tantalize your taste buds – our incredibly moist and flavorful Lemon Poppy Seed Bread! This isn’t just any quick bread; it’s a testament to the perfect harmony of bright citrus and subtle, nutty crunch. Born from a beloved lemon muffin recipe that has won the hearts of countless families, this loaf pan adaptation delivers the same irresistible taste and tender crumb in a new, delightful form. Whether you’re a seasoned baker or just starting your culinary journey, this recipe guarantees a show-stopping result that will leave everyone asking for more.

“Just made it today, and it’s truly wonderful! The taste is fantastic, and the consistency is perfect – so moist and rich. Thank you for sharing this incredible recipe!”
– Monika
Ultimate Moist Lemon Poppy Seed Bread: A Zesty Delight
Crafting the perfect lemon poppy seed bread is an art form, demanding a precise balance of moisture, vibrant flavor, and just the right touch of sweetness and tartness. As a passionate baker, I believe in fine-tuning every detail until a recipe achieves pure perfection, and this quick bread is no exception. After countless hours in the kitchen, experimenting and refining, I’ve created a lemon loaf that is not only incredibly moist and bursting with fresh lemon essence but also boasts that coveted sweet and tart symphony. Get ready to dive into all my tried-and-true tips and tricks for baking this exceptional treat!
There’s an undeniable magic to lemon poppy seed bread. Each slice offers a moist, tender crumb, a delightful sweetness, and a bright, tangy counterpoint that makes it utterly captivating. And yes, those tiny poppy seeds, while occasionally a minor inconvenience, are absolutely integral to the experience. A few years ago, I omitted them from the batter, thinking they only added visual appeal. To my surprise, the bread just wasn’t the same! While they don’t contribute flavor, that subtle, satisfying crunch they bring to the table is truly irreplaceable.
Speaking of texture, you’ll be particularly impressed by the moist and tender crumb of this lemon loaf. The secret ingredient? Buttermilk! It’s a game-changer, infusing the bread with unmatched moisture and contributing to its delicate texture. Beyond moisture, buttermilk’s natural tanginess beautifully amplifies the tartness of the fresh lemon, creating a harmonious blend of sweet and tart flavors that is simply divine. It’s this thoughtful combination of ingredients that elevates this quick bread to a league of its own.

Essential Ingredients for Your Lemon Poppy Seed Loaf
Crafting this exquisite Lemon Poppy Seed Bread requires a selection of fresh, high-quality ingredients. Each component plays a crucial role in achieving the perfect balance of flavor and texture. Below is a detailed list of what you’ll need. For precise quantities and step-by-step instructions, please refer to the comprehensive recipe card located further down this page.
- All-Purpose Flour: The foundational dry ingredient, providing structure to our quick bread.
- Granulated Sugar: Sweetens the loaf and helps in achieving a golden-brown crust.
- Baking Powder: A leavening agent that helps the bread rise and gives it a light texture.
- Baking Soda: Another leavening agent that reacts with the buttermilk to create lift and tenderness.
- Salt: Enhances all the other flavors, making them pop.
- Large Eggs: Bind the ingredients together and contribute to the rich, moist texture. For best results, allow eggs to come to room temperature. Warmer eggs incorporate more air when beaten, resulting in a lighter and fluffier crumb.
- Buttermilk: The star ingredient for moisture and a delicate tang. If you don’t have buttermilk, you can easily make your own by adding 1 tablespoon of lemon juice or white vinegar to a liquid measuring cup, then filling the rest with milk up to the ½ cup line. Let it sit for 5-10 minutes until it slightly curdles.
- Vegetable Oil: Adds moisture and richness without imparting a strong flavor, ensuring a tender loaf.
- Lemon Zest: The most crucial component for intense lemon flavor! You’ll need the zest from approximately 3 medium-sized lemons. Remember, the zest holds the potent essential oils that give this bread its bright aroma and taste.
- Fresh Lemon Juice: Balances the sweetness and enhances the tartness. Always zest your lemons before juicing them – it’s much easier!
- Poppy Seeds: These tiny seeds provide that characteristic, delightful crunch and visual appeal that makes lemon poppy seed bread so iconic. Don’t skip them!
Step-by-Step Guide to Baking Lemon Poppy Seed Bread
Baking this delightful lemon poppy seed bread is a wonderfully straightforward process, characteristic of most quick bread recipes. With just a few simple steps, you’ll have a fragrant, golden loaf emerging from your oven. Follow these instructions carefully for the best results:
1. Preheat and Prepare: Begin by preheating your oven to 350ºF (175ºC). Next, prepare your loaf pan. Generously coat a standard loaf pan (either 9×5 inches or 8.5×4.5 inches) with non-stick baking spray, ensuring every corner is covered. For an extra layer of protection against sticking, you can also line the bottom with a strip of parchment paper, allowing an overhang on the sides for easy removal.
2. Combine Dry Ingredients: In a medium-sized mixing bowl, whisk together the all-purpose flour, granulated sugar, baking powder, baking soda, and salt. Use a spoon or a whisk to ensure these dry ingredients are thoroughly combined and no lumps remain. Set this mixture aside.
3. Mix Wet Ingredients: In a larger mixing bowl, crack your room-temperature eggs. Add the buttermilk, vegetable oil, finely grated lemon zest, fresh lemon juice, and the poppy seeds. Using a rubber spatula or a whisk, gently stir these wet ingredients together for about 30 seconds, just until they are well incorporated. Avoid over-mixing at this stage.
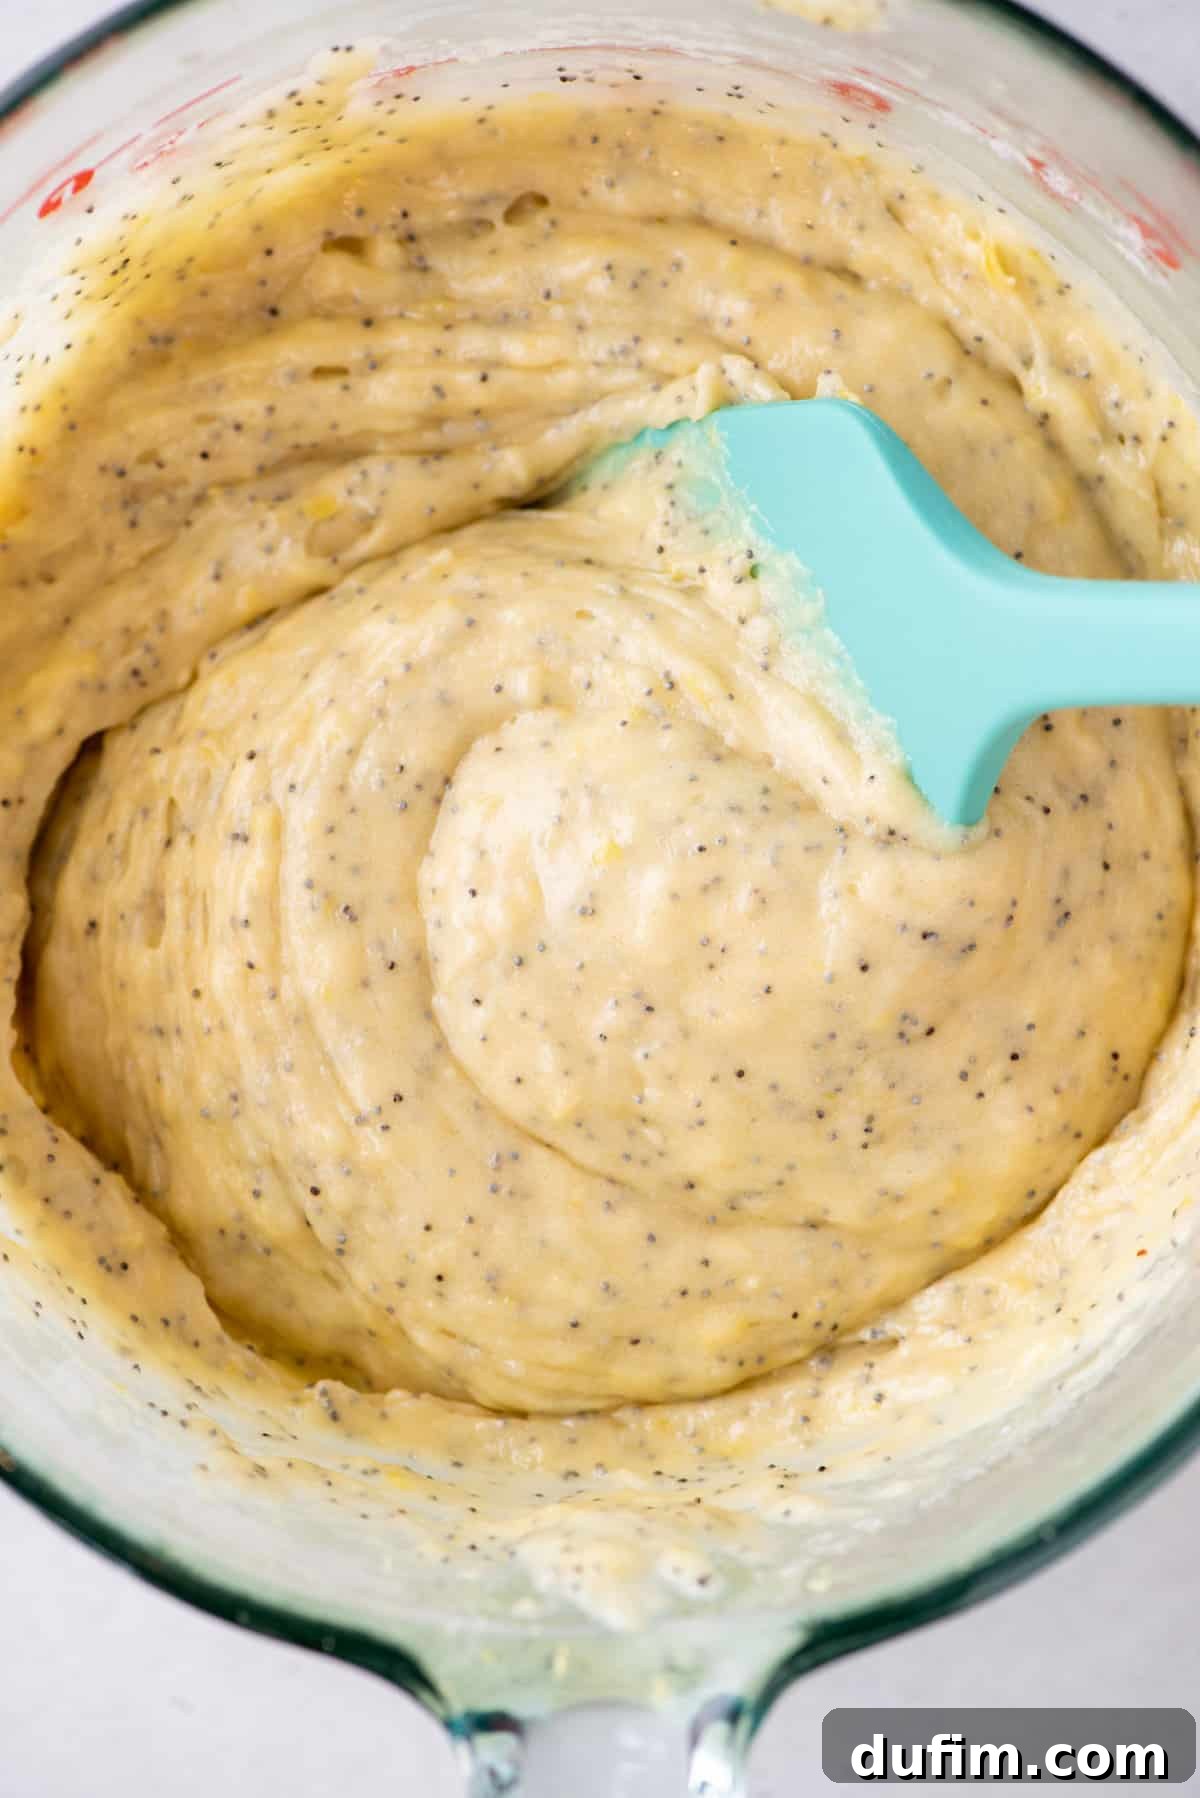
4. Gently Combine Wet and Dry: Gradually add the dry ingredient mixture to the wet ingredients. With a rubber spatula, stir gently until just combined. The key here is to mix until no streaks of dry flour are visible. Overmixing will develop the gluten in the flour, resulting in a tough, dense loaf, so mix just enough. The batter will be quite thick, which is perfectly normal.
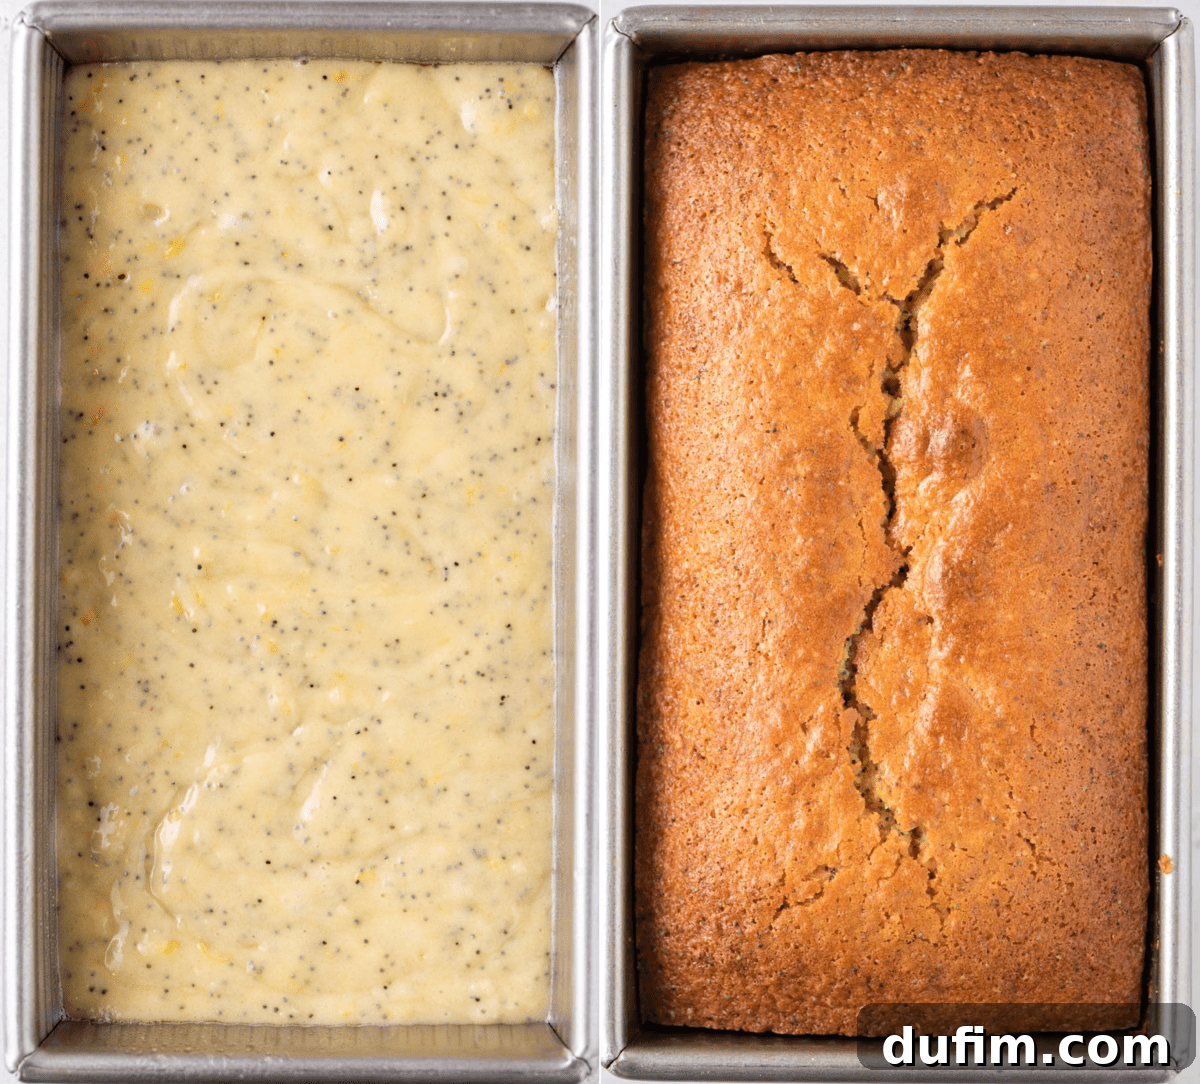
5. Bake to Golden Perfection: Pour the thick batter into your prepared loaf pan, using the spatula to spread it evenly. Place the pan in the center of your preheated oven. Bake for approximately 55 to 65 minutes. The baking time can vary slightly depending on your oven and the size of your pan (see ‘Expert Tips’ below for pan size guidance). To check for doneness, insert a wooden toothpick into the center of the loaf. If it comes out clean or with a few moist crumbs attached, your bread is ready. If it comes out with wet batter, continue baking for another 5-10 minutes and test again.
6. Cool Before Serving: Once baked, remove the loaf from the oven and let it cool in the pan on a wire rack for about 15-20 minutes. This allows the bread to set and prevents it from crumbling when removed. After this initial cooling, carefully invert the pan to remove the bread and place it directly on the wire rack to cool completely. Cooling thoroughly is essential, especially if you plan to add the glaze.
7. Glaze for an Extra Zesty Touch (Optional): If you desire an extra layer of lemon flavor and a beautiful finish, prepare the lemon glaze once the bread has cooled completely. In a small bowl, whisk together 1 cup of sifted powdered sugar with 1 tablespoon plus 2 teaspoons of fresh lemon juice. Stir until smooth and creamy. If the glaze is too thick, add a tiny bit more lemon juice; if too thin, add a touch more powdered sugar. Use a spoon or a whisk to drizzle or spread this vibrant glaze evenly over the cooled bread. Let the glaze set for a few minutes before slicing and serving.

Total Time Required
From start to finish, this recipe is designed to be efficient, allowing you to enjoy fresh-baked goodness without a lengthy commitment.
- Prep Time: Expect to spend about 10-15 minutes preparing the batter. This includes gathering ingredients, measuring, and mixing.
- Bake Time: The loaf will bake for approximately 55-65 minutes at 350ºF (175ºC), depending on your specific oven and loaf pan size.
- Cooling Time: Allow at least 20-30 minutes for the bread to cool in the pan and on a wire rack before slicing, and longer if applying a glaze.
No Zester? No Problem! How to Extract Lemon Zest
While a microplane zester is an invaluable tool for any frequent baker or cook, delivering fine, aromatic zest effortlessly, don’t despair if you don’t own one. You can still get that essential lemon zest with other common kitchen tools:
- Box Grater Method: If you have a standard box grater, use the side with the smallest holes. Gently rub the lemon against these holes, rotating the fruit frequently, being careful to only remove the bright yellow peel and avoid the bitter white pith underneath.
- Paring Knife Method: For a more precise approach, use a sharp paring knife to carefully cut thin strips of the yellow peel from the lemon. Try to get only the yellow part, leaving as much of the white pith as possible. Once you have several strips, lay them flat and use a chef’s knife to finely mince them into tiny pieces. This method works well but requires a bit more patience to achieve a fine texture.
No matter your tool, the goal is to capture that aromatic yellow layer, which is packed with flavorful oils essential to this bread’s signature taste.
Expert Baking Tips for a Perfect Lemon Poppy Seed Loaf
Achieving a consistently perfect lemon poppy seed bread is easy when you keep a few expert tips in mind. These insights will help you avoid common pitfalls and ensure your loaf turns out incredibly moist, flavorful, and beautifully textured every time:
- Understand Your Loaf Pan Size: This is a critical factor for bake time and appearance. There are two common loaf pan sizes: 9×5 inches and 8.5×4.5 inches. While the numbers seem similar, the smaller 8.5×4.5-inch pan has about 15% less volume. This difference means a taller, more domed loaf, which will require an additional 5-10 minutes of baking time.
- For a **8.5×4.5 inch pan**: Expect a total bake time of 55-65 minutes.
- For a **9×5 inch pan**: The suggested bake time is 45-60 minutes. Always check for doneness with a toothpick.
- Don’t Overmix the Batter: This is arguably the most important rule for quick breads. Overmixing develops the gluten in the flour, leading to a tough, dry, and dense loaf. Mix the wet and dry ingredients just until combined – a few lumps are perfectly acceptable and even desirable for a tender crumb.
- Adjust Poppy Seed Quantity: If you’re a true poppy seed enthusiast and love your bread generously speckled with that delightful crunch, feel free to increase the amount from 2 tablespoons to 3 tablespoons. The extra seeds won’t significantly alter the texture but will certainly enhance the poppy seed presence.
- Accurate Oven Temperature: Many home ovens can run hotter or cooler than their set temperature. Using an oven thermometer can help you calibrate your oven and ensure it’s baking at the correct temperature, which is vital for consistent results.
- Room Temperature Ingredients: Ensure your eggs and buttermilk are at room temperature. This allows them to emulsify more easily with other ingredients, creating a smoother batter and a more even texture in your final bread.
- Making Muffins Instead? This recipe is specifically adapted for a loaf pan, but if muffins are what you’re craving, I highly recommend following my dedicated recipe for Lemon Poppy Seed Muffins. It’s perfectly formulated for individual portions and a slightly different baking approach.
- Let it Cool Properly: Patience is a virtue when it comes to quick breads! Allowing the bread to cool completely before slicing not only prevents it from crumbling but also ensures the flavor fully develops and any glaze sets beautifully.

Versatile Serving Suggestions for Lemon Poppy Seed Bread
One of the many charms of lemon poppy seed bread is its incredible versatility. It effortlessly transitions from a bright breakfast treat to a delightful afternoon snack, or even a sophisticated dessert, depending on how you choose to present it. Here are some ideas to elevate your lemon loaf experience:
- For Breakfast or Brunch: Enjoy a warm slice on its own with a cup of coffee or tea. For a more substantial meal, pair it with a dollop of creamy vanilla yogurt and a handful of fresh mixed berries like blueberries, raspberries, or sliced strawberries. The tartness of the berries beautifully complements the bread’s sweetness.
- Afternoon Snack: A simple slice is perfect with a glass of iced tea or lemonade. For a richer snack, spread a thin layer of cream cheese frosting (made with a touch of lemon zest!) or a simple pat of butter.
- Elegant Dessert: Transform your lemon bread into a dessert masterpiece. Serve a warm slice with a generous scoop of high-quality vanilla bean ice cream, allowing the ice cream to gently melt into the warm bread. Another fantastic pairing is with my homemade Cheesecake Whipped Cream, which adds a luxurious, tangy-sweet richness. A garnish of candied lemon peel or a sprig of mint can add a touch of sophistication.
- On its Own: Truthfully, this lemon poppy seed bread is so delicious on its own that it needs no embellishment. The bright lemon flavor and moist crumb are a treat in themselves.
How to Store Your Lemon Poppy Seed Bread
To ensure your delicious lemon poppy seed loaf stays fresh and moist for as long as possible, proper storage is key. Whether you plan to enjoy it over a few days or save it for a later date, here’s how to store it effectively:
- At Room Temperature: For immediate enjoyment, the lemon poppy seed loaf can be stored at room temperature for up to 4 days. To maintain its moisture and prevent it from drying out, wrap the cooled bread tightly in plastic wrap, or place it in an airtight storage container. Keep it in a cool, dry place away from direct sunlight.
- In the Refrigerator: If you need to extend its shelf life slightly, you can store the bread in an airtight container in the refrigerator for up to 5-7 days. While refrigeration keeps it fresh longer, it can sometimes slightly alter the texture, making it a bit denser. Allow slices to come to room temperature or warm them gently before serving for the best experience.
Does Lemon Bread Freeze Well? Absolutely!
Yes, this lemon poppy seed bread is an excellent candidate for freezing, making it perfect for meal prepping or enjoying a slice whenever a craving strikes! Freezing helps preserve its delightful moisture and flavor for an extended period.
- To Freeze: Ensure the loaf is completely cooled before freezing. Wrap the entire loaf, or individual slices, tightly in a layer of plastic wrap. Then, add an additional layer of protection by either placing the wrapped bread into a freezer-safe bag (pressing out as much air as possible) or wrapping it again in a layer of aluminum foil. This double-layer method helps prevent freezer burn.
- Storage Duration: Freeze for up to 3 months.
- To Thaw: When you’re ready to enjoy, simply remove the desired portion from the freezer and let it thaw at room temperature. This typically takes a few hours for slices or overnight for a whole loaf. You can also gently warm slices in a toaster oven or microwave for a fresh-baked feel.

Explore More Zesty Lemon Recipes!
If you’ve fallen in love with the bright, refreshing flavors of lemon in this quick bread, you’re in for a treat! Lemon is an incredibly versatile ingredient that shines in a multitude of desserts. Here are some of my other favorite lemon-infused recipes that are sure to delight your palate and add a touch of sunshine to your baking repertoire:
- Lemon Layer Cake: A stunning and deliciously moist cake perfect for special occasions.
- Lemon Sugar Cookies: Chewy, soft, and bursting with citrusy goodness, these cookies are a crowd-pleaser.
- No Bake Lemon Pudding Pie: A cool, creamy, and effortlessly refreshing dessert, ideal for warmer days.
Each of these recipes leverages the vibrant flavor of lemon in unique ways, promising another delightful culinary adventure.
Lemon Poppy Seed Loaf Recipe FAQs
While it’s not strictly necessary for this recipe, soaking poppy seeds before baking can be a fantastic way to enhance their flavor and texture! Soaking them in warm liquid for about 30 minutes helps to soften the seeds and release their natural oils, contributing to a more pronounced nutty flavor and a slightly less gritty texture in your baked goods. It’s a simple step that can offer an added burst of deliciousness, making your lemon poppy seed bread even more remarkable!
Absolutely, it is perfectly safe to bake with poppy seeds! These tiny, versatile seeds are a common ingredient in many cuisines worldwide and are celebrated for the delightful crunch and subtle, nutty flavor they add to baked goods, savory dishes, and even beverages. Enjoy your lemon poppy seed treats without any worries!
The combination of lemon and poppy seed is truly a match made in baking heaven! The bright, zesty, and refreshing flavor of lemon provides a wonderful counterpoint to the subtle, earthy, and nutty crunch of poppy seeds. This dynamic duo creates a delightful contrast and balance: the tartness of the lemon cuts through the richness of the bread, while the poppy seeds add an intriguing textural element and a mild, pleasant depth. It’s this exquisite balance of tart, sweet, and nutty that makes lemon poppy seed treats so enduringly popular and utterly irresistible!

Tap stars to rate!
Lemon Poppy Seed Loaf Recipe
Beth
10 minutes
45 minutes
55 minutes
12
servings
Equipment
-
Glass Mixing Bowl
-
Favorite Spatula
-
Kitchen Scale
Ingredients
- 2 ½ cups (300g) all purpose flour
- 1 ¼ cups (248g) granulated sugar
- 2 ½ tsp baking powder
- ½ tsp baking soda
- ½ tsp salt
- 2 large eggs
- ½ cup (118ml) buttermilk
- ⅓ cup (79ml) vegetable oil
- 2 Tbsp lemon zest, about 3 lemons
- ¼ cup (59ml) lemon juice, fresh squeezed
- 2 Tbsp poppy seeds
Glaze
- 1 cup (113g) powdered sugar, sifted
- 1 Tbsp + 2 tsp lemon juice
Instructions
-
Preheat the oven to 350ºF (175ºC). Generously spray a loaf pan (9×5 or 8.5×4.5 inches) with non-stick cooking spray, or line with parchment paper for easy removal.
-
In a medium mixing bowl, combine the flour, granulated sugar, baking powder, baking soda and salt. Stir well with a spoon to ensure all dry ingredients are evenly distributed. Set aside.2 ½ cups (300g) all purpose flour,
1 ¼ cups (248g) granulated sugar,
2 1/2 tsp baking powder,
½ tsp baking soda,
½ tsp salt -
In a larger mixing bowl, combine the room-temperature eggs, buttermilk, vegetable oil, lemon zest, fresh lemon juice, and poppy seeds. Stir gently with a spatula or whisk for about 30 seconds until just combined.2 large eggs,
½ cup (118ml) buttermilk,
⅓ cup (79ml) vegetable oil,
2 Tbsp lemon zest,
¼ cup (59ml) lemon juice,
2 Tbsp poppy seeds -
Slowly add the dry mixture to the wet mixture. Stir gently by hand with a spatula until just combined. Do not overmix; a few lumps are fine. The batter will be quite thick.
-
Pour the batter into the prepared loaf pan and spread it evenly with a spatula.
-
Place the pan in the center of the preheated oven and bake for 55-65 minutes (for an 8.5×4.5 inch pan) or 45-60 minutes (for a 9×5 inch pan), or until a toothpick inserted into the center comes out clean. Ensure you know your pan size for accurate baking.
Glaze (Optional)
-
Allow the bread to cool completely on a wire rack before applying the glaze. In a small bowl, whisk together the sifted powdered sugar and lemon juice until smooth. Adjust the consistency with more lemon juice or powdered sugar as needed. Using a spoon, drizzle or spread the glaze evenly over the cooled bread. Let it set before slicing.1 cup (113g) powdered sugar,
1 Tbsp + 2 tsp lemon juice
Notes
Know what size loaf pan you have. There are two popular loaf pan sizes – 9×5 inches and 8.5×4.5 inches. Even though the numbers are similar, the pans actually differ in size by 15%. The 8.5×4.5 inch pan will yield a tall, more domed bread and will take 5-10 minutes longer when baking. The total suggested bake time for an 8.5×4.5 inch pan is 55-65 minutes and for a 9×5 inch pan is 45-60 minutes. Always check for doneness with a toothpick.
Nutrition
|
Carbohydrates: 52g
|
Protein: 4g
|
Fat: 8g
|
Saturated Fat: 1g
|
Polyunsaturated Fat: 4g
|
Monounsaturated Fat: 2g
|
Trans Fat: 1g
|
Cholesterol: 32mg
|
Sodium: 255mg
|
Potassium: 71mg
|
Fiber: 1g
|
Sugar: 31g
|
Vitamin A: 62IU
|
Vitamin C: 3mg
|
Calcium: 93mg
|
Iron: 2mg
Nutrition Disclosure
All nutritional values are approximate and provided to the reader as a courtesy. Changing ingredients and/or quantities will alter the estimated nutritional calculations.