

Prepare to be absolutely delighted by these incredible gluten-free sugar cookies! They are every bit as good as, if not better than, traditional sugar cookies. As a dedicated baker who has been committed to gluten-free living since 2006, I meticulously test and perfect each recipe until it achieves a truly exceptional standard, making it worthy of sharing with everyone. This particular gluten-free sugar cookie recipe is an undeniable winner, consistently delivering that classic, comforting taste and irresistible texture without any trace of gluten.
FINALLY!! A good GF cut out sugar cookie that tastes like the cookies mom made growing up.
-Abby

The Ultimate Guide to Baking Perfect Gluten-Free Cut-Out Sugar Cookies
If you’ve long believed that a gluten-free diet meant waving a final goodbye to the joy of soft, chewy, and beautifully decorated cut-out sugar cookies, prepare to have your perceptions delightfully challenged! This remarkably easy gluten-free sugar cookie recipe is here to completely revolutionize your baking experience. It’s designed to bring back all the cherished memories of classic sugar cookies, ensuring that no one has to miss out on this beloved treat, regardless of dietary restrictions.
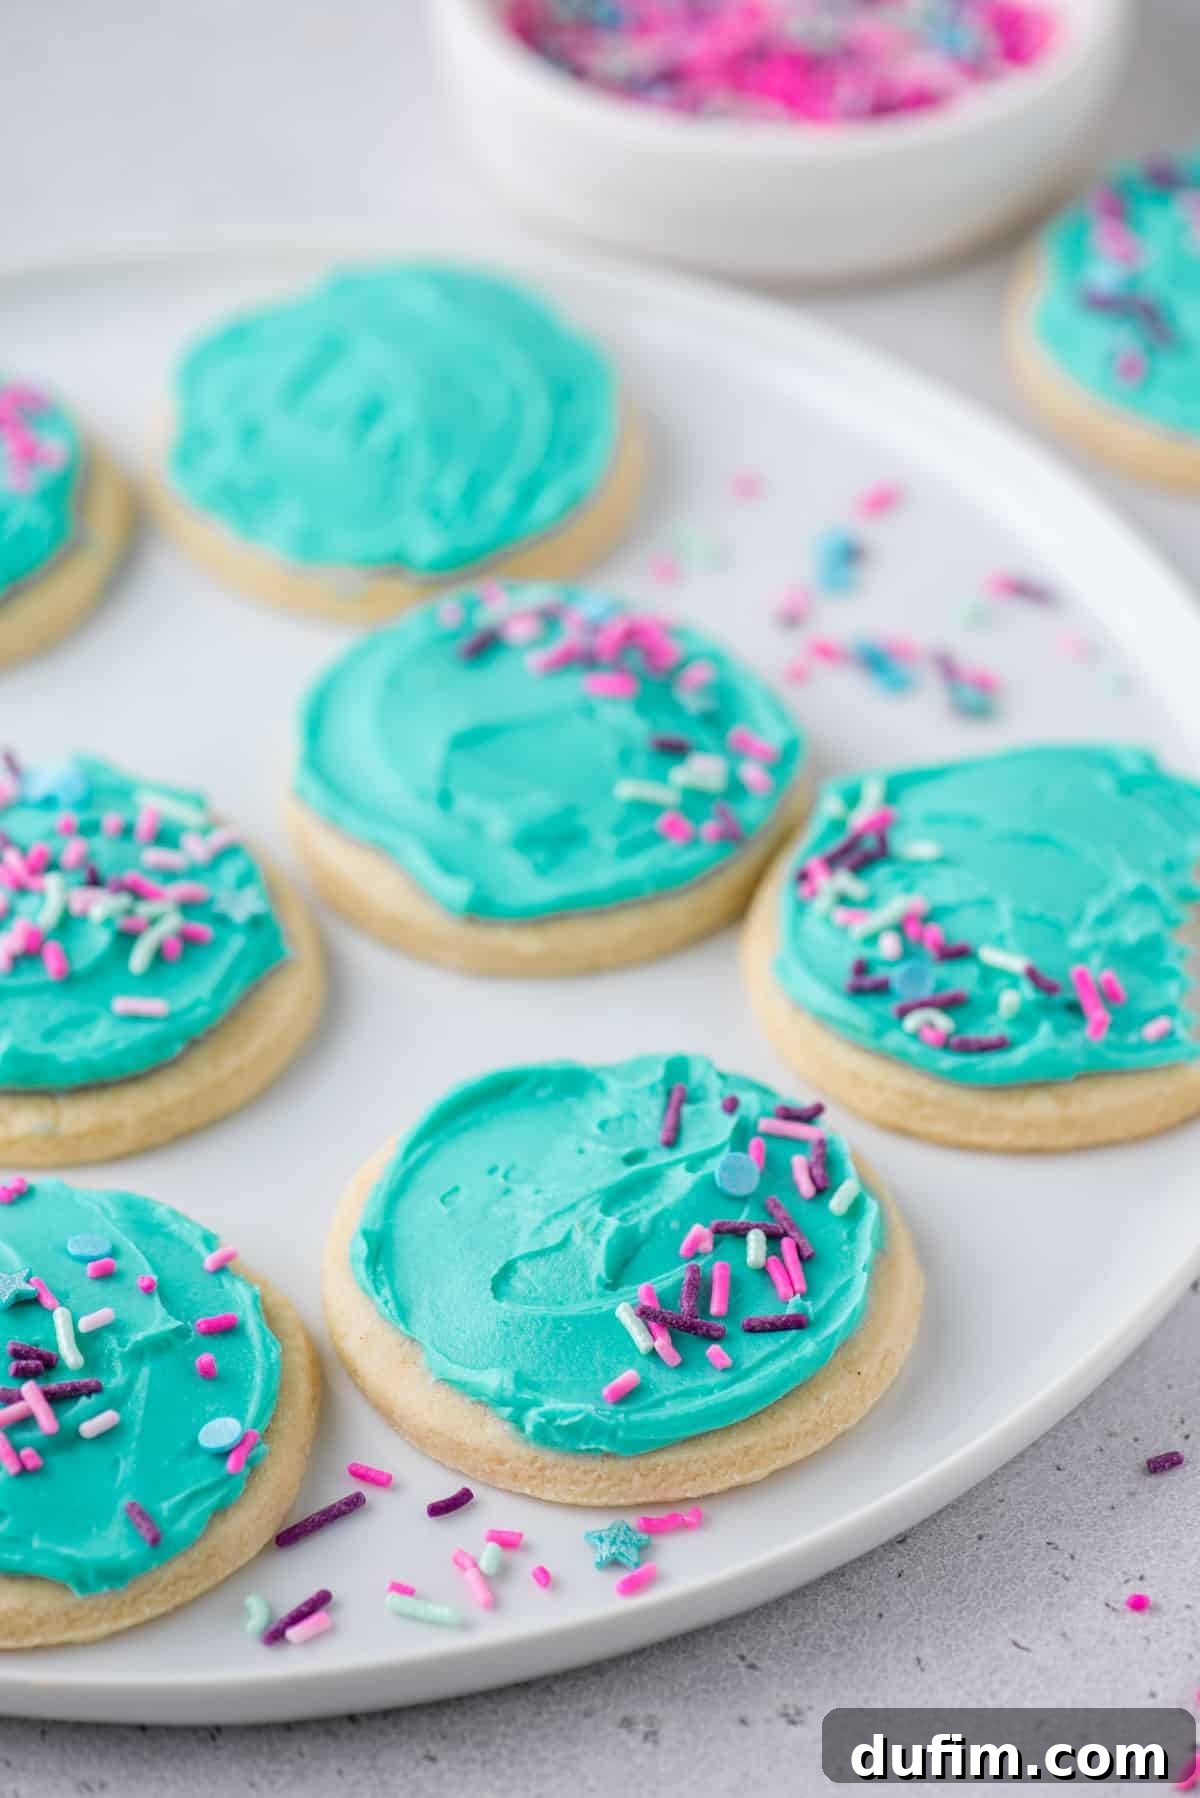
These cookies boast the quintessential sweet sugar cookie flavor, paired with an irresistibly soft and slightly chewy texture that melts in your mouth. Beyond their deliciousness, they serve as the perfect blank canvas for all your creative endeavors. Whether you’re cutting them into whimsical shapes for holidays, intricate designs for special occasions, or simply classic rounds, they hold their form impeccably. Topped with vibrant icing, they are not just a treat for the palate but also a feast for the eyes.
What sets this gluten-free sugar cookie recipe apart is its incredible accessibility and ease. There’s absolutely no need to scour specialty stores for obscure flours, hard-to-find gums, or complicated starches. You can effortlessly pick up a high-quality gluten-free all-purpose flour blend from your local grocery store, alongside all the standard, everyday sugar cookie ingredients you likely already have in your pantry. For consistently stellar results, my absolute favorite gluten-free all-purpose flour is King Arthur’s Gluten Free Measure for Measure Flour. It performs beautifully, mimicking traditional wheat flour without any fuss!
Eager to explore more delightful gluten-free recipes that don’t compromise on taste or texture? Be sure to check out my other tried-and-true favorites, including Gluten Free Blueberry Muffins, Gluten Free Chocolate Chip Cookies, and Gluten-Free Chocolate Cupcakes!

Essential Ingredients for Your Gluten-Free Sugar Cookie Masterpiece
Crafting these delectable gluten-free sugar cookies requires a precise selection of ingredients, all of which are widely available at most major supermarkets. Below, you’ll find a comprehensive breakdown of what you’ll need for the cookie dough itself, along with the ingredients for two popular and versatile frosting options: the rich and creamy buttercream, and the elegant, hard-setting royal icing. For exact quantities and full, detailed instructions, please refer to the complete recipe card conveniently located towards the end of this post.
Gluten-Free Sugar Cookies: Ingredient List
- Gluten-free all-purpose flour: This is the fundamental building block of our cookies. It is absolutely crucial to use a high-quality, pre-blended gluten-free all-purpose flour. Do not substitute with single gluten-free flours such as almond flour, coconut flour, or oat flour, as their unique absorption rates and binding properties will not work in this recipe and will result in a different texture or failure to hold shape. Look for a blend that ideally contains xanthan gum, which provides the necessary structure and elasticity typically found in gluten.
- Baking powder: This acts as a crucial leavening agent, helping the cookies to rise gently and contribute to their desirable soft, tender texture without becoming cake-like.
- Salt: A small but mighty ingredient, salt plays a vital role in balancing and enhancing all the sweet flavors in the cookie dough, preventing them from tasting overly sweet and adding depth.
- Unsalted butter: It is imperative that the butter is softened to room temperature. This allows it to cream effectively with the sugar, creating a light, airy, and cohesive base for your dough, which is key to a tender cookie. If you only have salted butter, simply reduce the added salt in the recipe by ¼ teaspoon.
- Granulated sugar: The primary sweetener for these classic cookies, granulated sugar contributes to their signature sweet flavor, helps achieve crisp edges, and keeps the centers wonderfully soft.
- Egg: A large egg, also at room temperature, serves as a vital binder, adding moisture, richness, and structure to the dough. Room temperature eggs emulsify much better with other ingredients, ensuring a smooth dough.
- Vanilla extract: An indispensable ingredient for that universally beloved, comforting aroma and classic sugar cookie flavor profile. Do not skimp on quality here.
- Almond extract: This is truly the “secret weapon” for achieving that traditional, nostalgic sugar cookie flavor that often gets overlooked. A small amount elevates the taste profile dramatically, setting these cookies apart. I highly recommend including it for the authentic experience.
Rich & Creamy Buttercream Frosting: Ingredient List
For a soft, beautifully spreadable, and intensely flavorful frosting that’s perfect for quick and colorful decorating, our classic buttercream recipe is an excellent choice. It offers a luscious sweetness and a satisfying mouthfeel.
- Unsalted butter: Similar to the cookie dough, softened unsalted butter is critical here. It ensures that the butter whips up into a wonderfully smooth, creamy frosting without any unsightly lumps, providing the perfect base.
- Powdered sugar: Also known as confectioners’ sugar, this finely milled sugar is essential for achieving the incredibly smooth and silky texture characteristic of classic buttercream. Sifting it beforehand is a recommended step to eliminate any potential lumps.
- Vanilla extract: Adds a delightful depth and warmth of flavor to the frosting, complementing the cookies beautifully.
- Almond extract: A small touch of almond extract in the frosting perfectly echoes and enhances the almond notes in the cookies, creating a harmonious flavor.
- Milk: A splash of milk (or, for an extra touch of indulgence, heavy cream) helps to adjust the frosting’s consistency, making it wonderfully smooth and easily spreadable or pipeable.
- Gel food coloring: Always opt for gel food coloring instead of liquid varieties. Gels deliver vibrant, intense hues with just a tiny amount, crucially avoiding the introduction of excess liquid that could thin out your perfectly prepared frosting.
Elegant Royal Icing: Ingredient List
If your preference leans towards a frosting that dries hard, creates crisp, defined lines, and allows for intricate, detailed decorations, then royal icing is undoubtedly your ideal choice. It’s superb for creating layered designs and robust decorative elements that hold their shape beautifully.
- Powdered sugar: Sifting your powdered sugar is an absolute must when making royal icing. This ensures an impeccably smooth, lump-free consistency that will flow perfectly when piped, making detailed work much easier.
- Milk or warm water: Used sparingly to thin the royal icing to the precise consistency required for various decorating techniques, such as outlining or flooding. Start with a very small amount and add gradually.
- Corn syrup: Incorporating light corn syrup into your royal icing provides a beautiful, subtle sheen to the dried icing and, more importantly, helps to prevent it from becoming too brittle, making it more resistant to cracking.
- Vanilla or almond extract: These extracts infuse the royal icing with a delicate flavor, ensuring it complements the deliciousness of the sugar cookies rather than just being a sweet topping.
- Gel food coloring: As with buttercream, gel food coloring is the superior choice for royal icing. It allows you to achieve rich, vivid colors without altering the delicate consistency of the icing, which is crucial for precise decorating.
What Gluten-Free Flour is Best for These Sugar Cookies?
The choice of gluten-free flour blend is absolutely pivotal to the success and texture of these cut-out sugar cookies. After extensive experimentation and consistent excellent results, I confidently recommend King Arthur’s Gluten-Free Measure-for-Measure Flour. This particular blend is meticulously formulated to behave remarkably similarly to traditional all-purpose wheat flour, making it an incredibly reliable and foolproof option for all your gluten-free baking projects, especially for delicate cookies like these. It mixes seamlessly, bakes consistently, and delivers a taste and texture that closely mirrors its gluten-containing counterparts, guaranteeing a delightful experience without any unwelcome surprises!
A high-quality gluten-free all-purpose flour blend typically features a thoughtful combination of ingredients such as rice flour (both white and brown), potato starch, tapioca flour, and critically, xanthan gum. Xanthan gum is an essential component; it acts as a binder, effectively mimicking the elasticity and structural properties that gluten provides in wheat-based baking. This helps prevent your gluten-free cookies from becoming crumbly, dry, or spreading excessively during baking. Always take a moment to check the ingredient list of your chosen flour blend to ensure it includes a binder like xanthan gum. If it doesn’t, you might need to add a small amount separately, typically ¼ to ½ teaspoon per cup of flour, to achieve the desired structure.
How to Make & Expertly Decorate Your Gluten-Free Sugar Cookies
Baking these gluten-free sugar cookies is an incredibly satisfying culinary journey, and the decorating phase is where you can truly unleash your artistic flair! Please keep in mind that you’ll want to select *one* of the two frosting options – either the rich buttercream or the elegant royal icing – to top your cookies. There’s no need to prepare both unless you’re planning an exceptionally large batch and have doubled the cookie recipe to accommodate.
Step-by-Step Instructions: Making the Gluten-Free Sugar Cookie Dough
- Mastering Flour Measurement – The Foundation of Success: Before you even think about mixing, it’s imperative to properly measure your gluten-free flour. This is the single most common reason why baking recipes fail. The most accurate and recommended method for precise baking is to use a kitchen scale, weighing the flour in grams (for 2 ¼ cups, aim for 270g). This eliminates any variability from scooping. If a kitchen scale isn’t available, follow the “spoon and level” method: First, aerate your gluten-free flour by whisking or stirring it thoroughly in its container; flour tends to settle and compact, leading to over-measurement. Then, use a spoon to lightly sprinkle the aerated flour into your measuring cup until it slightly overflows. Do not pack the flour down or tap the cup, as this will compact it. Finally, use the straight edge of a butter knife or similar tool to sweep off any excess flour, ensuring a perfectly level measurement. Do not sift the flour unless the recipe specifically instructs you to.
- Combining the Dry Ingredients: In a large mixing bowl, thoroughly whisk together your precisely measured gluten-free all-purpose flour, baking powder, and salt. This crucial step ensures that all the dry ingredients are evenly distributed throughout the mixture, which is vital for uniform rising and consistent flavor in every cookie. Once mixed, set this bowl aside.
- Creaming the Wet Ingredients: In a separate, even larger mixing bowl, place your softened unsalted butter and granulated sugar. Using an electric mixer (either a handheld mixer or a stand mixer fitted with the paddle attachment), beat these ingredients together on medium speed for approximately 90 seconds. This process, known as creaming, incorporates air into the mixture, which is essential for achieving light and tender cookies. Next, add the room temperature egg, vanilla extract, and almond extract. Continue beating for another full minute until the mixture is visibly lightened in color and appears fluffy and well-emulsified.
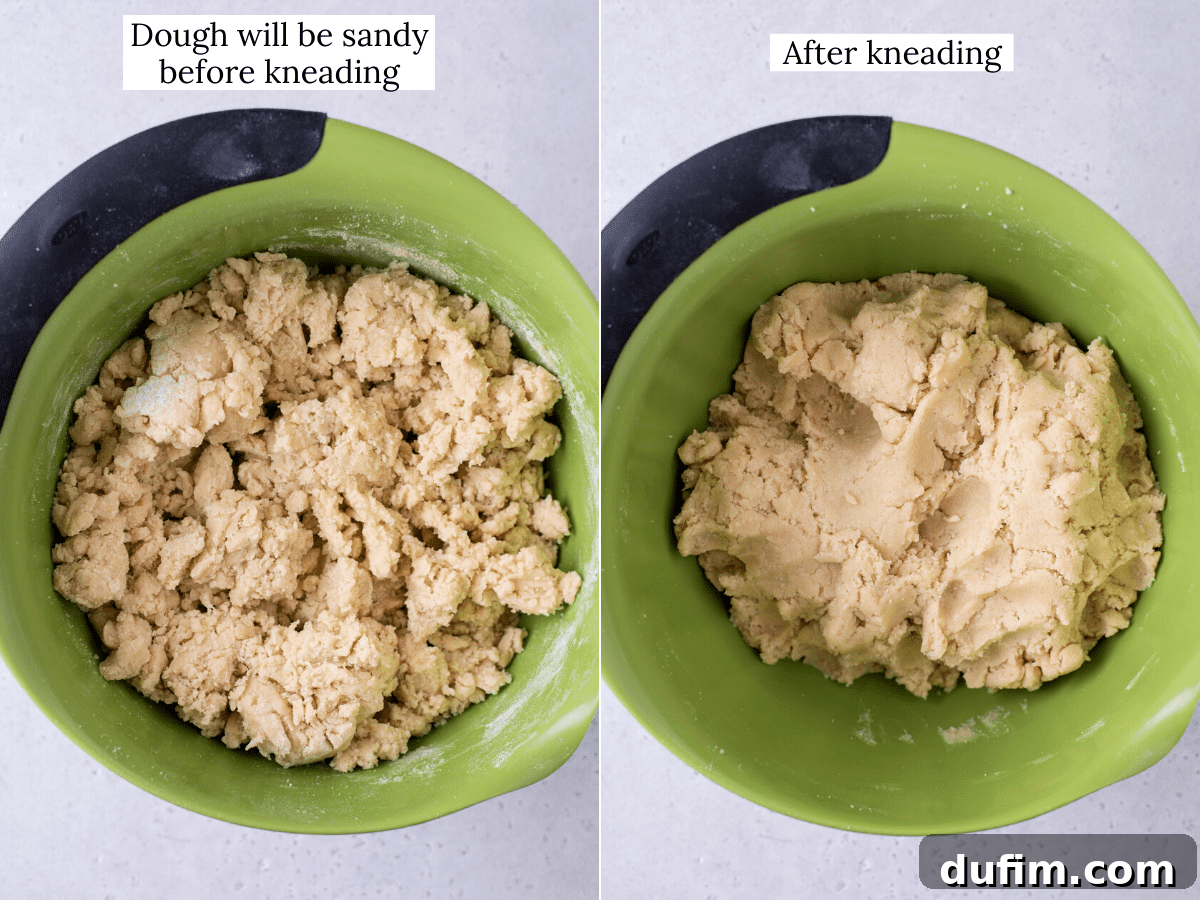
- Bringing the Dough Together & Gentle Kneading: Gradually add the whisked dry flour mixture to your wet ingredients in three separate portions. Mix on low speed, just until the flour is barely incorporated after each addition. It’s normal for the dough to appear quite crumbly and almost sandy at this stage – do not be alarmed, this is typical for gluten-free doughs. Continue mixing until the mixture begins to thicken and visibly clump together. To achieve a perfectly cohesive dough, finish by using your clean hands to gently knead the dough together for a brief 20 to 30 seconds. This gentle hand-kneading is crucial for bringing the dough into a smooth, manageable ball without overworking it, which could otherwise lead to tougher cookies. This dough is naturally quite thick, so a little effort here is normal.
- Crucial Chilling for Dough Stability: Divide the prepared dough into two equal portions. Gently pat each portion into a flat disc, approximately an inch thick. Wrap each disc tightly in plastic wrap, ensuring no air can reach the dough to prevent it from drying out. Place both wrapped dough discs into the refrigerator to chill for a minimum of one hour, or ideally, for up to two days. This chilling period is a critical step: it allows the gluten-free flours to fully hydrate and absorb moisture, while also firming up the butter in the dough. This prevents the cookies from spreading excessively in the oven and ensures they beautifully retain their intricate cut-out shapes.
- Rolling Out the Dough for Perfect Shapes: When you’re ready to bake, preheat your oven to 350ºF (175ºC). Remove one disc of chilled dough from the refrigerator and allow it to sit on the counter for 5-10 minutes. This brief rest helps the dough soften slightly, making it more pliable and easier to roll without cracking. Prepare your rolling surface: a very lightly floured countertop (and I mean minimal flour to avoid toughening the dough) or, ideally, a silicone baking mat (my preferred method for a no-mess, non-stick experience). Use a rolling pin to evenly roll the dough out to approximately ¼-inch thick. Aim for consistent thickness across the entire disc to ensure all your cookies bake evenly.
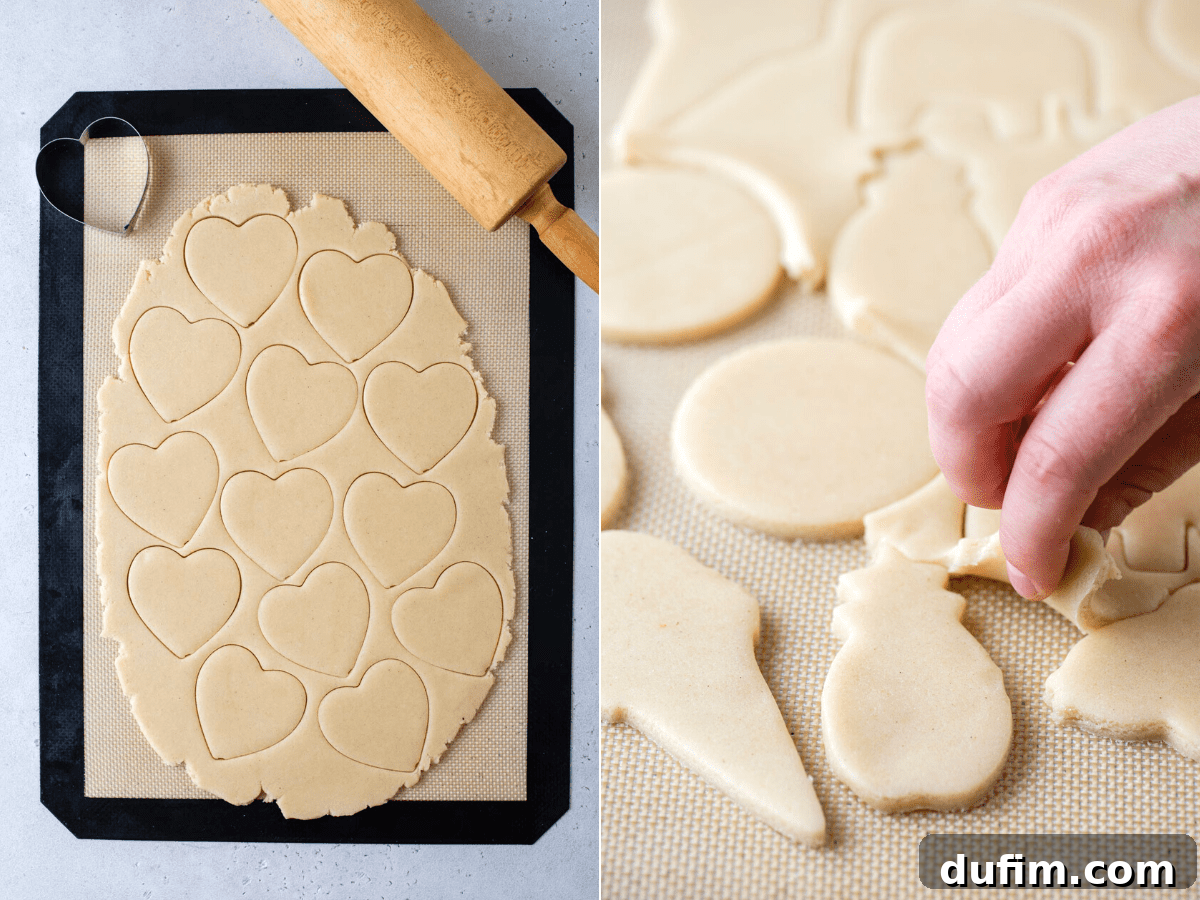
- Cutting Out and Transferring the Cookies: With your rolled dough, use your favorite cookie cutters to create desired shapes. Carefully pull away the excess dough scraps from around the cut shapes. Use a thin, flat spatula to gently transfer the delicate cut cookies to a baking sheet that is lined with either a silicone baking mat or parchment paper. These liners are essential for preventing sticking and aiding in even baking. If you wish to re-roll the dough scraps, gather them gently, press them back into a disc, and then crucially, chill them in the refrigerator for an additional 15-20 minutes before attempting to roll them out again. This extra chill is vital, especially if the dough feels warm, as it significantly helps prevent the re-rolled cookies from spreading excessively during baking.
- Baking to Golden Perfection: Place your baking sheet with the cut-out cookies into the preheated oven and bake for approximately 9 to 10 minutes. Keep a close eye on them, as oven temperatures can vary. If your oven has known hot spots or tends to bake unevenly, rotate the baking sheet halfway through the cooking time to ensure uniform baking across all cookies. It’s important to note that these cookies will remain relatively pale in color even when they are fully baked. They might still appear slightly soft in the center when removed from the oven, but don’t fret; they will continue to firm up and cook slightly from the residual heat on the hot baking sheet as they cool. Avoid overbaking at all costs, as this can lead to dry and hard cookies, sacrificing that desirable soft and chewy texture.

- Cooling Completely for Optimal Decoration: Once baked, allow the cookies to cool undisturbed on the baking sheet for at least 10 minutes. This initial cooling period is crucial as it allows them to firm up adequately before you attempt to move them, preventing breakage. After 10 minutes, carefully transfer the cookies to a wire cooling rack to allow for complete air circulation and cooling. It is absolutely paramount that the cookies are entirely cool – to the touch – before you even consider applying any frosting. Attempting to frost warm or even slightly warm cookies will cause your frosting to melt, slide off, and ruin your decorations.
- Repeat with Remaining Dough: Continue the entire process (rolling, cutting, and baking) with your second disc of dough. If your first baking sheet is still warm from the previous batch, it’s advisable to use a second, cool baking sheet. If you only have one, allow it to cool completely before reusing it. Baking on a warm sheet can cause the cookies to spread prematurely.
How to Prepare Decadent Buttercream Frosting for Your Cookies
- Whip the Butter to Perfection: In a clean mixing bowl, place the softened unsalted butter. Using an electric mixer (either a handheld mixer or a stand mixer with the paddle attachment), beat the butter on medium-high speed for a full 90 seconds. This vigorous beating is critical for incorporating plenty of air, transforming the butter into a light, fluffy, and visibly paler base for your creamy buttercream frosting.
- Gradually Incorporate Remaining Ingredients: Begin to gradually add the powdered sugar to the whipped butter, starting with about 2 cups at a time. Beat on low speed until the sugar is fully incorporated, then increase the speed to medium. Stir in both the vanilla and almond extracts. Once combined, take a moment to taste the frosting. This is your opportunity to adjust for sweetness and consistency. If you desire a sweeter frosting or a thicker consistency for more defined piping, gradually add more powdered sugar, a cup at a time, beating thoroughly after each addition until your desired flavor and texture are achieved. I found that using a total of 4 cups of powdered sugar yielded a perfectly balanced and pipeable consistency. If at any point the frosting becomes too thick, simply add one tablespoon of milk or heavy cream, then beat again until it returns to a smooth, creamy, and spreadable state.
- Coloring the Frosting with Precision: Determine how many distinct colors you wish to use for decorating your cookies. Divide the prepared buttercream frosting into separate bowls, one for each color. Add a small amount of gel food coloring to each bowl. Using a spoon or a small spatula, thoroughly mix the gel into the frosting until the color is vibrant, uniform, and streak-free. Remember, gel food colorings are highly concentrated, so start with a tiny drop and add more incrementally until you reach your desired shade, avoiding over-saturation.
- Decorating Your Sugar Cookies with Flair: Now for the enjoyable decorating phase! Carefully scoop the colored frosting into piping bags that are fitted with small round tips for intricate designs, or simply use a small offset spatula to spread the frosting smoothly and evenly onto your completely cooled gluten-free sugar cookies. If you plan to adorn your cookies with sprinkles or any other edible decorations, it is crucial to apply them immediately after frosting. This ensures they adhere properly to the wet buttercream before it begins to set. Once decorated, allow the frosting to fully set and harden for several hours, or ideally, leave them overnight, at room temperature. To protect your beautiful creations while they set, place the frosted cookies on baking sheets and cover them loosely with lids or gently tent them with aluminum foil. This prevents smudging and ensures your artistic efforts remain perfectly intact.
Crafting Smooth & Elegant Royal Icing for Detailed Designs
- Mixing the Royal Icing Base: In a medium-to-small sized mixing bowl, combine all the royal icing ingredients, with the exception of the gel food coloring. This includes your thoroughly sifted powdered sugar, milk or warm water, light corn syrup, and your chosen extract (vanilla or almond). Use a spatula or an electric mixer on low speed to mix everything until the icing is completely smooth and free of any lumps. Achieving a smooth consistency is paramount for flawless piping. If, after initial mixing, the icing appears too thick for your specific decorating needs (e.g., outlining requires a thicker consistency, while flooding requires a thinner, more fluid consistency), add more milk or warm water, one teaspoon at a time. Mix thoroughly after each addition until you achieve the perfect flow and consistency.
- Coloring and Decorating with Royal Icing: Once your smooth royal icing base is ready, divide it into separate bowls, one for each color you intend to use. Add a tiny amount of gel food coloring to each bowl and mix until the color is uniformly vibrant and rich. Carefully transfer the colored icing into piping bags fitted with fine tips or, for excellent control, into squeeze bottles. These tools are ideal for executing precise and detailed decorating work. Begin decorating your completely cooled gluten-free sugar cookies. When creating layered designs, remember to allow each layer of royal icing to dry slightly before applying the next. This critical step prevents colors from bleeding into each other and ensures crisp, professional-looking designs.

Mastering the No-Chill Method for Speedy Gluten-Free Cut-Out Cookies
Are you pressed for time but still dreaming of perfectly shaped gluten-free sugar cookies? This ingenious no-chill method is your culinary shortcut! While chilling the dough is generally recommended for optimal shape retention and a less sticky dough, you can skillfully bypass this step with a clever adjustment to the butter temperature and a swift, efficient approach.
The key to successful no-chill gluten-free cut-out cookies lies in using cold unsalted butter, cut into small cubes, instead of softened butter. This keeps the dough cooler from the outset. Throughout the mixing, rolling, and cutting process, the golden rule is to work quickly and decisively. As long as you maintain a rapid pace, the dough will remain sufficiently cold to hold its shape beautifully when baked immediately, preventing excessive spreading. This means you can go from mixing to baking without the typical waiting period!
However, for subsequent batches, especially if your kitchen tends to be warm, I strongly advise giving any remaining dough or re-rolled scraps a quick chill in the refrigerator. Even a brief 15-20 minute chill, whether the dough is in a disc or already cut into shapes, can make a significant difference. This brief refrigeration helps prevent any softness that might lead to misshapen cookies and ensures consistently crisp edges. This no-chill method offers a fantastic balance between speed and quality, perfect for those spontaneous baking moments or when you simply can’t wait to enjoy freshly baked cookies!
Expert Tips for Gluten-Free Sugar Cookie Success Every Time
Achieving bakery-quality gluten-free sugar cookies that are soft, chewy, and hold their shape beautifully is entirely within reach with a few key expert tips. For even more detailed guidance on the nuances of cutting, decorating, and storing these delectable treats, I encourage you to visit my comprehensive cut-out sugar cookie post. Here are some of my most important pointers to guarantee perfect results with this gluten-free recipe:
- Measure Your Flour with Unwavering Accuracy: This tip is paramount and cannot be overstressed. Incorrect flour measurement is by far the most common reason for baking mishaps, especially in gluten-free recipes where the balance is delicate. Never scoop flour directly into your measuring cup, as this compacts it, resulting in a significant excess of flour. Too much flour will lead to dry, dense, and ultimately crumbly cookies. Instead, always spoon the gluten-free flour lightly into the measuring cup until it overflows, then level off the excess with the flat edge of a butter knife. For truly precise and consistently perfect baking, invest in a good kitchen scale and measure your flour by weight (grams) – it’s a game-changer that ensures accuracy every time!
- Maintain a Cold Dough: A consistently cold dough is your absolute best friend when making any cut-out cookies, and it’s even more critical for gluten-free versions. Chilling the dough serves multiple vital purposes: it solidifies the butter, which prevents the cookies from spreading excessively in the oven, and it allows the gluten-free flours to fully hydrate, resulting in a more pliable, less sticky dough that readily holds its perfectly cut shapes. If your dough becomes too warm or soft while you are rolling or cutting, do not hesitate to pause and pop it back into the refrigerator for 10-15 minutes until it firms up again. This brief chill is a small investment for perfectly shaped cookies.
- Allow Icing or Frosting to Fully Harden: Patience truly is a virtue when it comes to the decorating stage of these beautiful cookies. If you stack, layer, or package your meticulously frosted cookies before the icing or buttercream has completely set and hardened, you run a high risk of smudging, sticking, and ultimately ruining your artistic efforts. I highly recommend arranging your decorated cookies on baking sheets and leaving them uncovered at room temperature for several hours, or ideally, overnight. Once an initial crust has formed, you can loosely cover them with lids or gently tent them with foil to protect them from dust while they continue to fully set.
- Avoid Overmixing the Dough: While gluten-free dough needs to be thoroughly combined, it’s important not to overmix it. Overmixing can overdevelop any inherent starches in the gluten-free flour blend, which can lead to a tougher, less tender cookie texture. Mix the wet and dry ingredients just until they are combined, then follow the instructions for gentle hand-kneading to bring the dough together cohesively without excessive agitation.
- Prevent Overbaking at All Costs: Gluten-free cookies, like many delicate baked goods, can transition from perfectly baked to dry and hard very rapidly. It’s crucial to watch them closely during the last few minutes of baking. They should still appear relatively pale in color and perhaps slightly soft in the center when you remove them from the oven. The residual heat from the hot baking sheet will continue to cook them gently as they cool, leading to that ideal soft, chewy, and tender texture.
Gluten-Free Sugar Cookies: Comprehensive Storage and Freezing Guide
Ensuring proper storage is key to keeping your freshly baked and beautifully decorated gluten-free sugar cookies wonderfully fresh and delightful for as long as possible. Once your exquisite frosting or elegant royal icing has completely set and hardened – a process that typically requires several hours at room temperature – you can proceed with storing your cookies.
To store, gently place the frosted cookies in an airtight container. If you need to stack them, always separate layers with a sheet of parchment paper or wax paper. This protective layer is essential for preventing the cookies from sticking together and preserving your intricate decorations. Stored at room temperature, your cookies will maintain their delightful freshness for approximately three days. For extended enjoyment, consider the convenience of freezing, a fantastic option for longer-term preservation.
Can These Gluten-Free Sugar Cookies Be Frozen for Later?
Absolutely! These versatile gluten-free sugar cookies are excellent candidates for freezing, offering incredible flexibility whether you prefer to prepare the dough in advance or preserve baked cookies for future enjoyment. This makes them an ideal choice for holiday meal prep, batch baking, or simply having a delicious, homemade treat readily available for unexpected guests or spontaneous cravings.
You have two convenient options for freezing:
- Freezing Unbaked Cookie Dough: Divide your prepared dough into flat discs, then wrap each disc tightly in plastic wrap. For an extra layer of protection against freezer burn, place the wrapped discs into an airtight freezer-safe bag or container. The unbaked dough can be safely frozen for up to 3 months. When you’re ready to bake, transfer the frozen dough discs to your refrigerator and allow them to thaw completely overnight. Once thawed, you can proceed with rolling and cutting the dough as usual, following the recipe instructions.
- Freezing Baked, Unfrosted Cookies: Bake the cookies according to the recipe, then ensure they cool completely on a wire rack. Once fully cooled, arrange the cookies in a single layer on a baking sheet and “flash freeze” them for about an hour, or until they are solid. This prevents them from sticking together. After flash freezing, transfer the solid cookies to an airtight freezer-safe container or bag, separating layers with parchment paper to maintain their quality. They can be frozen for up to 3 months. To enjoy, simply remove the desired number of cookies and let them thaw at room temperature for an hour or two before decorating and serving.
Freezing is a fantastic and highly recommended method for extending the shelf life of these delicious gluten-free treats, ensuring you always have a delightful batch of homemade goodness on hand!

Gluten-Free Cut-Out Cookies: Frequently Asked Questions (FAQs)
I personally believe that the perfect sugar cookie achieves a beautiful harmony between being wonderfully soft and pleasantly chewy. This gluten-free recipe is meticulously crafted to deliver precisely that ideal texture when followed as written. However, you have the flexibility to customize the texture to match your personal preference! If you desire even softer, melt-in-your-mouth cookies, simply roll the dough out slightly thicker (e.g., to about ½ inch). Conversely, if you prefer a crispier cookie with a satisfying snap, you can either roll the dough a bit thinner (e.g., to ⅛ inch) or extend the baking time by a minute or two, being sure to keep a very close eye on them to prevent over-browning or burning. Remember, cookies that are paler in color tend to be softer, while those with slightly golden edges will offer a crispier bite.
Gluten-free flours inherently lack the gluten protein that provides essential elasticity and binding properties in traditional wheat flour, which can indeed sometimes lead to a more crumbly texture. To effectively combat this common issue, it is absolutely essential to ensure you are using a high-quality gluten-free all-purpose flour blend that explicitly contains a binder such as xanthan gum. Xanthan gum is crucial for mimicking gluten’s binding effect, helping your cookies to hold together beautifully and maintain their structure. Additionally, precise flour measurement is paramount; using too much flour can dry out your dough significantly, making it much more prone to crumbling. Always utilize the spoon and level method or measure by weight in grams for accuracy. Finally, ensuring your dough is adequately hydrated and properly chilled before baking also contributes significantly to a cohesive, less crumbly texture.
Several factors can contribute to gluten-free cookies becoming unexpectedly puffy rather than spreading evenly. The specific gluten-free flour blend you are using can play a significant role; some blends contain higher amounts of leavening agents or certain starches that promote puffiness. Excessive use of leavening agents (like baking powder or baking soda) can also cause cookies to rise too much, resulting in a domed, puffy appearance instead of spreading. A lack of proper binders (such as xanthan gum) might lead to an uneven or excessive rise. Overmixing the dough can incorporate too much air, creating a lighter, puffier texture. High baking temperatures can cause the edges of the cookies to set too quickly before they have a chance to spread, trapping air and leading to puffiness. Lastly, using dough that isn’t sufficiently chilled before baking can also contribute to spreading issues, sometimes manifesting as a puffy, rather than flat, cookie.
To achieve perfectly non-crumbly and wonderfully cohesive gluten-free cookies, focus on implementing these key best practices:
- Select a Premium Flour Blend: As previously emphasized, utilize a reputable gluten-free all-purpose flour blend that explicitly includes xanthan gum. This ingredient is essential for providing the necessary structure, elasticity, and binding capacity.
- Chill the Dough Thoroughly: Adequate chilling (for at least one hour, or even better, longer, up to two days) allows the various gluten-free flours to fully hydrate and the butter to firm up. This creates a much more stable and significantly less crumbly dough that holds its shape.
- Avoid Overmixing: Mix your dough only until the ingredients are just barely combined. Overmixing can overdevelop the starches present in gluten-free flours, which can paradoxically lead to a tougher, more crumbly final texture.
- Adjust Moisture Levels Carefully: If, after mixing and gentle kneading, your dough feels excessively dry or stiff, you can sometimes carefully add an extra teaspoon of milk or water, very gradually, to improve its workability and moisture content without making it sticky.
- Handle with Care During Shaping: When handling and transferring your delicate cut cookies, always be gentle. Gluten-free dough can sometimes be more fragile than its wheat-based counterpart, so use a thin, flexible spatula to minimize any potential breakage.
- Bake at the Correct Temperature: Ensure your oven temperature is accurately calibrated. Baking at too low a temperature might prevent the cookies from setting properly, while too high a temperature can dry them out too quickly, contributing to crumbling.
- Cool Cookies Properly: Allow your freshly baked cookies to cool completely on the baking sheet for the initial 10 minutes before attempting to transfer them to a wire rack. This critical step enables them to set and firm up, dramatically reducing the likelihood of breakage.
This recipe was a huge hit in our home! We’re just dabbling into gluten-free recipes, and everyone thought these were delicious! I followed the recipe exactly, (using a kitchen scale to measure flour as recommended). Everything was perfect. Slight crunch, but soft and chewy inside. So good! Thank you for an amazing recipe! It’s a keeper. 🥰
-Julie

Tap stars to rate!
Gluten-Free Sugar Cookies Recipe
Beth
15 minutes
10 minutes
2 hours
2 hours
25 minutes
24
cookies
Pin Recipe
Rate Recipe
Print Recipe
Equipment You’ll Need
-
Silicone Baking Mat: Essential for non-stick baking and easy dough handling, or parchment paper.
-
Kitchen Scale: Highly recommended for the most accurate flour measurement in grams.
-
Large Mixing Bowls: At least two; one for dry ingredients, one for wet.
-
Electric Mixer: Either a handheld mixer or a stand mixer with the paddle attachment for creaming butter and sugar, and whipping frosting.
-
Rolling Pin: For achieving an even thickness when rolling out the cookie dough.
-
Cookie Cutters: In your favorite shapes for festive or themed cookies.
-
Baking Sheets: Sturdy baking sheets to hold your cookies during oven baking.
-
Wire Cooling Rack: To allow baked cookies to cool completely, preventing sogginess and preparing them for frosting.
-
Piping Bags & Tips (optional): For precise and intricate frosting decoration, or squeeze bottles for royal icing.
Ingredients
For the Gluten-Free Sugar Cookies:
-
2 ¼ cups (270g) gluten-free all-purpose flour, my top recommendation is King Arthur’s Gluten Free Measure for Measure Flour, known for its consistent results in GF baking. -
1 tsp baking powder -
¼ tsp salt -
½ cup (113g) unsalted butter, softened to room temperature (crucial for proper creaming). -
1 cup (198g) granulated sugar -
1 large egg, at room temperature for better emulsion with other ingredients. -
1 tsp vanilla extract -
½ tsp almond extract, the secret ingredient for that classic sugar cookie flavor!
For the Classic Buttercream Frosting (Optional):
-
1 ½ cups (339g) unsalted butter, softened to ensure a smooth, creamy frosting. -
3-4 cups (340-454g) powdered sugar, sifted to prevent any lumps in your frosting. -
1 tsp vanilla extract -
1 tsp almond extract -
1 Tbsp milk, heavy cream also works great for added richness and creaminess. -
Gel food coloring, for vibrant colors without thinning the frosting’s consistency.
Or for Elegant Royal Icing (Optional):
-
2 cups (227g) powdered sugar, sifted thoroughly after measuring for a silky smooth, lump-free icing. -
2 Tbsp milk or warm water, used to adjust the icing to your desired consistency for outlining and flooding. -
1 Tbsp light corn syrup, adds a beautiful sheen to the dried icing and prevents it from becoming too brittle. -
½ tsp vanilla or almond extract -
Gel food coloring, for achieving vibrant, consistent colors without compromising icing texture.
Detailed Instructions for Gluten-Free Sugar Cookies
Making the Cookies:
-
Crucial First Step: Accurate Flour Measurement. Many bakers encounter difficulties with this recipe due to incorrect flour measurement. To ensure perfect, consistent results every time:
The most precise method is to use a kitchen scale to weigh your gluten-free flour in grams. (For 2 ¼ cups, aim for 270 grams). This eliminates variability.
If you do not have a kitchen scale, use the “spoon and level” method: First, aerate the gluten-free flour by whisking or stirring it in its container. Flour settles and becomes compact, leading to over-measurement if scooped directly. Next, use a spoon to lightly sprinkle the aerated flour into your measuring cup until it overflows. Do NOT tap the cup against the counter, as this will compact the flour again. Finally, use the straight edge of a butter knife or similar tool to sweep off any excess flour from the top, ensuring a level measure. Do not sift the flour unless the recipe specifically states to do so.
-
In a large bowl, combine the accurately measured gluten-free flour, baking powder, and salt. Mix these dry ingredients thoroughly with a spoon or fork until well combined. Set this bowl aside.2 ¼ cups (270g) gluten-free all-purpose flour,
1 tsp baking powder,
¼ tsp salt -
In a separate large mixing bowl, combine the room temperature unsalted butter and granulated sugar. Using an electric mixer, beat these ingredients together on medium speed for approximately 90 seconds until the mixture is light, creamy, and fluffy. Next, incorporate the room temperature egg, vanilla extract, and almond extract. Beat for another minute, ensuring everything is well combined and aerated. Finally, add the dry flour mixture into the wet ingredients in three gradual additions, mixing on low speed only until the flour is just incorporated after each addition. Initially, the dough will look crumbly, almost like wet sand. Continue mixing until the mixture starts to thicken and clump together. To bring it fully together, use your hands to gently knead the dough for a brief 20-30 seconds at the very end. This dough is naturally quite thick!½ cup (113g) unsalted butter,
1 cup (198g) granulated sugar,
1 large egg,
1 tsp vanilla extract,
½ tsp almond extract -
Divide the finished dough into 2 equal, flat discs. Wrap each with plastic wrap and place in the fridge for at least 1 hour to chill. The dough can be left in the fridge to chill for up to 2 days, making it perfect for make-ahead baking.
-
After chilling, remove one disc and allow it to sit on the counter for 5-10 minutes to soften slightly, making it easier to roll without cracking. Preheat the oven to 350ºF (175ºC).
-
On a very lightly floured surface (and I mean minimal to avoid toughening the dough) or, ideally, on a silicone baking mat, use a rolling pin to roll the dough to ¼ inch thick. Use cookie cutters to cut out your desired shapes. Carefully remove the dough scraps. With a thin spatula, gently transfer the cut cookies to a baking sheet lined with a silicone baking mat or parchment paper. If you re-roll the dough scraps, gather them gently, press them into a disc, and chill for 15-20 minutes before rolling again, especially if the dough feels warm, to prevent spreading. Bake for 9-10 minutes. If your oven has a hot spot, rotate the cookie sheet halfway through. The cookies will appear pale even when done; they will continue baking slightly once removed from the oven. Allow them to cool on the baking sheet for at least 10 minutes before moving to a wire cooling rack. Allow them to cool completely before frosting. Repeat the process with the remaining dough.
Preparing Buttercream Frosting:
-
Place the softened unsalted butter in a mixing bowl. Using an electric mixer, beat it on medium-high speed for 90 seconds until light and fluffy.1 ½ cups (339g) unsalted butter
-
Gradually add the powdered sugar, starting with 2 cups, and beat until combined. Stir in the vanilla and almond extracts. Taste for sweetness. If desired, add more powdered sugar, a cup at a time, beating after each addition. I found 4 cups to be perfect. If the frosting is too thick, add 1 tablespoon of milk or heavy cream and beat until creamy and smooth.3-4 cups (340-454g) powdered sugar,
1 tsp vanilla extract,
1 tsp almond extract,
1 Tbsp milk -
Divide the frosting into bowls based on the number of colors desired. Add a small amount of gel food coloring to each bowl and mix with a spoon or spatula until the color is even and vibrant.Gel food coloring
-
Scoop the frosting into piping bags fitted with small round tips for detailed designs, or use spreaders to apply it onto the cookies. Add sprinkles immediately if desired. Allow the frosting to harden for several hours or overnight. To protect them while setting, place cookies on baking sheets and cover loosely with lids or tent with aluminum foil.
Crafting Royal Icing:
-
In a medium-sized mixing bowl, combine all royal icing ingredients (powdered sugar, milk or warm water, corn syrup, vanilla or almond extract) except for the gel food coloring. Mix with a spatula or mixer until smooth. If the icing is too thick for decorating, add more milk or water, 1 teaspoon at a time, until the desired consistency is reached (thicker for outlining, thinner for flooding). Divide the icing into bowls and add gel food coloring to each, mixing until uniform. Transfer the colored icing to piping bags or squeeze bottles to easily decorate the cooled cookies. Allow layers to dry before adding more.2 cups (227g) powdered sugar,
2 Tbsp milk or warm water,
1 Tbsp corn syrup,
½ tsp vanilla or almond extract,
Gel food coloring
Helpful Video Guide
Chef’s Notes & Pro Tips
If you find yourself short on time and need to accelerate your gluten-free sugar cookie baking, you can indeed opt for a no-chill method. The key adjustment here is to use cold unsalted butter, cut into small cubes, instead of softened butter. When incorporating the butter and sugar, work quickly. As long as you mix, roll out, and cut the dough swiftly, the dough will retain enough of its cold temperature to prevent excessive spreading in the oven, allowing you to bake them right away. For best results and to ensure consistent shape, I still recommend giving any remaining dough or re-rolled scraps a quick 15-20 minute chill in the fridge between batches, whether in a disc or already cut into shapes. This helps maintain the integrity of your cookies.
Flour Hydration and Dough Consistency: Gluten-free flours absorb liquid differently and often take longer to fully hydrate compared to wheat flour. This is precisely why the chilling step is so beneficial – it provides the necessary time for the flour to fully absorb the moisture, resulting in a more pliable, less sticky dough that holds its shape better and yields a less crumbly cookie. Don’t be alarmed if the gluten-free dough feels a bit different from traditional wheat dough after mixing – it might be slightly less elastic. The gentle kneading at the end of the mixing process is specifically designed to bring it together effectively.
Nutrition Information
Calories:
301
kcal
|
Carbohydrates:
48
g
|
Protein:
2
g
|
Fat:
12
g
|
Saturated Fat:
7
g
|
Polyunsaturated Fat:
1
g
|
Monounsaturated Fat:
3
g
|
Trans Fat:
0.5
g
|
Cholesterol:
38
mg
|
Sodium:
48
mg
|
Potassium:
11
mg
|
Fiber:
1
g
|
Sugar:
39
g
|
Vitamin A:
369
IU
|
Calcium:
25
mg
|
Iron:
1
mg
Nutrition Disclosure
All nutritional values provided are approximate estimations and are offered to the reader as a courtesy. Please be aware that modifying ingredients, including substitutions or changes in quantities, will alter these estimated nutritional calculations. For precise dietary information, it is recommended to conduct your own calculations based on the exact products and amounts used.
Loved this recipe? Share your thoughts below!