Embarking on the journey of wedding planning can be exhilarating, especially when you envision a theme that truly resonates with your spirit. For us, a rustic wedding theme was a clear choice, promising warmth, natural beauty, and a deeply personal touch. Last year, as we meticulously planned every detail for our June wedding, we immersed ourselves in a world of rustic charm. This meant countless hours scouring for unique ideas, numerous trips to the paper store, and even several memorable “rock hunting” dates with my fiancé, Ryan – adventures you’ll soon understand the significance of!
Pulling everything together was a labor of love, made possible by an incredible support system, particularly the tireless efforts of my sister and mom. Their help was truly invaluable in transforming our rustic vision into a breathtaking reality.
We know many brides-to-be are out there, just like we were, eagerly searching for creative inspiration and practical, budget-friendly solutions to bring their dream wedding to life. If you’re captivated by the rustic aesthetic and aiming to create an unforgettable day without overspending, you’ve landed in the perfect spot. This series is dedicated to sharing our firsthand experiences, innovative ideas, and money-saving tips to help you craft your own charming, rustic celebration.
All the beautiful moments captured in these photos were expertly taken by Crystal Rose Photography, whose talent truly brought our vision to life. She is absolutely amazing!
Rustic Wedding Series – Part 1: Enchanting Reception Decor
Welcome to the first installment of our Rustic Wedding Series, where we dive into the heart of your celebration: the reception decor. Get ready to be inspired by personalized touches, clever DIY projects, and thoughtful details that will make your rustic wedding truly stand out.
Personalized Table Numbers: A Touch of Storytelling
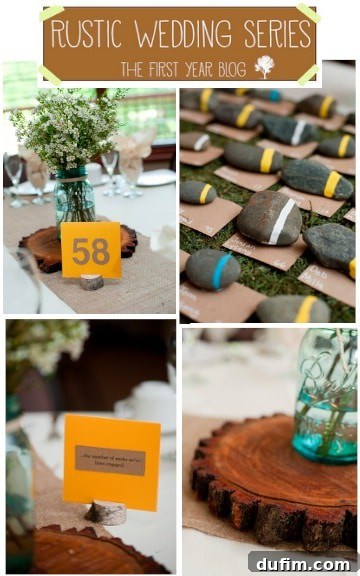
One of our favorite elements was our personalized table numbers. We wanted to move away from traditional, generic numbering and infuse each table with a piece of our story. Our idea was simple yet profound: select numbers that held significant meaning in our lives – from the date of our first meeting to an important anniversary or a cherished memory. With approximately 24 tables, finding unique and meaningful numbers became a delightful challenge towards the end, but it was worth every effort.
Each table number was beautifully printed on high-quality paper, and on the backside of every card, we included a brief explanation detailing why that particular number was special to us. This allowed our guests to engage with our journey, sparking conversations and adding a unique, intimate layer to the reception experience. It transformed a simple navigational tool into a charming storytelling element that truly personalized our rustic wedding reception.
Beyond the personalized cards, other carefully chosen elements completed our table decor. The foundation for many of our rustic accents was burlap. We sourced a generous 100 yards of burlap from Uline.com for an incredibly affordable price of about $50. We truly were “swimming in burlap,” which proved to be an exceptionally versatile material for table runners, wraps, and various decorative touches throughout the venue.
For the charming tiny wooden tree slice table number holders, we turned to Etsy, a treasure trove for unique handmade wedding items. These small, authentic wood pieces perfectly complemented our rustic theme. The beautiful blue ball mason jars, which added a vintage touch, were a fortunate find from a lovely old couple who had listed them on Craigslist. This goes to show that local marketplaces can yield some of the best and most budget-friendly discoveries! Finally, all the paper for our table numbers, as well as for the entire wedding stationery suite, came from Anchor Paper, a fantastic Minnesota-based business known for its quality products. Utilizing local suppliers not only supports small businesses but can also offer a more personalized service.
DIY Wooden Tree Slices: Rustic Centerpieces That Save
From the very beginning of our wedding planning, I knew that wooden tree slices would be essential for our centerpieces. They exude a natural elegance and bring an undeniable rustic charm to any table setting. While you can find them online at retailers like Save On Crafts, they can be quite pricey, often ranging from $10 to $40 for a single slice. This cost can quickly add up, especially if you have many tables.
Determined to keep our budget in check, we embarked on a search for a more economical solution. After some diligent inquiries, we were incredibly lucky to find a mutual friend who generously offered to cut the tree slices for us from wood available in his own backyard. This was a tremendous cost-saver and added a truly unique, personal element to our decor. If you don’t have a friend with a ready supply of wood, consider reaching out to local arborists, sawmills, or even tree removal services in your area. Often, they are willing to provide wood slices for a fraction of the retail price, or even for free, especially if they are disposing of fallen trees.
Once we had our tree slices, the next crucial step was to preserve them to prevent cracking as they dried. We opted to dip them in a specialized wood sealant. This step is vital for ensuring the longevity and integrity of your wooden decor, especially if you plan to prepare them well in advance. We actually acquired our tree slices about a year before the wedding and stored them in our garage, and I’m happy to report that none of them cracked.
A helpful tip for anyone undertaking this DIY project: for the first couple of weeks immediately after the wood is cut, it’s important to lay the slices out flat on the ground. Avoid stacking them directly on top of each other during this initial drying phase. Wood releases a significant amount of moisture right after being cut, and stacking them too soon can lead to mold formation. Allowing them to air out individually will help them dry properly and prevent any undesirable issues.
Head Table Hanging Tree Branches: A Creative Overhead Display
My sister, with her keen eye for design, came up with the brilliant idea of creating a hanging display in front of our head table. This concept promised to add a captivating, whimsical dimension to our main table, framing us beautifully throughout the reception. While the final result was absolutely stunning and a highlight of our decor, getting there involved a good deal of trial and error – a testament to the DIY spirit!
We gathered small wooden branches and twigs, all sourced from our own backyard, embracing the natural elements readily available to us. These were then meticulously tied together using twine and clear fishing line, creating a delicate yet impactful garland. The real ingenuity came in rigging them up. To ensure the branches hung perfectly and remained stable, we devised a system of several counterweights. These “weights” were essentially bags of rocks, discreetly attached to the hanging branches with fishing line and carefully positioned on the back side of the head table. This clever setup allowed the clear fishing line to run almost invisibly across the top of the table, creating the illusion that the branches were floating effortlessly above, adding a magical, ethereal touch to our rustic setting.
Rock Place Cards: A Unique & Memorable Guest Detail
And now for the story behind those intriguing “rock hunting” dates! We wanted our place cards to be as unique and memorable as the rest of our rustic decor. Our solution? Small, smooth rocks, each personalized for our guests. We embarked on several fun excursions, gathering suitable rocks from various public areas and along the picturesque Mississippi River. When sourcing, always be mindful of local regulations and private property boundaries to ensure an ethical collection process.
Each rock became a canvas for personalization. We painted a distinctive colored stripe on each one, a subtle yet effective way to indicate our guests’ meal choices to the catering staff. This not only streamlined the serving process but also added another layer of thoughtful detail. Once the paint was dry, the rocks were then securely attached to individual paper place cards using hot glue. This ensured they remained in place, preventing any mishaps during the bustling reception. Guests absolutely loved these creative and tactile place cards, often taking them home as a cherished keepsake from our special day.
The foundation upon which these unique rock place cards rested was an incredibly lush and natural moss mat. We discovered these at Save On Crafts, and they were an absolute game-changer. Not only were they incredibly affordable, but their quality truly impressed us. The best part was that the moss was actually sewn together, which meant it didn’t shed or fall apart, maintaining its pristine appearance throughout the entire event. These moss mats provided the perfect earthy base, enhancing the rustic feel and creating a beautiful display for our personalized rock place cards.
We hope these ideas inspire you as you plan your own rustic wedding! These DIY projects not only helped us stay within our budget but also infused our day with a deeply personal and authentic charm that our guests truly appreciated. By embracing natural elements and a bit of creativity, you too can craft a reception space that perfectly reflects your love story.
Continue your journey through our rustic wedding inspiration with Part 2 of our Rustic Wedding Series for even more reception decor ideas, and then explore Part 3 for charming ceremony decor concepts.