
Crafting Your Own Space-Saving Wooden Christmas Tree: A DIY Guide
The holiday season invariably brings with it the joy of decorating, and at the heart of this tradition often stands the majestic Christmas tree. However, for those living in cozy apartments, tiny homes, or simply seeking a fresh, modern approach to festive decor, a traditional towering tree might not always be the most practical solution. The good news? You absolutely don’t have to sacrifice holiday cheer for lack of floor space! There’s always room for creativity, and in our case, there’s always space for a beautiful Christmas tree, especially when you think vertically.
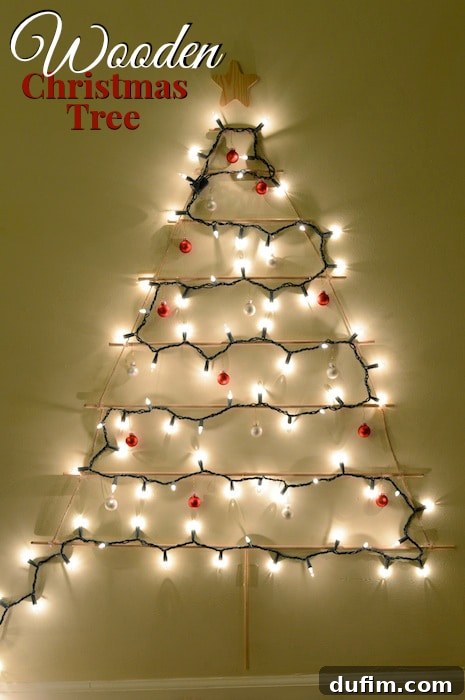
This tutorial offers a charming and ingenious solution: a unique, wall-mounted wooden Christmas tree. It’s a design marvel that combines minimalist aesthetics with undeniable holiday spirit, proving that grand gestures aren’t always about size. This innovative approach puts a delightful twist on the classic Christmas tree, offering a stunning focal point that’s both space-efficient and incredibly stylish. Imagine transforming an empty stretch of wall into a beacon of festive light and warmth. This DIY project is not just about making a tree; it’s about crafting a personalized piece of holiday art that perfectly fits your home and lifestyle. We’re excited to guide you through creating your very own 3.5 to 4-foot wooden Christmas tree, a project so satisfying you might just want to make one as tall as your wall!
Why Choose a DIY Wooden Christmas Tree?
Embracing a DIY wooden Christmas tree offers a multitude of benefits beyond merely saving floor space. It’s a statement of style, sustainability, and personal touch that resonates deeply in contemporary homes.
- Space Efficiency: This is arguably the most compelling reason. For urban dwellers, small apartment residents, or anyone looking to maximize their living area, a wall-mounted tree frees up precious square footage. It allows for unobstructed movement and avoids the clutter that a traditional tree might introduce.
- Unique Aesthetic: Unlike the conventional evergreen, a wooden dowel tree offers a sleek, modern, and minimalist look. It can complement various interior design styles, from Scandinavian and rustic to contemporary and industrial. It’s a conversation starter, guaranteed to impress guests with its originality.
- Customization Potential: This project is a blank canvas. You have complete control over the size, the finish of the wood (natural, stained, painted), the type of lights, and the ornaments. This allows for endless personalization, ensuring your tree perfectly reflects your taste and holiday theme.
- Sustainability and Reusability: Choosing a wooden tree is an eco-conscious decision. Unlike cut trees that have a limited lifespan or artificial trees made from plastics, your wooden tree is durable and reusable year after year, minimizing waste and environmental impact.
- Budget-Friendly: Crafting your own tree can often be more cost-effective than purchasing a high-quality artificial tree or repeatedly buying fresh-cut ones. The supplies are readily available and relatively inexpensive, making it an accessible project for most budgets.
- A Fulfilling Project: There’s immense satisfaction in creating something beautiful with your own hands. This DIY project is not just about the end product, but also the joy and pride derived from the crafting process, making your holiday decorations even more special.
Ready to embark on this creative journey? Let’s gather your materials and transform simple wooden dowels into a stunning festive display.
Supplies You’ll Need for Your Wooden Christmas Tree
Before diving into the construction of your wall-mounted masterpiece, gathering all necessary supplies is key to a smooth and enjoyable crafting experience. Most of these items are easily found at your local craft store, hardware store, or even online.
- Wooden Dowels:
- Quantity & Size: For a 3.5-4 foot tree, you’ll need several dowels. The exact number and length will depend on the final dimensions you desire. We recommend dowels around 1/4 inch in width for a delicate, yet sturdy structure. You might purchase longer dowels (e.g., 36-inch or 48-inch lengths) and cut them down. Consider the type of wood – pine dowels are common, affordable, and easy to cut, but you could opt for oak or birch for a different grain and strength.
- Where to Buy: Craft stores like Hobby Lobby, Michaels, or Joann Fabrics are excellent sources. Hardware stores such as Home Depot or Lowe’s also carry a wide selection.
- Twine:
- Type: Natural jute twine or cotton twine works beautifully for this project, offering a rustic yet clean aesthetic. Ensure it’s strong enough to hold the dowels together without stretching too much.
- Quantity: A standard roll should be more than sufficient. You’ll need enough to create two vertical lines that connect all the horizontal dowels, plus extra for wrapping.
- Hot Glue Gun and Glue Sticks:
- Importance: A hot glue gun is essential for securely attaching the twine to the dowels. It provides a quick, strong bond.
- Tips: Ensure your glue gun is fully heated before use. Have plenty of glue sticks on hand, as you’ll be making multiple connections. Safety first: be careful of hot glue burns.
- Christmas Lights:
- Type: One 100-count pack of mini string lights or fairy lights typically works well for a 3.5-4 foot tree. LED lights are recommended for energy efficiency and cooler operation.
- Color: Warm white lights offer a cozy, traditional glow, while cool white lights provide a more modern, crisp look. Choose what best fits your aesthetic.
- Power Source: Consider battery-operated lights for ultimate flexibility in placement, or plug-in lights if you have a convenient outlet nearby.
- Essential Tools (Not listed but crucial):
- Measuring Tape or Ruler: For precise dowel cutting and spacing.
- Pencil: For marking cutting lines and dowel centers.
- Saw or Dowel Cutter: A hand saw, miter box saw, or even strong pruning shears can be used to cut the dowels. Ensure clean, straight cuts.
- Scissors: For cutting twine.
- Protective Surface: Cardboard, old newspapers, or a drop cloth to protect your floor or table from hot glue.
- Optional: Clear Tape or Small Zip Ties: For securing lights to the dowels.
- Optional: Cardboard for Spacers: As detailed in the steps, this helps maintain consistent spacing.
- Optional: Nails or Command Hooks: For hanging the finished tree.
Having everything organized before you start will make the crafting process much more enjoyable and efficient. Let’s get building!
Step-by-Step Tutorial: Building Your Wooden Christmas Tree
Creating your wall-mounted wooden Christmas tree is a rewarding project that comes together with careful planning and execution. Follow these detailed steps to construct your unique holiday decor.
Step 1: Preparing Your Wooden Dowels
The foundation of your tree lies in accurately cut dowels. The text on the image to the left illustrates the ideal spacing between each dowel, which inherently determines their varying lengths to create the iconic triangular tree shape. Begin by deciding on the overall height and base width of your desired tree. For our 3.5-4 foot example, you might start with the longest dowel at the base (e.g., 20-24 inches) and progressively shorten subsequent dowels as you move upwards, maintaining an even reduction in length for a symmetrical taper. It’s highly recommended to lay out a visual guide or template on a large piece of paper or directly on your protected workspace. Measure and mark each dowel before cutting. Precision here is paramount for a beautifully symmetrical tree. When cutting, always use appropriate safety measures, such as wearing protective eyewear and securing the dowel to prevent it from rolling. Clean, straight cuts will ensure a professional finish.
Step 2: Marking the Centers of Each Dowel
Once your dowels are cut to their respective lengths, the next crucial step is to find and mark the exact center of each one. This might seem like a small detail, but it’s absolutely vital for ensuring that your finished tree is perfectly symmetrical and visually balanced. A well-centered tree will have a pleasing aesthetic, whereas off-center dowels can make the entire structure appear lopsided. To do this, simply measure the total length of each dowel, divide by two, and place a small, clear pencil mark at that midpoint. This mark will serve as your guide when you align all the dowels during assembly, ensuring that the central axis of your tree is straight and true. Take your time with this step, as accuracy here will pay dividends in the final look of your Christmas tree.
Step 3: Setting Up Your Workspace and Spacing
This is where the magic of assembly begins, and a well-organized workspace is your best friend. First, lay down a protective surface on your floor or table – cardboard, old newspapers, or a drop cloth will prevent any errant hot glue from damaging your surfaces. The key challenge in this step is maintaining consistent spacing and perfect alignment for all your dowels while the glue sets. A clever trick is to create temporary cardboard “spacers.” Cut small rectangular pieces of cardboard to the exact height you want between each dowel (as indicated in the original tree’s design diagram). Tape these spacers securely to your protected floor or table surface. Now, as you lay out your dowels, you can easily position them against these spacers. This method ensures that if a dowel shifts slightly, you can quickly realign it without having to re-measure everything. Alternatively, you could draw a full-scale template of your tree directly onto your protective surface, marking the exact positions for each dowel end and their centers. This visual guide will greatly assist in keeping everything perfectly aligned and spaced, creating the beautiful, tapering Christmas tree shape.
Step 4: Securing the Twine
With your dowels perfectly aligned and spaced, it’s time to connect them with the twine, forming the main structure of your tree. This step requires a steady hand and careful application of hot glue. Start with the top-most (shortest) dowel. Apply a small bead of hot glue to the very end of one side of the dowel. Press the end of your twine into the glue, holding it firmly until it sets. Once secure, run the twine vertically down to the next dowel. Ensure the twine remains taut but not overly tight, otherwise, it might distort the dowel alignment. Apply another bead of hot glue to the end of the second dowel and secure the twine. To ensure maximum durability and to prevent the twine from slipping, it’s highly recommended to wrap the twine around each end of the dowel a couple of times before gluing it down. This creates a stronger anchor point. Repeat this process for all dowels on one side, then carefully turn the tree structure and repeat for the other side, making sure to align the dowels perfectly with their previously marked centers. Take your time, allowing the glue to set at each connection point before moving to the next. This meticulous approach guarantees a robust and symmetrical tree frame.
Step 5: Drying and Hanging Your Tree
Once all the dowels are securely attached with twine, allow the entire wooden tree structure to dry completely. Hot glue sets quickly, but giving it a few extra minutes ensures all bonds are strong and stable before you move or hang the tree. After drying, your beautiful wooden frame is ready for its grand debut on your wall! Choose a prominent spot in your home – perhaps in your living room, entryway, or even a child’s bedroom – where its unique charm can truly shine. To hang it, we recommend using two small nails or sturdy Command Picture Hanging Strips, positioned on the wall to align with the top two corners of your tree frame. Ensure the nails or strips are level before hanging to prevent your tree from looking crooked. Gently lift your tree and carefully place the twine loops (or directly rest the top dowel) onto the hanging points. Step back and admire the elegant, minimalist silhouette that now graces your wall.
Step 6: Lighting and Decorating Your Minimalist Masterpiece
With the wooden frame securely on your wall, it’s time for the most enchanting part: bringing your tree to life with lights and decorations! Begin by carefully draping your chosen string of Christmas lights across the dowels. You can weave them over and under each dowel, or simply lay them on top. To ensure the lights stay perfectly in place and create a neat appearance, use small pieces of clear tape, miniature zip ties, or small clear Command clips to secure the light strand to the underside or top of each dowel. Distribute the lights evenly to achieve a consistent glow across the entire tree. Beyond lighting, the beauty of this minimalist design is its versatility in decor. Consider lightweight ornaments that won’t weigh down the dowels – think small wooden cutouts, delicate paper stars, minimalist ceramic pieces, or even small, dried orange slices for a natural touch. You can also weave in strands of faux greenery, tiny pinecones, or festive ribbons for added texture and color. The goal is to enhance the elegant simplicity of the wooden structure rather than overpower it. Let your creativity flow and personalize your tree to reflect your unique holiday style.
Customizing Your Wooden Christmas Tree for Any Style
One of the most exciting aspects of this DIY wooden Christmas tree is its incredible adaptability. While the basic structure remains the same, you have endless opportunities to customize it to perfectly match your personal style and holiday theme. Here are some ideas to spark your imagination:
- Size and Scale: Don’t feel limited to a 3.5-4 foot tree. You can scale this project up or down. Create a grand, wall-to-wall centerpiece or a series of smaller, mini wooden trees for different rooms or even a unique garland effect. Adjust the length and number of dowels accordingly.
- Wood Finish: Instead of keeping the dowels in their natural state, consider painting them. White dowels create a chic, ethereal look, while a dark stain can lend a rustic or industrial feel. You could even use metallic spray paint (gold, silver, rose gold) for a touch of glamour.
- Twine Alternatives: While natural twine offers a charming rustic appeal, explore other options. Black or white cord can create a more modern, graphic aesthetic. Thin metallic wire could add subtle sparkle.
- Lighting Themes: Beyond traditional string lights, experiment with different types of illumination. Micro fairy lights can give a delicate, almost magical glow. LED strip lights along the back of the dowels could create a stunning backlit effect.
- Ornamentation: This is where your creativity can truly shine.
- Minimalist: Stick to simple shapes, natural materials (pinecones, dried oranges, cinnamon sticks), and a monochrome color palette.
- Boho Chic: Add macrame ornaments, tassel garlands, and earthy tones.
- Rustic Farmhouse: Incorporate mini burlap bows, small tin stars, and plaid fabric accents.
- Glamorous: Hang delicate glass ornaments, crystal icicles, and pearl strands.
- Personalized: Include small framed photos, handmade clay ornaments, or custom engraved wooden tags for a truly unique touch.
- Greenery and Florals: Weave in artificial or real eucalyptus branches, small sprigs of pine, or even dried flowers to add texture and a touch of nature to your minimalist frame.
- Base Accents: While it’s a wall tree, you can still add elements at the base. A small stack of wrapped presents, a cozy blanket, or even a miniature faux fur rug can ground the display and add warmth.
By experimenting with these customizations, you can ensure your DIY wooden Christmas tree is not just a decoration, but a true reflection of your personality and holiday vision, making it a cherished part of your festive celebrations for years to come.
Conclusion: Embrace Your Unique Holiday Creation
Crafting your own wall-mounted wooden Christmas tree is more than just a DIY project; it’s an opportunity to infuse your home with personalized charm and innovative design. This elegant, space-saving alternative allows you to celebrate the holiday season beautifully, regardless of your living space constraints. From the satisfying process of assembling the dowels to the joyous moment of adorning it with lights and ornaments, each step contributes to a truly unique festive display.
We hope this comprehensive tutorial has inspired and equipped you to create a stunning piece of holiday decor that perfectly fits your home and style. This wooden Christmas tree stands as a testament to creativity and practicality, proving that the spirit of the season can thrive in any form. So go ahead, unleash your inner crafter, and make this holiday season truly merry and bright with a handmade touch that will be admired by all!