
Pink Confetti Chocolate Chip Cake: The Ultimate Celebration Masterpiece
Unveiling a Symphony of Flavor and Fun
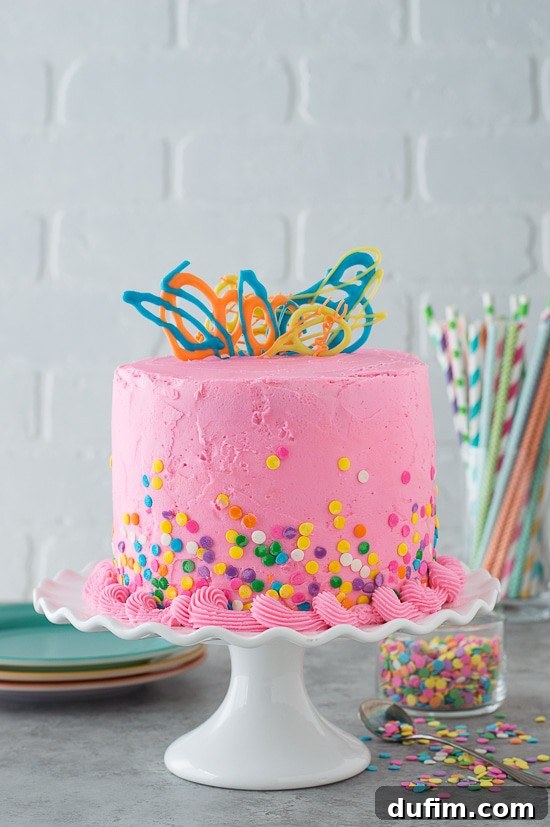
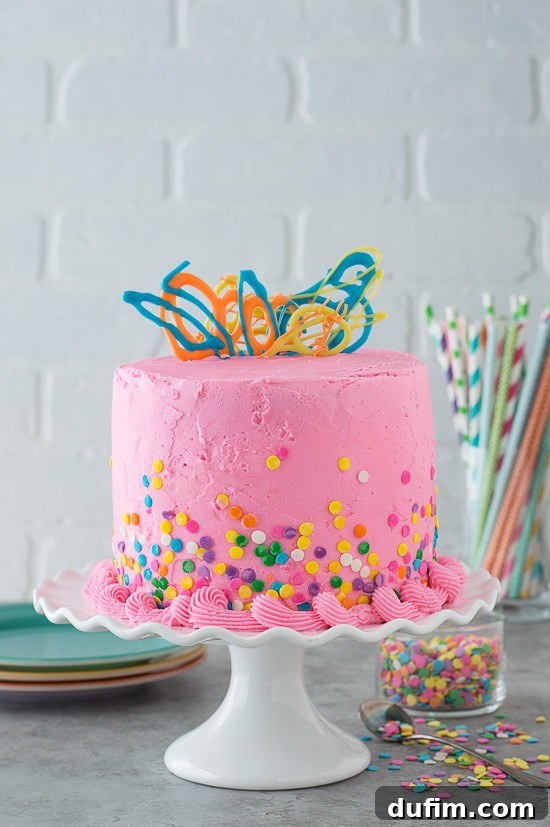
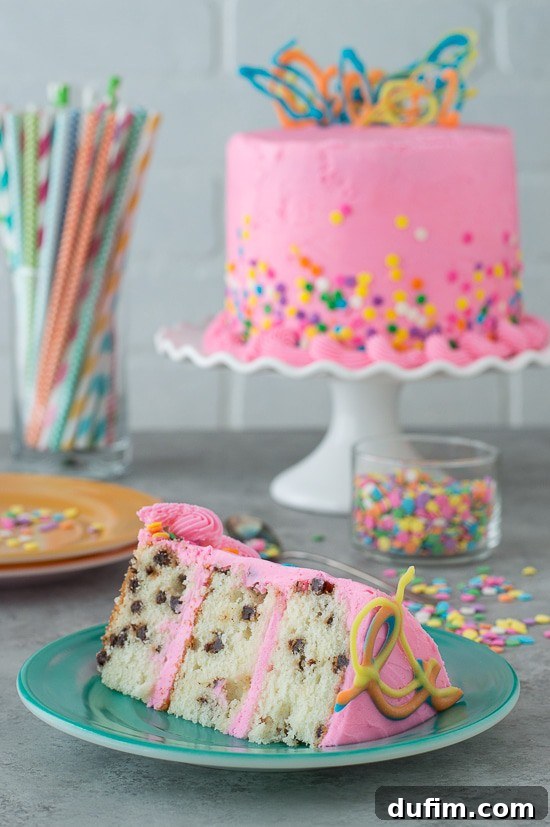
For the longest time, this vibrant cake remained a delightful enigma, its captivating charm defying a simple name. But how do you encapsulate such a joyous creation in just a few words? Imagine a dessert that instantly brings a smile to your face with its utterly charming appearance: a canvas of soft, pastel pink buttercream, generously adorned with a playful cascade of confetti sprinkles, and topped with whimsical, handcrafted chocolate decorations that shimmer with colorful allure. Yet, the true magic unfolds when you slice into this masterpiece. Inside, you’ll discover layers of our signature moist and tender white cake, liberally studded with countless mini chocolate chips, ensuring a burst of delightful flavor and texture with every single bite. It’s not merely a cake; it’s an experience, a giant party condensed into a single, irresistible treat, perfect for elevating any celebration or simply brightening an ordinary day.
The Perfect Name: A Balancing Act of Creativity and SEO
The journey to christen this confection was quite the odyssey. My initial, rather spontaneous, idea was the “Crazy Cake.” While certainly reflecting its exuberant personality, this name lacked the descriptive power needed to convey its delicious essence. Next, it evolved into the “Chocolate Chip Cake,” a step in the right direction but still a gross understatement for a dessert bursting with so much more character and visual appeal.
Then came the grander, albeit somewhat cumbersome, proposal: “Cool Chocolate Chip Cake with Pink Buttercream, Confetti Sprinkles, and Colorful Chocolate Decorations.” This name, while painstakingly accurate in its description, presented a significant hurdle for Search Engine Optimization (SEO). For a recipe to reach a wide audience online, it needs to be easily discoverable by search engines like Google. A title brimming with too many words can dilute its focus, making it challenging for algorithms to pinpoint the core subject and rank it effectively.
After much deliberation and a keen understanding of digital visibility, we settled on the concise and evocative “Pink Confetti Chocolate Chip Cake.” This name strikes a perfect balance: it’s memorable, clearly highlights the cake’s key features, and is optimized for search engines, ensuring that home bakers searching for a festive, flavorful, and fun cake will effortlessly find this recipe. It encapsulates the very essence of what makes this cake a truly special and beloved treat.
Crafting the Flawless Cake Layers: Foundations of Deliciousness
Embarking on the creation of this Pink Confetti Chocolate Chip Cake is a delightful culinary adventure, and while it features several steps, each is designed to be approachable and rewarding. The cornerstone of any exceptional layer cake lies in its foundational layers. I highly recommend baking your chocolate chip cake layers in advance—even a few days ahead—as this not only streamlines your baking schedule but also allows the cake to settle, resulting in a moister, more stable crumb that’s easier to work with when assembling.
The Versatility of Our 6-Inch Layer Cake Recipe
The chocolate chip cake recipe shared here is meticulously portioned for one single 6-inch layer. This intentional design offers incredible flexibility. Whether you envision a charming two-layer cake for a smaller gathering or a magnificent, towering three-tier spectacle for a grand celebration, you can easily scale the recipe to suit your needs. Simply double the ingredients for two layers, or triple for three, and so on. This ensures consistent quality and flavor across all your cake tiers, making customization effortless.
For consistently perfect cake layers, preparation is paramount. Always thoroughly grease and flour your cake pans, and then line the bottom with a perfectly cut circle of parchment paper. To achieve a wonderfully flat top that minimizes trimming, consider using a bake-even strip. These ingenious tools, which can be homemade by simply wetting a strip of towel or old shirt and securing it around the outside of your pan, help the cake bake more evenly by insulating the edges, preventing them from setting too quickly. This promotes a gentle rise and a tender, uniform crumb from edge to center.
Once your cake layers emerge from the oven, resist the urge to handle them immediately. Allow them to cool in their pans on a wire rack for about 10-15 minutes before carefully inverting them to cool completely. This crucial step prevents sticking and breakage. Once entirely cool, wrap each layer tightly in plastic wrap. This not only preserves their freshness for up to a week in the refrigerator but also locks in moisture, resulting in a cake that’s even more tender and delightful. If needed, a serrated knife or cake leveler can be used to achieve perfectly flat tops, ensuring your assembled cake is beautifully even and stable.
The Art of Pink Buttercream and Festive Sprinkles
A cake as special as our Pink Confetti Chocolate Chip Cake deserves a buttercream that’s equally exquisite – smooth, creamy, and vibrant. Our standard buttercream recipe is celebrated for its perfect balance of richness and stability, making it ideal for both filling and frosting your cake layers.
Achieving the Perfect Pink Hue
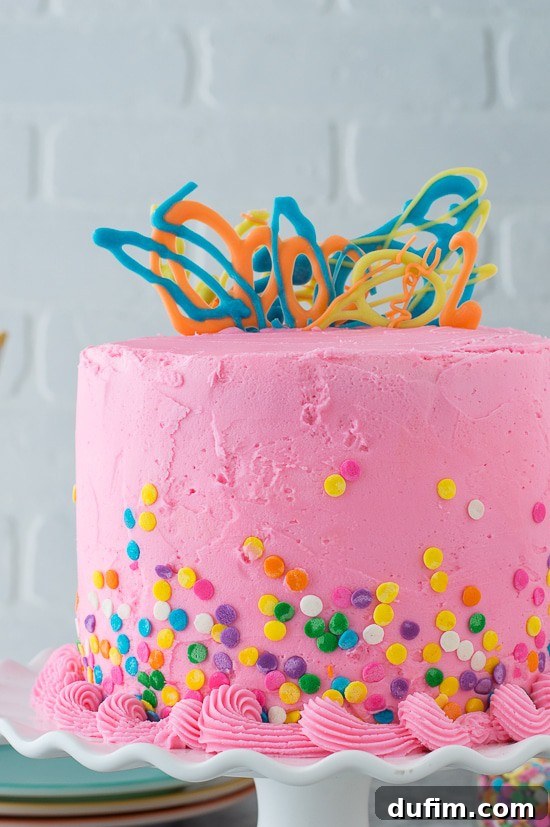
For that signature, eye-catching pink, I exclusively rely on high-quality gel food coloring, such as those produced by Wilton. Unlike their liquid counterparts, gel colors are incredibly concentrated, meaning a tiny dab on a toothpick is often all you need to achieve a deep, saturated shade without altering the consistency of your buttercream. You have full control to customize the pink, from a delicate blush that hints at sweetness to a bold, celebratory fuchsia that truly pops. Add incrementally and mix thoroughly to watch the magic unfold.
The Joy of Confetti Sprinkles
Sprinkles are more than just decoration; they’re tiny explosions of joy and texture! For this particular chocolate chip cake, I gravitated towards classic confetti sprinkles for their cheerful, whimsical vibe. However, don’t feel limited! This is your opportunity to infuse your personality into the cake. Explore a universe of sprinkle options: delicate nonpareils for a fine, elegant shimmer, long jimmies for a more defined stripe, sparkling sanding sugars for a subtle crunch, or even a custom blend to match your party’s unique theme. Each type of sprinkle brings its own unique charm and textural delight.
The Ingenious Wax Paper Trick for Impeccable Sprinkle Placement
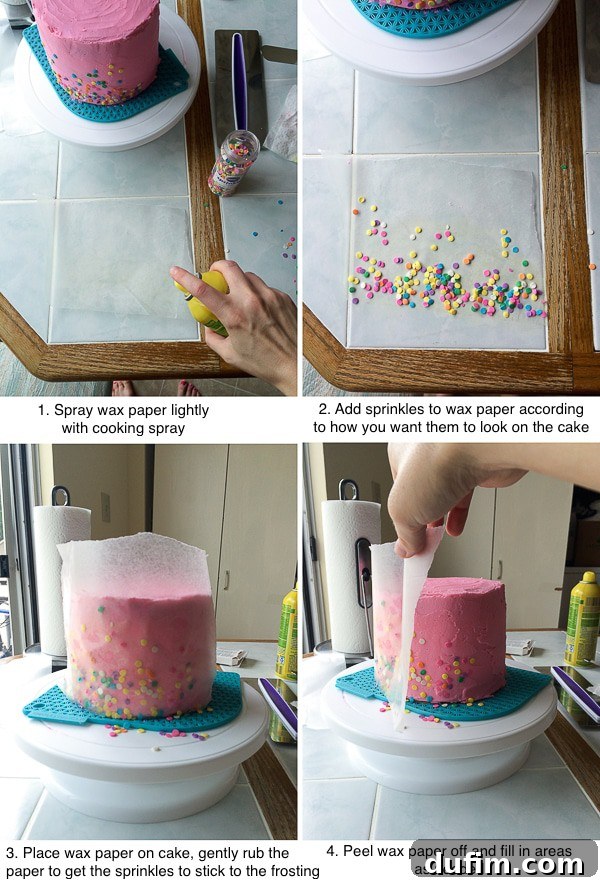
Applying sprinkles to the sides of a frosted cake can often lead to a delightful but messy situation. To achieve a clean, professional-looking band of sprinkles, especially on the lower half of your cake, the wax paper trick is an absolute game-changer. As demonstrated in the accompanying image, begin by lightly misting a piece of wax paper with a non-stick cooking spray; this subtle tackiness helps the sprinkles adhere. Generously pour your confetti sprinkles onto the prepared wax paper. Gently lift the wax paper, positioning the sprinkle-covered side against the freshly frosted cake. With a soft hand, gently rub the back of the wax paper against the cake, ensuring good contact between the sprinkles and the buttercream. Once you carefully peel away the wax paper, you’ll reveal a beautifully adorned, neat band of sprinkles. While this method is highly effective, a quick touch-up by hand may be needed to fill any minor gaps, ensuring a completely uniform and festive finish.
Elevating Your Cake with Custom Chocolate Decorations
Beyond the vibrant buttercream and playful sprinkles, the Pink Confetti Chocolate Chip Cake is crowned with elegant, custom-made chocolate decorations. These edible accents are surprisingly simple to create and offer an incredible opportunity to add a personalized and sophisticated touch to your homemade masterpiece.
Crafting Exquisite Chocolate Designs with Ease
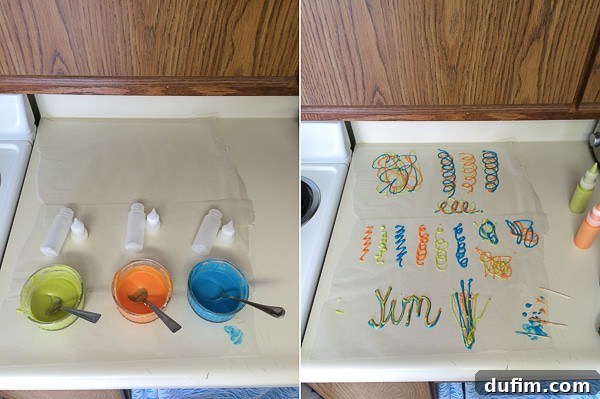
The process begins with melting chocolate candy melts in an array of different colors. To achieve the perfect consistency for piping – one that is smooth, fluid, and controllable – incorporate a small amount of vegetable shortening into the candy melts before heating. This simple addition helps prevent the chocolate from becoming too thick or seizing, ensuring a beautiful flow. Melt the chocolate in a microwave-safe bowl, using short bursts (30 seconds at 50% power) and stirring thoroughly between each interval. Patience is key here; avoid overheating to prevent burning and maintain that luscious, smooth texture.
Once your colored candy melts are perfectly smooth and fluid, carefully transfer them into squeeze bottles. These bottles are invaluable tools for precision and control, allowing you to draw intricate designs, fine lines, and delicate patterns with ease. Lay out a sheet of wax paper on a flat surface, such as a baking sheet, and let your artistic flair take over! Create swirls, dots, zigzags, abstract shapes, or any design that complements your cake’s theme. Feel free to overlap different colors to create stunning, multi-layered effects.
After your chocolate designs are complete, place the baking sheet into the refrigerator for a brief chill – just about 2 minutes is usually sufficient. This quick cooling period allows the chocolate to harden rapidly. Once firm, gently peel the wax paper away from your custom creations. You’ll be amazed at how easily they release and how robust they are. These handmade chocolate decorations instantly transform your cake, adding a touch of elegance and a truly bespoke feel, making your Pink Confetti Chocolate Chip Cake undeniably unique and instantly dress up a cake!
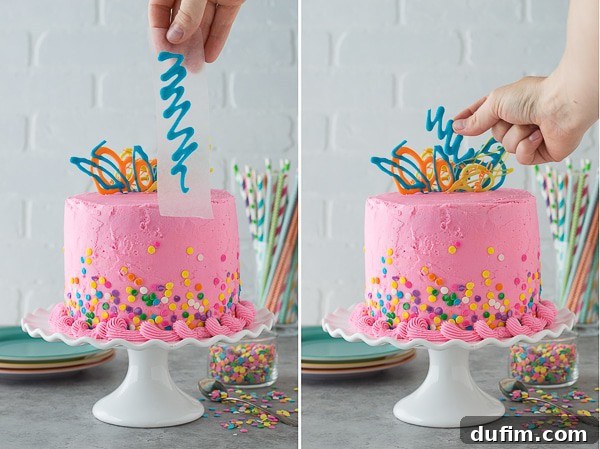
The versatility of chocolate decorations extends far beyond abstract art. Imagine the joy of presenting a cake adorned with a personalized message! You can use the melted chocolate to elegantly write someone’s name, pipe a specific number to celebrate a birthday or anniversary year, or, if you’re feeling particularly ambitious and steady-handed, craft a full “Happy Birthday” greeting. While more elaborate phrases can be a delightful challenge (even for experienced decorators, those many letters can be tricky!), simple names, dates, or initials are surprisingly achievable and add a wonderfully heartfelt touch that makes your cake truly one-of-a-kind. Consider sketching your design on paper first or even using a stencil for perfect results.
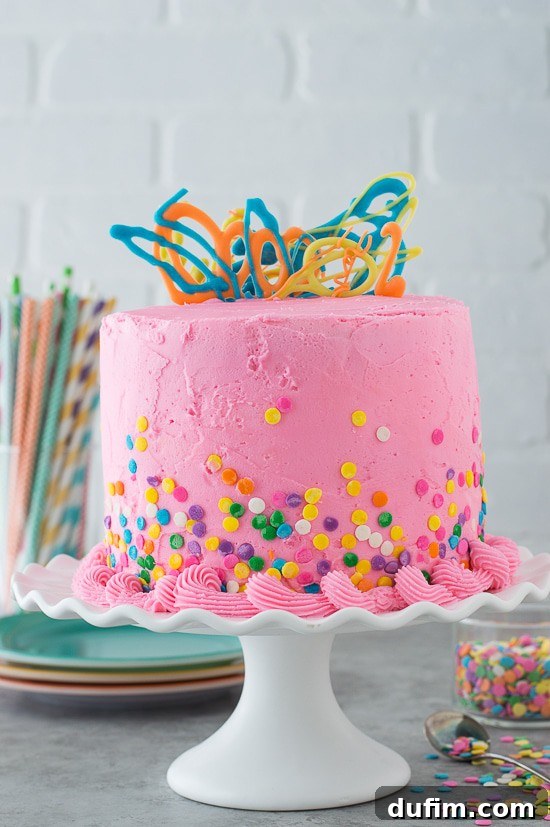
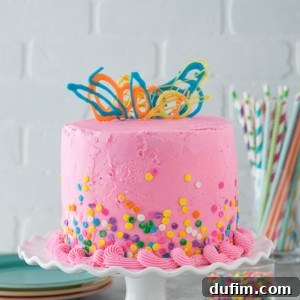
A reader favorite for festive occasions!
Pink Confetti Chocolate Chip Cake
Print Recipe
Ingredients
For One 6-inch Cake Layer (Repeat for additional layers)
- 3 tbsp unsalted butter, softened
- 5 ½ tbsp granulated sugar
- 1 ½ large egg whites
- ¼ cup sour cream
- ½ tsp vanilla extract
- ½ cup + 1 tbsp all-purpose flour
- ¾ tsp baking powder
- ¼ tsp salt
- 3 tbsp mini chocolate chips
Pink Buttercream Frosting
- 2 sticks unsalted butter, softened (1 cup)
- ½ cup vegetable shortening
- 1 tsp vanilla extract
- 6-7 cups powdered sugar
- pink gel food coloring
For Decoration
- Confetti sprinkles (or your favorite variety)
- Chocolate candy melts, in various colors, for making decorations
- Vegetable shortening (for chocolate melts)
Instructions
Chocolate Chip Cake Layers
-
1. Prepare Oven and Pan: Preheat your oven to 350º F (175°C). Prepare your 6-inch round cake pan or springform pan by generously greasing the bottom and sides with butter, then lining the bottom with a round piece of parchment paper. For an extra touch of perfection, wrap a damp bake-even strip around the pan to promote even baking and a flat top. (You can make one by wetting a towel or old shirt strip and securing it with a safety pin.)
-
2. Cream Butter and Sugar: In a large mixing bowl, combine the softened unsalted butter and granulated sugar. Using an electric mixer, beat on medium-high speed until the mixture is light, pale, and fluffy, typically for 2-3 minutes. Add the egg whites and continue to beat until they are fully incorporated and the mixture is smooth.
-
3. Incorporate Wet Ingredients: Stir in the sour cream and vanilla extract. Mix thoroughly until the mixture is completely smooth and homogeneous, ensuring no lumps remain.
-
4. Add Dry Ingredients Gradually: In a separate, smaller bowl, whisk together the all-purpose flour, baking powder, and salt. Gradually add half of this dry mixture to your wet ingredients. To prevent overmixing and ensure a tender crumb, gently spoon the flour mixture over the wet ingredients (as if sifting) and carefully fold it in with a spatula until just combined. Repeat with the remaining half of the flour, folding gently and scraping the sides and bottom of the bowl to fully incorporate all ingredients without developing too much gluten.
-
5. Fold in Chocolate Chips: Gently fold in the mini chocolate chips until they are evenly distributed throughout the cake batter.
-
6. Bake: Scrape the prepared cake batter into your greased and parchment-lined 6-inch cake pan. Use a spatula to spread it evenly across the bottom. Bake for 23-25 minutes, or until a wooden toothpick inserted into the center of the cake comes out clean. Keep in mind that baking times can vary slightly depending on your oven.
-
7. Cool Cake Layers: Once baked, remove the cake from the oven and allow it to cool in the pan on a wire cooling rack for 10 minutes. After 10 minutes, carefully invert the cake onto the cooling rack, remove the pan (and springform sides if applicable), and gently peel off the parchment paper from the bottom. Allow the cake to cool completely. Ensure it is absolutely cool before wrapping it tightly in plastic wrap and placing it in the refrigerator. This cake can be stored for up to one week like this. If desired, use a serrated knife or a dedicated cake leveler to trim any uneven tops, creating perfectly flat surfaces for stacking.
-
8. Repeat for Layers: Repeat this recipe as many times as necessary to bake all your desired cake layers, ensuring each one is cooled and wrapped properly.
Pink Buttercream Frosting
-
1. Cream Fats: In a large mixing bowl, combine the softened unsalted butter and vegetable shortening. Beat them together using an electric mixer on medium-high speed until the mixture is light, fluffy, and well combined, about 2 minutes.
-
2. Add Vanilla: Stir in the vanilla extract and beat briefly until fully incorporated.
-
3. Incorporate Powdered Sugar: Gradually add the powdered sugar, 1-2 cups at a time. Begin by stirring it in by hand with a spatula to prevent a sugar cloud, then switch to the electric mixer on low speed. Continue adding powdered sugar until your buttercream reaches your desired consistency and sweetness. If the frosting is too thick, add a tablespoon or two of milk or cream; if too thin, add more powdered sugar.
-
4. Color and Finish: Introduce your pink gel food coloring. Start with a very small amount (a toothpick’s worth) and gradually add more, beating well after each addition, until you achieve the perfect shade of pink. Beat the frosting on medium speed for a final minute to ensure it’s extra smooth, creamy, and free of air bubbles.
Cake Assembly
-
1. Prepare Base: Spread a small dollop of buttercream in the center of a 6-inch round cardboard cake circle (or your chosen serving plate) to act as an adhesive. Center your first cooled cake layer on top. Apply a generous layer of buttercream onto the first cake layer and spread it as evenly as possible using an offset spatula. The amount of frosting between layers is a matter of personal preference.
-
2. Stack Layers: Carefully place the next cake layer on top, pressing down gently to ensure it’s level. Repeat the frosting process for each subsequent layer until all cake layers are stacked.
-
3. Apply Crumb Coat: Apply a “crumb coat” to the entire cake. This is a thin layer of buttercream spread around the sides and top, designed to trap any loose cake crumbs and create a smooth base for your final frosting layer. It’s often easier to apply more frosting than needed and then scrape off the excess with your offset spatula or bench scraper.
-
4. Chill Cake: Transfer the crumb-coated cake to the freezer for 15-20 minutes, or the refrigerator for 30 minutes, to allow the frosting to firm up. This crucial step prevents crumbs from getting into your final layer of frosting.
-
5. Final Frosting Layer: Once the crumb coat is firm, apply your second, thicker layer of buttercream. Start by frosting the top of the cake, then work your way down the sides, striving for the smoothest, most even finish possible. Use an offset spatula or bench scraper to achieve sharp edges and a professional look.
Decorating Your Pink Confetti Chocolate Chip Cake
-
1. Add Sprinkles: To add sprinkles to the bottom of the cake, you have two primary options. Option A (Freehand): Hold a handful of sprinkles and gently press them directly into the fresh buttercream around the bottom half of the cake. Fill in any gaps as needed. Option B (Wax Paper Trick): Lightly spray a piece of wax paper with non-stick cooking spray and spread sprinkles generously on the sprayed surface. Carefully position the wax paper against the cake (sprinkle-side facing the frosting) and gently rub your hand over the wax paper to help the sprinkles adhere. Peel back the wax paper and fill in any missed spots by hand.
-
2. Pipe a Frosting Border (Optional): Fill a piping bag fitted with a Wilton 32 star tip (or your preferred decorative tip) with some of the remaining pink buttercream. Pipe a decorative border around the top edge of the cake using a continuous looping, shell, or corkscrew pattern to add a polished, finished touch.
-
3. Prepare Chocolate Decorations: In small microwave-safe bowls, melt about 2 tbsp of colored candy melts with ½ tbsp of vegetable shortening for each desired color. Microwave on 50% power for 30-second intervals, stirring thoroughly after each, until smooth and fully melted. Continue to microwave in short bursts if needed, ensuring not to burn or overheat the chocolate.
-
4. Transfer to Squeeze Bottles: Allow the melted candy melts to cool slightly, ensuring they are still fluid but not hot. Carefully transfer the cooled, melted chocolate into squeeze bottles for superior control over your designs.
-
5. Create and Chill Designs: Cover a baking sheet with a fresh piece of wax paper. Begin drawing your desired chocolate designs onto the wax paper. Get creative with abstract shapes, words, or numbers. You can layer different colors for unique effects. Once you’re finished creating your decorations, place the baking sheet in the refrigerator for approximately 2 minutes to allow them to harden quickly and set.
-
6. Adorn Your Cake: Remove the hardened chocolate designs from the fridge. Gently peel the wax paper away from each design. Carefully arrange these beautiful, custom chocolate pieces artfully on top of your Pink Confetti Chocolate Chip Cake for a stunning and personalized finish. Serve and enjoy!
Nutrition Information
Carbohydrates: 54g |
Protein: 1g |
Fat: 21g |
Saturated Fat: 11g |
Polyunsaturated Fat: 2g |
Monounsaturated Fat: 6g |
Trans Fat: 1g |
Cholesterol: 38mg |
Sodium: 187mg |
Potassium: 20mg |
Fiber: 1g |
Sugar: 50g |
Vitamin A: 447IU |
Vitamin C: 1mg |
Calcium: 24mg |
Iron: 1mg
Nutrition Disclosure
All nutritional values are approximate and provided to the reader as a courtesy. Changing ingredients and/or quantities will alter the estimated nutritional calculations. Please consult a professional for precise dietary information.
Love this recipe? Share your thoughts and creations below!